Introduction
Relevance Search has been there for a while in our Dynamics 365 CRM that provides access to exciting new search capabilities in the environment. However, before you use this feature, an administrator must enable relevance search in target environment. Using relevance search we can search across multiple tables/entities, sorted by relevance.
Let us say you are on call with your customer and you want to check what information (Contact, Leads, Opportunities, emails, etc.) about this customer you have in your CRM.
In this situation, we can use the Relevance search feature which will search your customer across all the tables in the system and will show it in the result list.
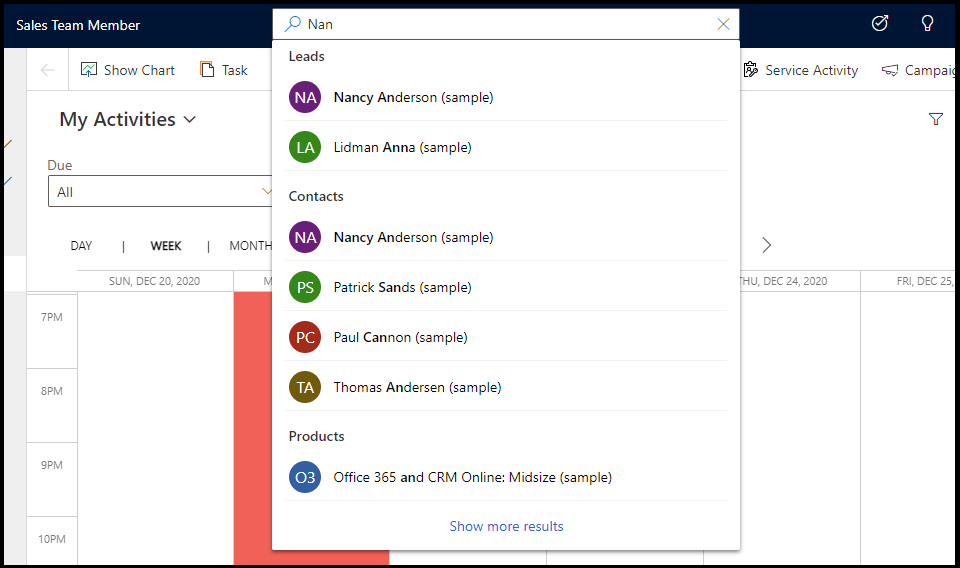
In the above screenshot, we searched for ‘Nancy’ and it showed the search results which included contact and lead.
You can use this feature inside your Dynamics 365 CRM environment but what if you want to use Relevance Search functionality in your external system, say a custom portal or any other external app or plugin or Power Automate or Canvas App?
Here the Relevance Search API comes into the picture. We can use this API provided by Microsoft to add a relevance search feature to your project.
POST [Organization URI]/api/search/v1.0/query
{
“search”: “<search term>”
}
This blog will illustrate how we can use the Relevance Search API to add the Relevance search feature into the Canvas app.
I am dividing this blog into two parts. In the first part, we will create a Power Automate Flow to execute the Relevance Search API and in the second part, we will design a simple Canvas app then we will call the Power Automate flow to show the search results.
Let us start with creating a Power Automate Flow that can be call from the Canvas App.
• Create new Instant cloud Flow and select the PowerApps trigger.

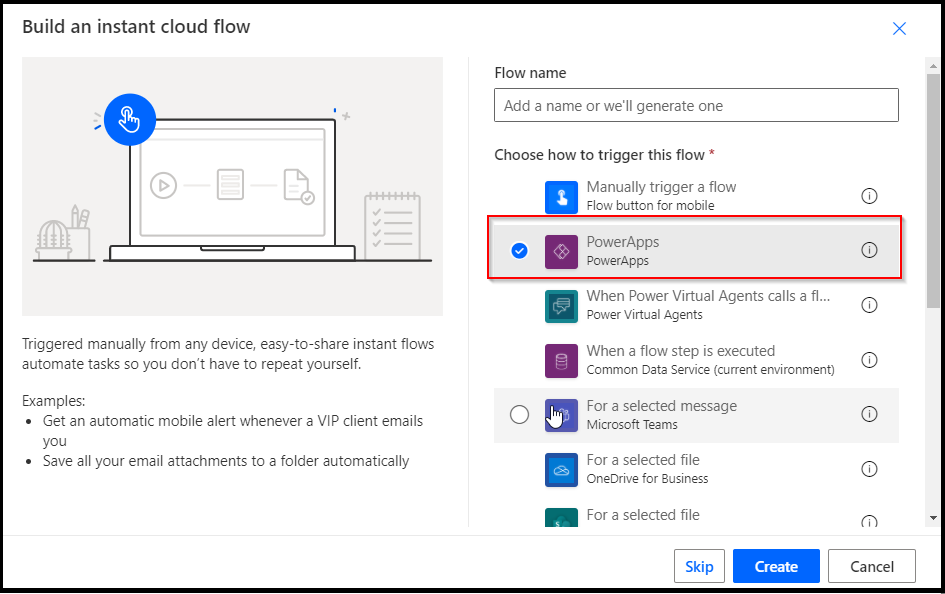
• This will create a Power Automate Flow, which we can later call from the Canvas App. Give an appropriate name to the Flow.
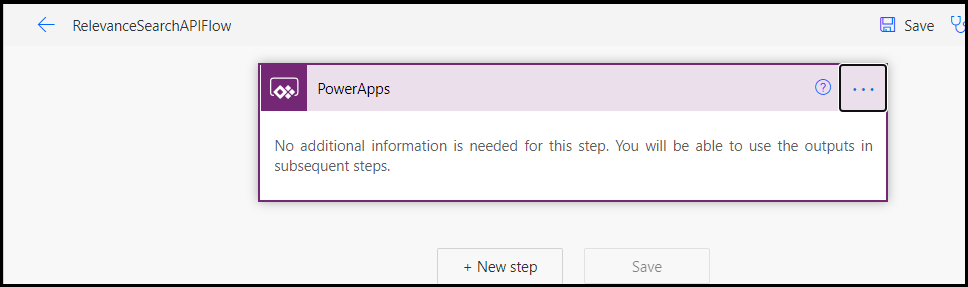
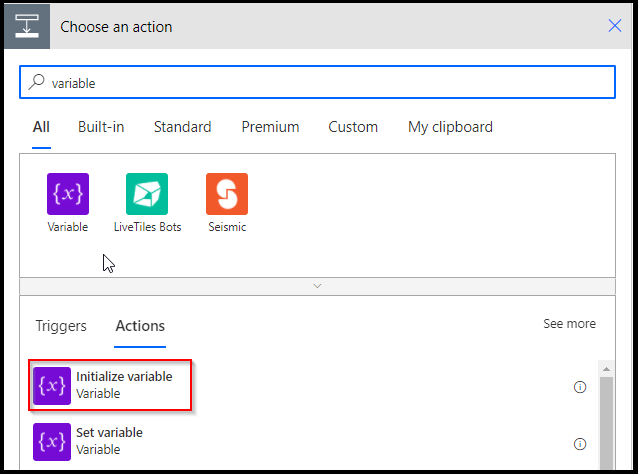
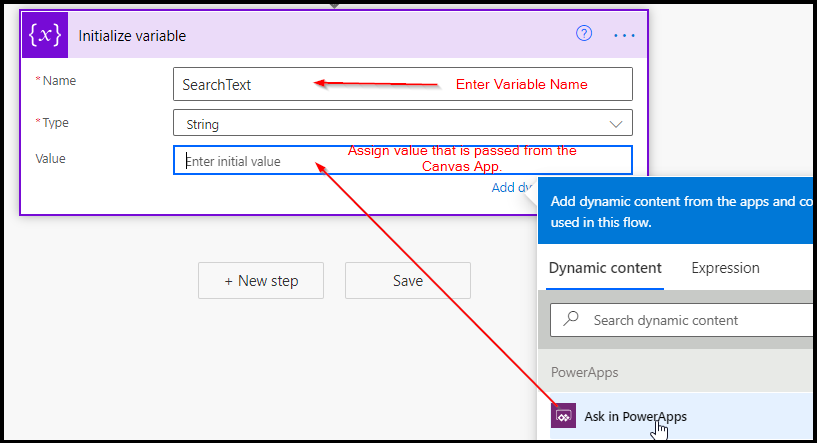
• Add the next step to initialize the variable and assign the text that the user wants to search for across the multiple tables.
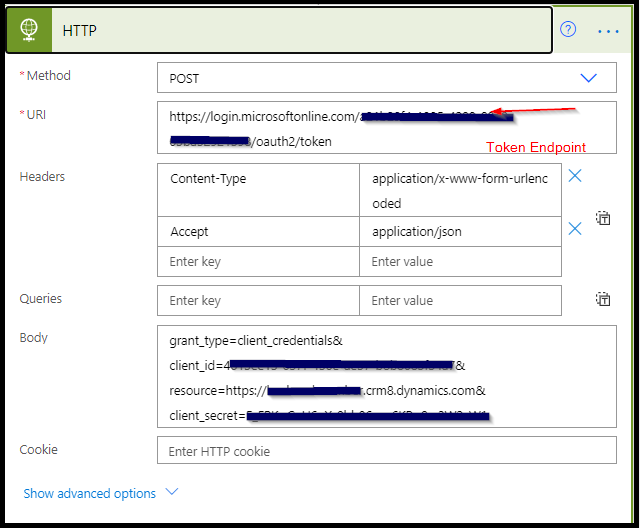
• To execute the Relevance search API, we first need to get the Access Token to authenticate the request. To do this we will use HTTP Request action.
Add new Step in the flow and select the HTTP request.
In this step, we are obtaining the access token that can be used to execute the Relevance Search API request.
Here we are using the Application User, which is a non-licensed user to generate the Access token.
As a prerequisite, you must perform the below,
– First, we have to register an Application on the Azure Active Directory. For more information click here.
– Then create an Application user on the Dynamics 365 CRM. For more information click here.
You will get the client id and secret key of your registered application in Azure Active Directory.
Pass the parameter to the HTTP step as below.
Method: – POST
URI: – https://login.microsoftonline.com/00000000-0000-0000-0000-000000000000/oauth2/token
<This is the OAuth 2.0 Token Endpoint>
Headers
Accept : application/json
Content-Type : application/x-www-form-urlencoded
Body
grant_type=client_credentials
client_id=<Application Id of registered application in Azure Active Directory>
client_secret=<Secret key of registered application in Azure Active Directory>
resource= <crm url> e.g. https://contoso.crm.dynamics.com
After this step, run and test the Power Automate Flow manually to check whether we are getting the access token or not.
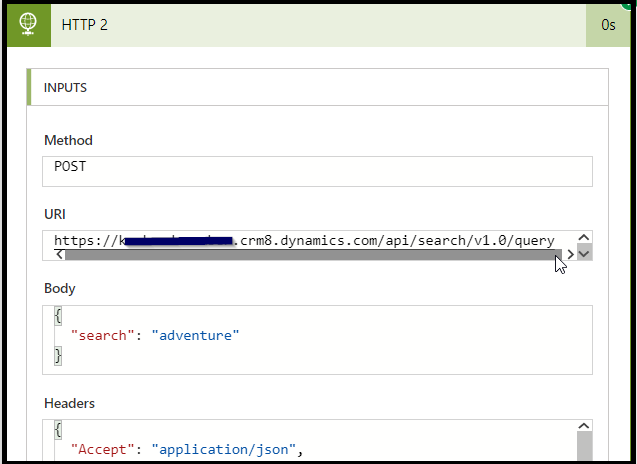
• Add another HTTP Request step where we will execute the Relevance search API request with the following details,
Method: POST
URI: <organization URL>/api/search/v1.0/query
Header: As shown in the below screenshot.
Body: {“search”: SearchText} //here ‘SearchText’ is the variable initialize above which holds the text pass from the Canvas App

• Save and run the flow again and check the response of the above HTTP Request step.
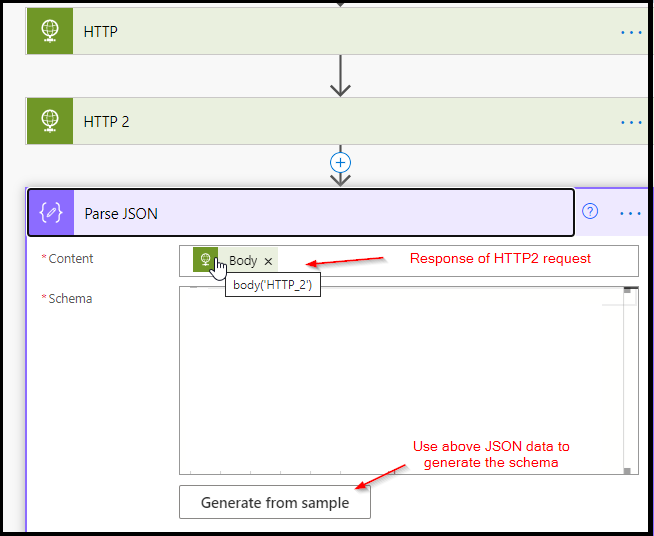
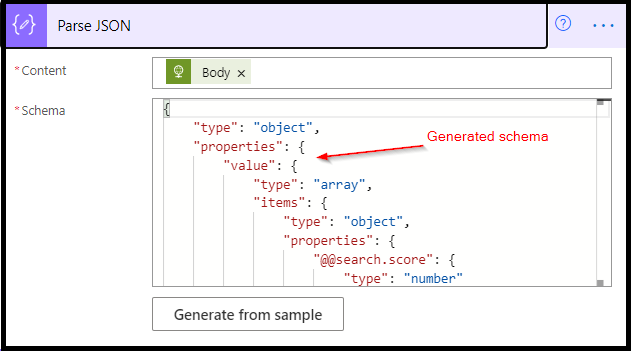
• Add Parse JSON step after HTTP Request. Here we will pass the response from the above step to the content and will use below sample JSON data to generate the Schema.
{
“value”: [
{
“@search.score”: 18.536037,
“@search.highlights”: {
}
},
{
“@search.score”: 10.059773,
“@search.highlights”: {
}
},
{
“@search.score”: 3.0122523,
“@search.highlights”: {
}
}
],
“facets”: {},
“totalrecordcount”: -1
}
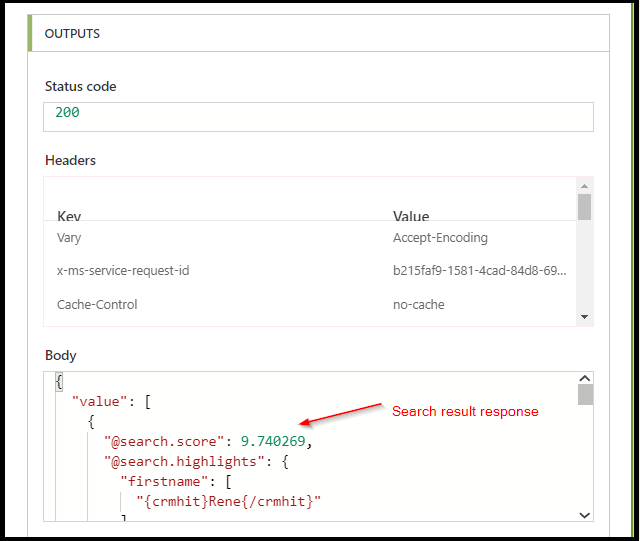
• Before we add another step in the Flow, we will first understand the Relevance Search API Response.
Relevance search API response returns a ‘value’ object, which is an array of individual record along with search score, and fields where the matching word is found (highlights).
Below is the sample response,
{
“value”: [
{
“@search.score”: 9.740269,
“@search.highlights”: {
“firstname”: [
“{crmhit}Rene{/crmhit}”
],
“fullname”: [
“{crmhit}Rene{/crmhit} Sample”
]
},
“@search.entityname”: “lead”,
“@search.objectid”: “79763014-cc8f-4afc-b33b-68a61710350c”,
“key”: “79763014-cc8f-4afc-b33b-68a61710350clead4”,
“ownerid”: “f39878a4-163d-eb11-bf68-000d3af05901”,
“owneridname”: “Sam C2C”,
“@search.ownerid.logicalname”: “systemuser”,
“owningbusinessunit”: “019278a4-163d-eb11-bf68-000d3af05901”,
“owningbusinessunitname”: “”,
“@search.owningbusinessunit.logicalname”: “businessunit”,
“sharedtoprincipalid”: [],
“@search.objecttypecode”: 4,
“fullname”: “Rene Sample”,
“versionnumber”: 2241955,
“statecode@StringCollection”: [
“Open”
],
“statecode”: 0,
“statuscode@StringCollection”: [
“New”
],
“statuscode”: 1,
“entityimage_url”: null,
“lastsyncdate”: “/Date(1608822206278)/”,
“createdon”: “12/24/2020 3:03 PM”,
“modifiedon”: “12/24/2020 3:03 PM”,
“documentbody”: null,
“body”: null,
“filebody”: null,
“emailaddress1”: null,
“companyname”: null,
“subject”: “Interested in Azure Subscription”,
“telephone1”: null
}
],
“facets”: {},
“totalrecordcount”: -1
}
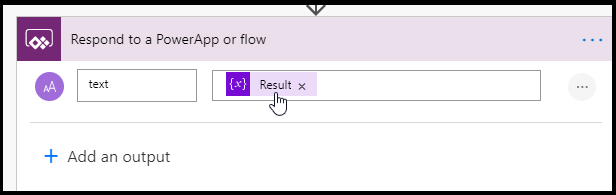
• We will now return the required response to the Canvas app. For that, we will first initialize the new Variable called “Result”,

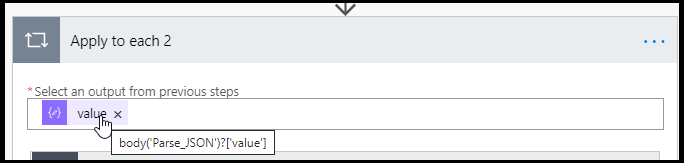
• We will add ‘Apply to each’ step and will loop through the ‘value’ from Parse JSON step. This value is actually an array of the individual record.
• We will then add Switch step inside ‘Apply to each’. Here will check entity logical name of the individual record and based on the entity we will create the response.
We will use the following expression, trim(items(‘Apply_to_each_2’)?[‘@search.entityname’])

• As the Relevance Search API returns multiple entity records, we get different fields per record. For example, if the entity is contact then we get fullname field in the result, similarly, for Opportunity we get Name.
Therefore, to read the values that differ from entity to entity, we would need to add cases for each entity that we want to show the search result in the canvas app.
Here we have added a switch case for Contact, Lead and Opportunity.
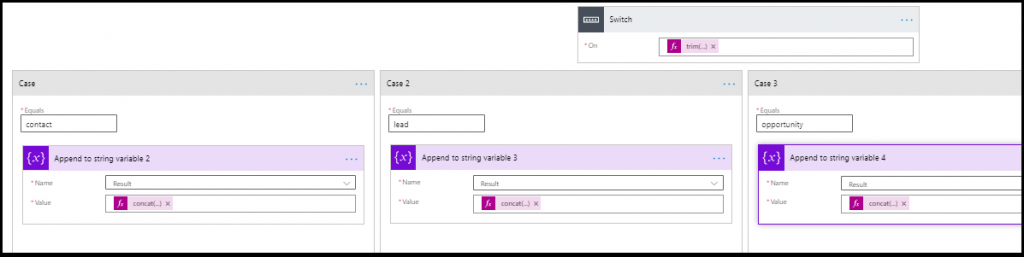
• We will append the formatted response to the ‘Result’ variable. We will create the response in below format,
Entity1 Logical Name, Entity1 GUID, Entity1 Primary Entity Name Field| Entity2 Logical Name, Entity2 GUID, Entity2 Primary Entity Name Field
Each entity values will be separated by ‘|’ character and each entity value will contain the entity logical name, its unique identifier and its primary name field.
We will append the string generated by the below expression to the variable,
concat(trim(items(‘Apply_to_each_2’)?[‘@search.entityname’]),’,’,trim(items(‘Apply_to_each_2’)?[‘@search.objectid’]),’,’,trim(items(‘Apply_to_each_2’)?[‘fullname’]),’|’)
Here you would need to change the Primary name field based on the entity. If want, we can add any other additional field of that entity as well.
• Add final step ‘Respond to a PowerApp or flow’ as shown below in the screen shot. We will add the Text output and will assign the Result variable.
• If we run and test this flow we will finally get the response like below which we will read in the canvas app and will show the search results
{
“text”: “lead,79763014-cc8f-4afc-b33b-68a61710350c,Rene Sample|contact,9e79b434-363d-eb11-bf68-002248d4bfa8,Rene Valdes (sample)|”
}
Here we have got two matching records (contact and lead) for the search text ‘Rene’.
Conclusion
Hence, we learned how to execute the Relevance Search API query in Power Automate. In Part-2 of this blog, we will see how to represent the response data in the Canvas App.
I got the “HTTP Error 400. The request has an invalid header name” error when I followed this guide and wanted to make a new flow to do the same. Can you please help to share the screenshot of your Head of your HTTP2? Thanks.
Hi Michael Jiang,
Below is the screenshot of the header of HTTP2. It is also there in the article. Let me know if you are expecting anything else.

Hope this helps,
Thanks!