Introduction
In our previous blog, we explained a New way for creating and updating records in Dynamics 365 CRM. This blog post will be dedicated towards making sure the columns available in the Excel worksheet to create/update data are tailored as per the organization’s need.
After following the steps mentioned in our previous blogpost, you’d have downloaded the Excel that can be used to edit data in Dynamics 365 CRM. Now, let us see how to design it as per the requirement.
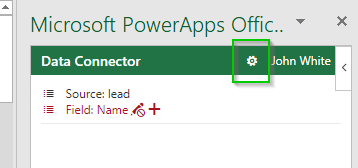
At first, you will be presented with the below options. (which means Design option is not visible by default.)

Also, all the columns (attributes) of an entity are shown in the Excel worksheet. However, seeing all the columns is not an ideal solution for data entry. In that case, the option of designing the Excel worksheet comes into the picture.
Let us see how to enable Design option.
Step 1: Click on the gear icon beside the username
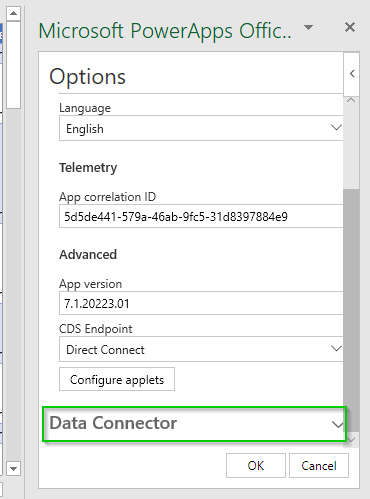
Step 2: Scroll down and expand Data Connector
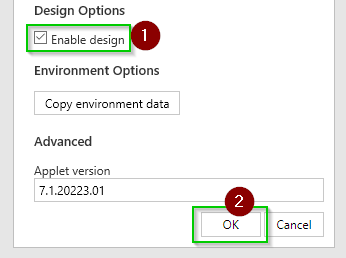
Step 3: Check the checkbox before Enable design and then click on OK.
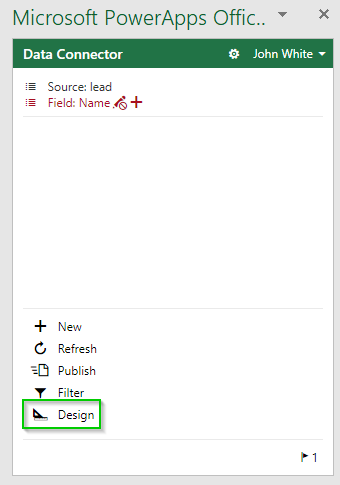
Step 4: You must see the Design option. (the other four options are explained here)
Since we have the design option let us see how to modify the Excel worksheet.
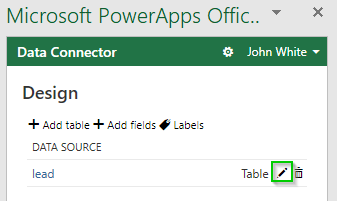
Step 1: Click on Design
Step 2: Edit the Data Source by clicking the pencil (In the next blog we will learn about Add table, Add fields and Labels)
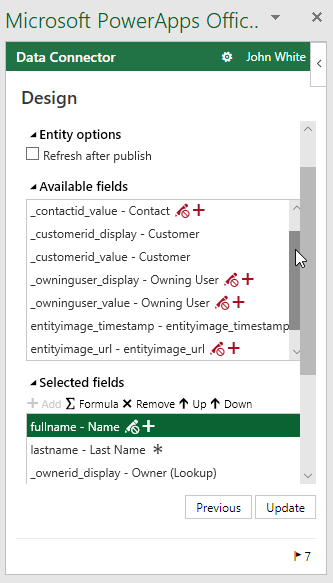
Step 3: Below is the screen you will be presented with.
Let me explain each of the section in brief,
- Entity Options
If this checkbox is enabled, after every publish you do, the data in the excel will be refreshed. Publish is a mandatory step to upload/sync the data with Dynamics 365 CRM.
- Available fields
This will list down all the fields that are currently not there on the Excel worksheet.
- Selected fields
This will list down all the fields that are there on the Excel worksheet.
Let us look at each of the options available in detail,
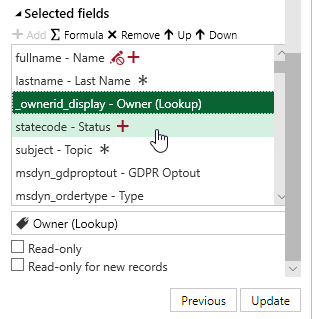
- Add
Once you select a field in the Available fields section, the Add button will be enabled and the user can add a field form the Available fields to Selected fields.
- Formula
It adds the calculated field to the list. You can perform various math equations like Concatenate, Sum, etc. on the columns that we get from Dynamics 365 CRM.
Note: You can use Excel Formulas.
- Remove
If you want to remove any field from the Selected fields, you need to select the corresponding field and hit Remove. It will move that field to the Available fields section.
- Up and Down
These two buttons allow the sorting of the fields, and the columns in the Excel worksheet will be sorted accordingly.
- Read-only
The selected column would be a read only meaning the user will not be able to add value to it.
- Read-only for new records
The selected column would be read only till the time data is not published.
Step 4: Once the necessary changes are done click on Update and then on the next screen at Done.
Step 5: You have the modified Excel worksheet ready to be used.
Note:
- While removing the unwanted attributes do not remove the attribute having key beside it (That is the primary key field of the entity). Removing this field will disable the Publish option.

- Users with a non-admin security role can also modify the excel workbook.
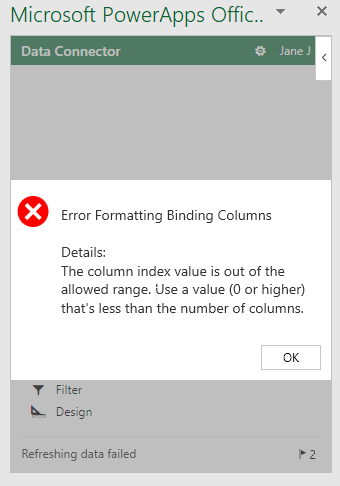
- Kindly do not try deleting columns directly in the Excel worksheet as a workaround to the steps mentioned in this blog. It would result in the below error.

Conclusion
You can now make sure the columns available in the Excel worksheet to create/update data are tailored as per the organization’s need.