Introduction
In this blog we are going to explain how to convert personal views into system views without any coding or without using any third party solution. System views, similar to Public views are automatically created by Dynamics 365 CRM on installation.
Why we need to convert personal views to system views?
Personal view is only visible to the person who has saved the view unless it is shared or assigned. So, if you are in a large organization and you are constantly sharing views to a large group of people, then it is good to actually make a system view.
To convert personal views to system views follow the steps given below.
Step 1: Click on ‘Advanced Find’ as shown below:

After clicking on it, choose the ‘Look for’ as entity name and add the conditions and download the fetch xml for the user view. Save it.
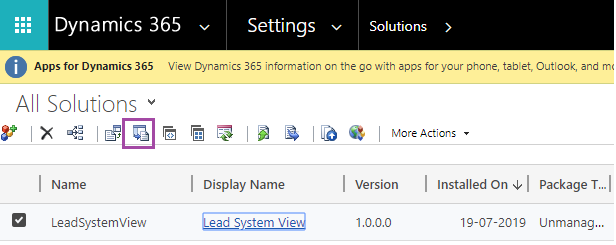
Step 2: Navigate to Settings à Solution and click on (+New) to create new solution and add the entity for which you want to create the view. In this blog I have created a solution for Lead entity.

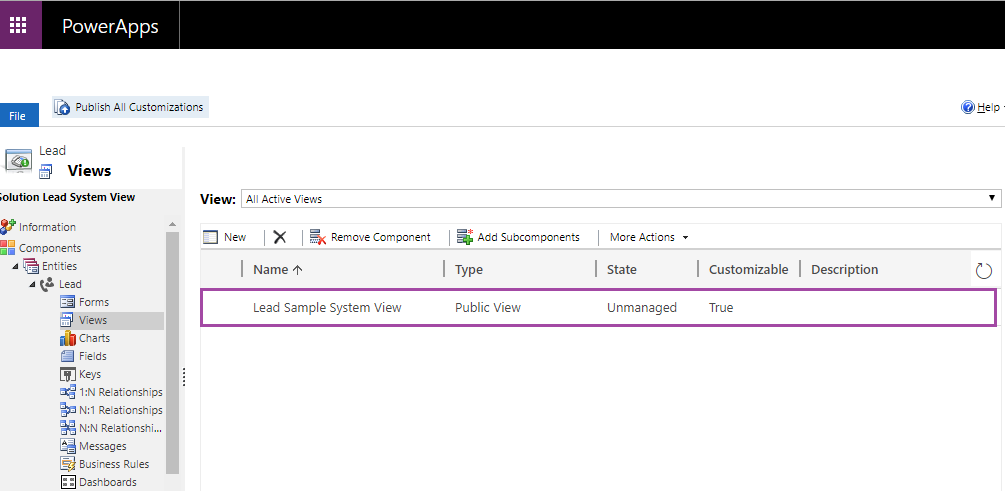
Step 3: Now create a System View for the Lead entity.
Step 4: Next select the newly created solution and click on ‘Export’ to export the solution as un-managed as shown below:
Step 5: Once the solution get downloaded as unmanaged solution you need to Un-zip the solution file. In un-zip folder you will find the Customization.xml. Then in Customizations.xml file you will find the savedquery node. Replace the fetchxml with the saved xml(downloaded fetch xml Step 1) in local file.
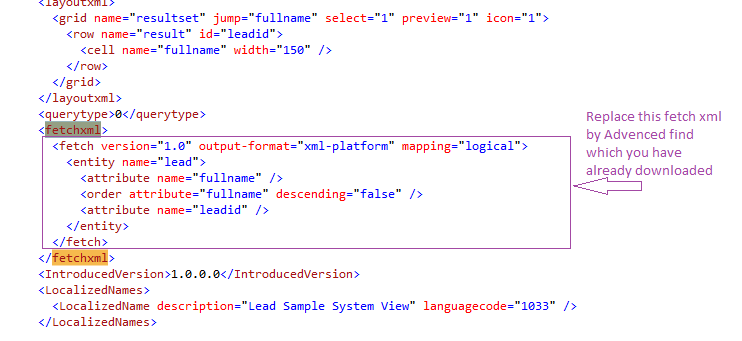
Step 6: Change the fetch xml in Customization file and save it.
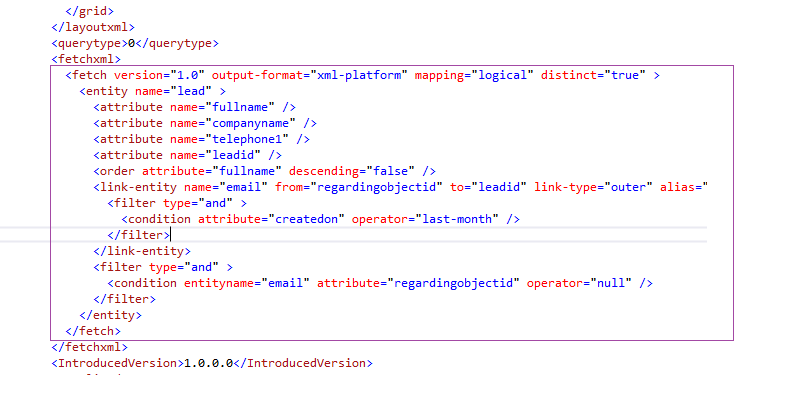
Step 7: Once you have saved the file, zip all the files and re-import the solution in your Dynamics 365 CRM. Once you have successfully imported the solution you can see the changed system view.
Conclusion
In this way, you have to just replace a fetch xml in exported solution and import it again to create system views.
Generate Your Own New Leads Within Microsoft Dynamics 365 CRM
Contact us for a demo to know more about how Maplytics can help you to generate new leads from within Microsoft Dynamics 365 CRM.
Maplytics is a 5-star rated, preferred business app on the Microsoft AppSource that is Certified for Microsoft Dynamics 365 (CfMD) and comes with powerful features like Appointment Planning, Sales Routing, Territory Management, Heat Maps, Geo-analytical Dashboards and more that empower organizations to add more value to their CRM data, improve sales & service processes, and achieve high ROI.
Get your free trial from our Website or Microsoft AppSource!
‘If data is the new oil, location intelligence is ??”
You can alternatively use XrmToolBox plugins (like FetchXML builder) to save the view to CRM.