Event marketers know the drill: a contact registers enthusiastically for a webinar, then forgets about it entirely by the time it starts. Customer Insights – Journeys addresses this gap with a native Add to Calendar button that lets registered contacts drop the event straight into their calendar app from the confirmation email.
Why it matters
No-shows are one of the biggest silent killers of event ROI — registration numbers look great, attendance numbers don’t. Adding a calendar reminder at the point of registration is one of the simplest, lowest-effort ways to close that gap, and doing it natively (instead of a manual workaround) means less setup and fewer broken links.
How to set it up
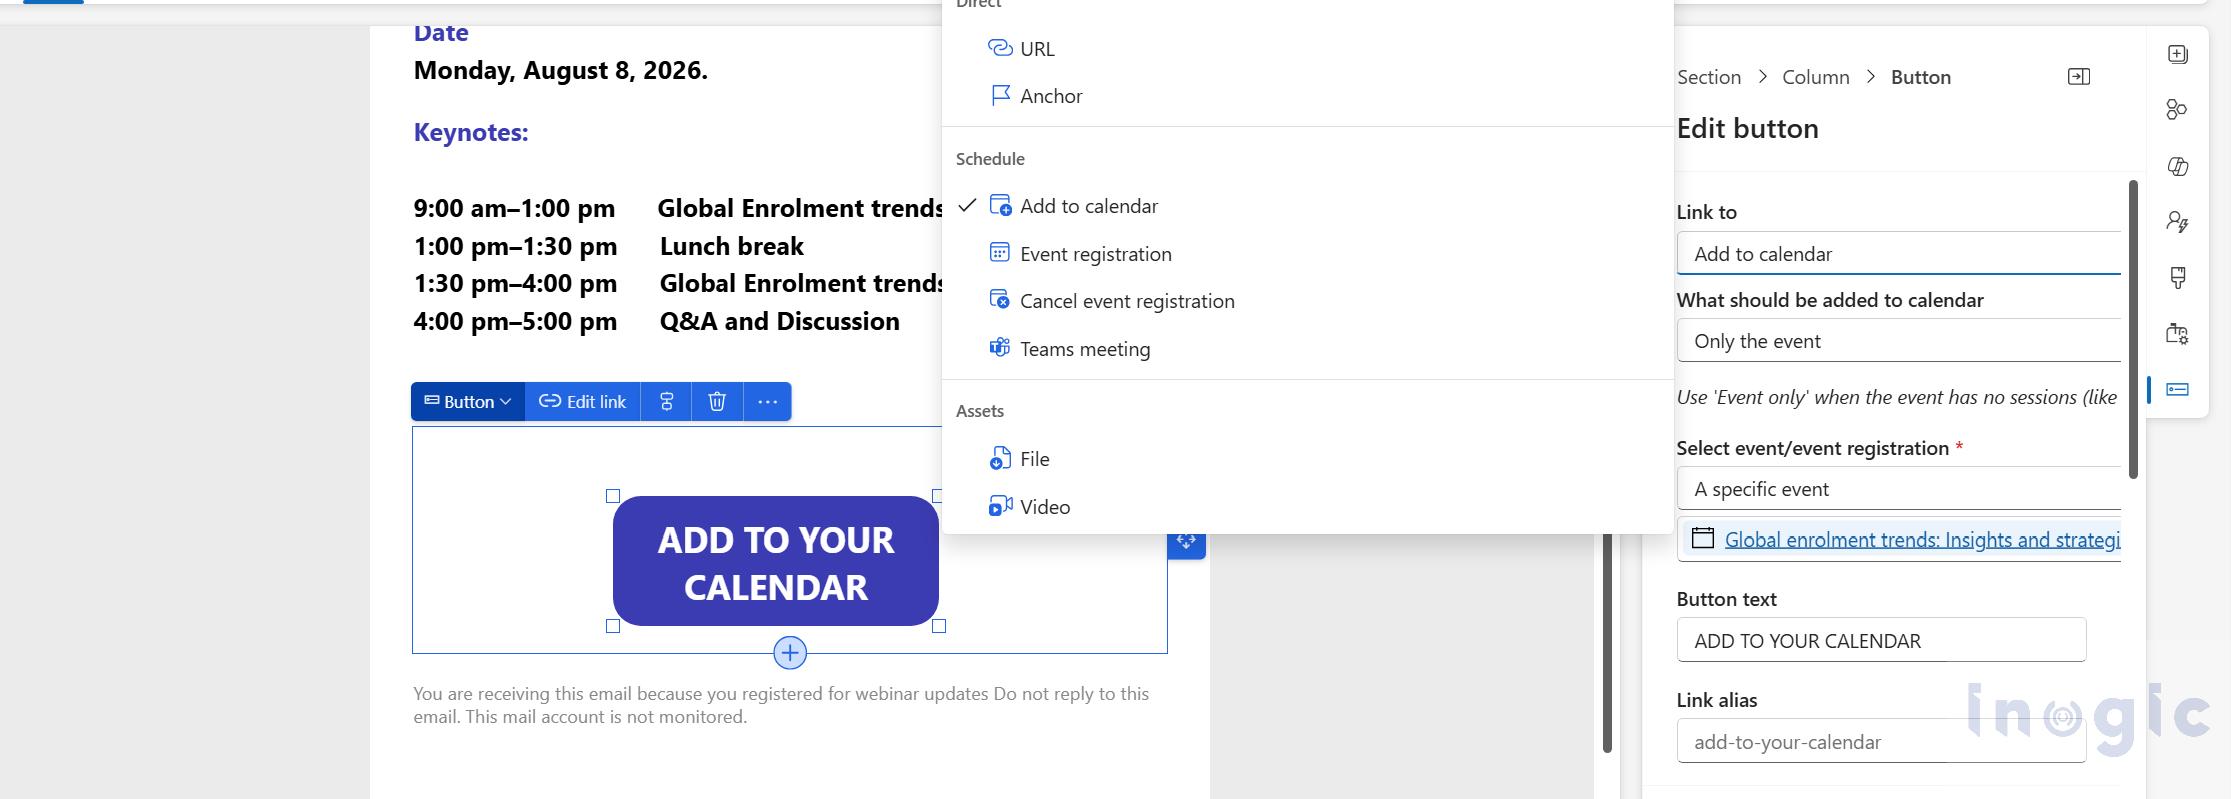
- In the email designer, add a button.
- On the button’s Properties tab, set Link to → Add to Calendar.
- Choose what the file should contain: event only, sessions only, or both.
- Select the event to link to.
- Set your button text and styling.
Where this button belongs
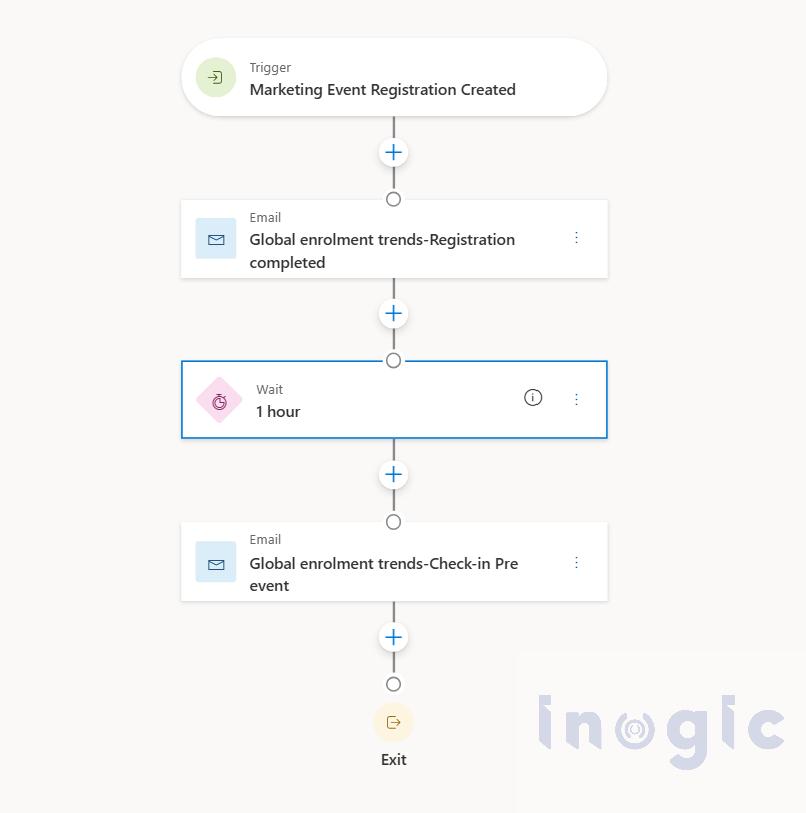
This isn’t a general-purpose email button – it’s tied to registration data, so it only makes sense inside a journey that fires after someone registers. The standard pattern is a trigger-based journey built on the Event Registration Created trigger: a contact submits the registration form, the trigger fires, and the journey sends a welcome/confirmation email containing the Add to Calendar button. The same journey pattern is typically extended with reminder emails (seven days and one day out) and a text message an hour before the event, using the Event Check-in and Event Registration Cancelled triggers to branch the post-event follow-up between “thank you for attending” and “we missed you” paths.
The practical implication: build the Add to Calendar button into your registration confirmation email, not a generic newsletter or invitation blast, because the button’s visibility depends entirely on the recipient already having a registration record tied to that event.
How the iCalendar Button Works in Reality (Outlook and Gmail)
The Add to Calendar button doesn’t link to a static file. Every time a contact clicks it, Customer Insights – Journeys generates a personalized iCalendar (.ics) file on the fly, which is downloadable, built from that specific contact’s actual event or session registration. You control:
- Whether the file includes the event, the sessions, or both
- Separate description content for HTML-capable calendar clients (Outlook) vs. text-only clients (Gmail, Apple Calendar)
- For streamed events, a check-in link that’s automatically embedded — or replaceable via a wildcard — so the calendar entry itself becomes a launch point for the session
You must manually add the downloaded .ics file to your personal calendar after downloading it, if the calendar client does not automatically add the event.
In Outlook:
- Download the .ics file to your computer.
- Open Outlook Calendar.
- Select Add calendar → Upload from file.
- Select the downloaded .ics file.
- Choose the calendar where you want to add the event.
- Select Import. The event will then appear in your Outlook calendar.
In Gmail / Google Calendar:
- Download the .ics file to your computer.
- Open Google Calendar.
- Select Settings → Import & export.
- Under Import, select ‘Select’ file from your computer and choose the downloaded .ics file.
- Select the calendar where you want to add the event.
- Click Import. The event will then appear in your Google Calendar.
Note: The exact steps may vary slightly depending on whether you are using the Outlook desktop app, Outlook on the web, or the Google Calendar mobile app.
For more details you can refer to this doc.
What happens when a contact clicks it
The behaviour differs a bit depending on where the click lands:
- Outlook renders the HTML pane of your calendar content, so any formatting, links, or styled buttons you built into the left-hand description pane show up as designed. This is the client most organizers optimize for, since it supports the richest description.
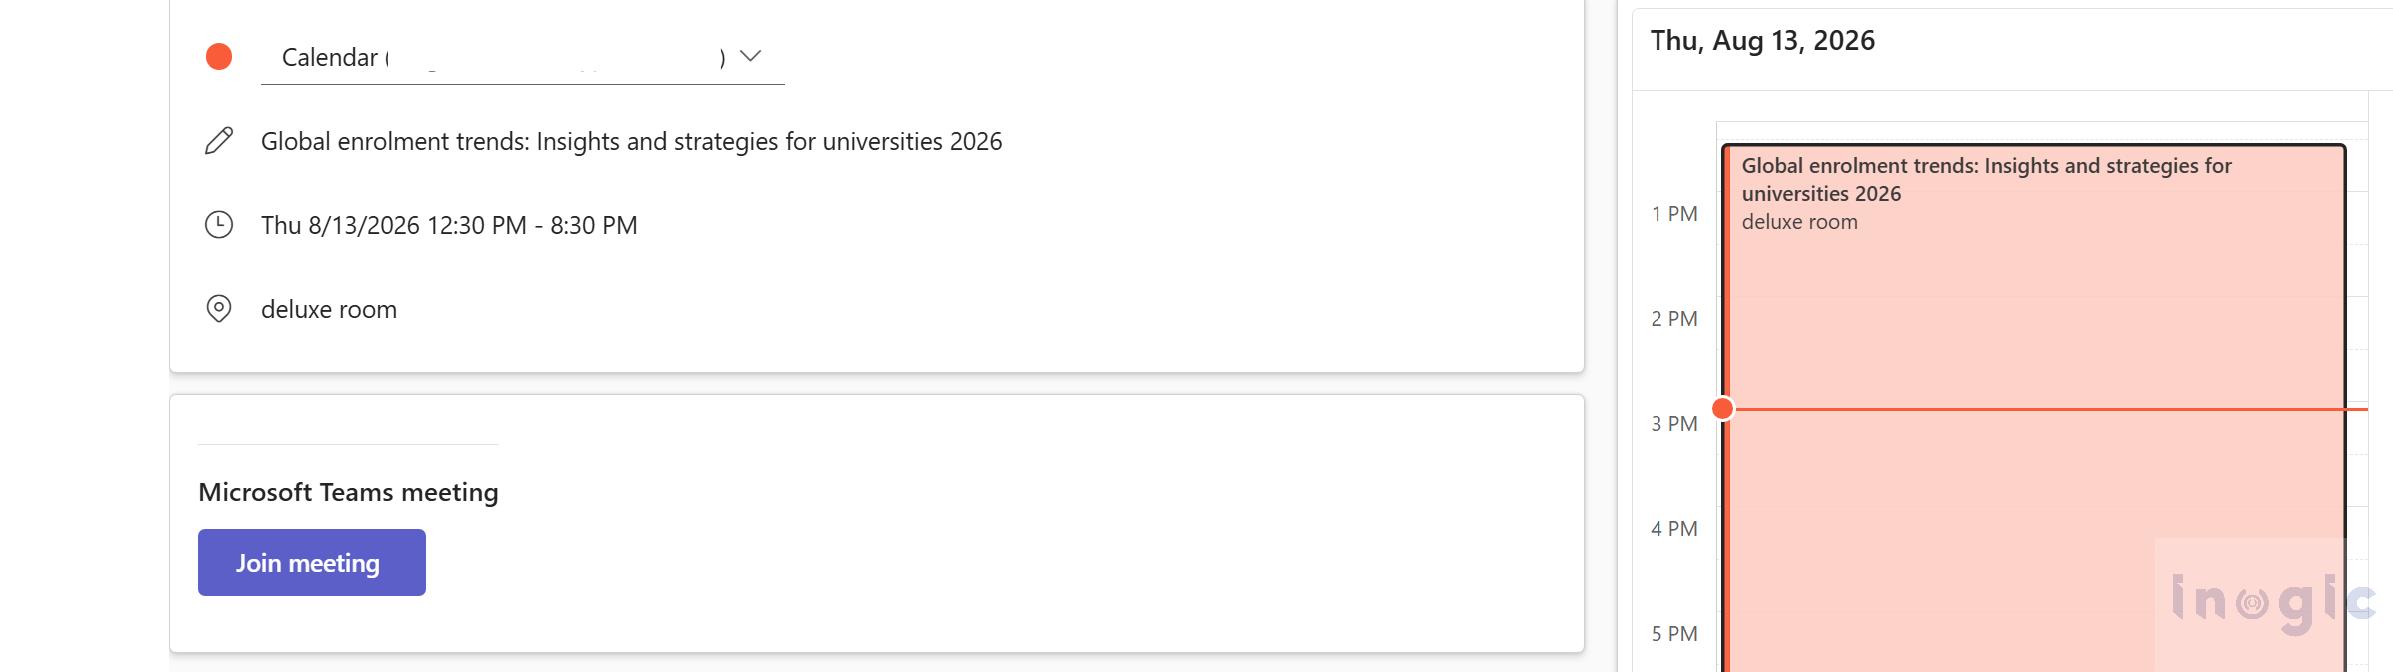
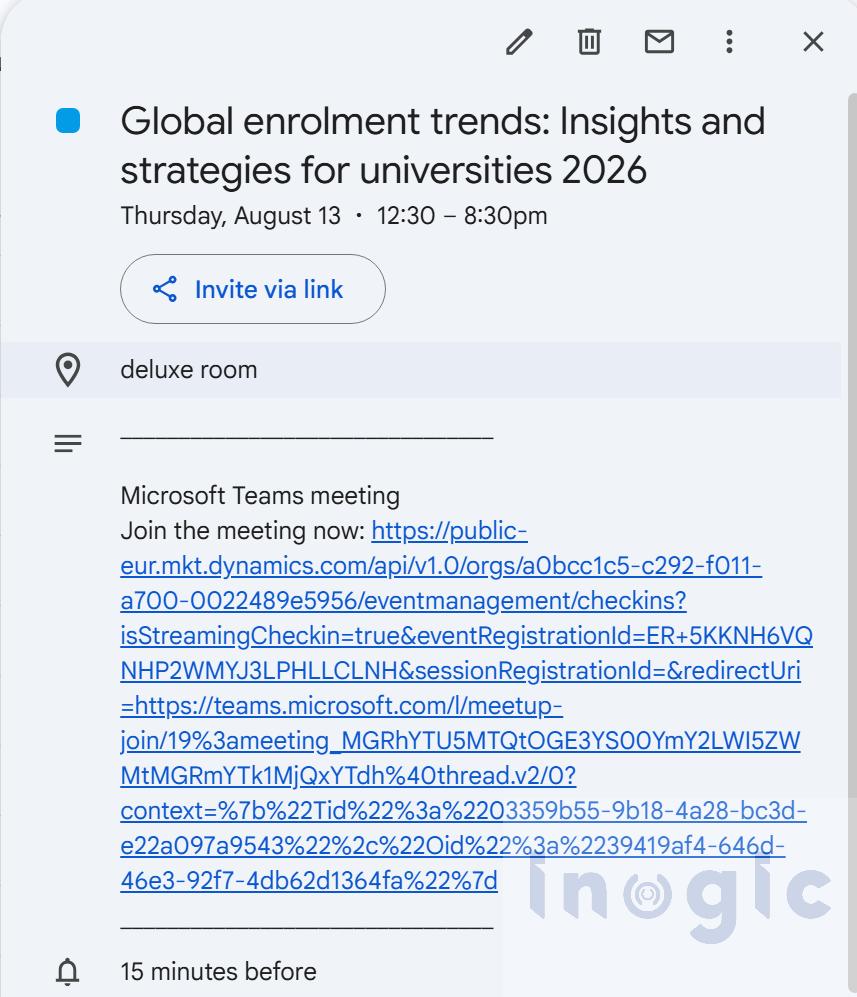
- Gmail and Apple Calendar fall back to the plain-text pane. Anything HTML-specific – styled buttons, embedded formatting – won’t render; only the plain-text content you’ve written on the right-hand side shows up when you set up an event record (mentioned later). If you don’t maintain a separate plain-text version, Gmail/Apple users may see a stripped-down or empty-looking description, so it’s worth writing (or at minimum reviewing) both panes rather than assuming the HTML content will gracefully degrade.
The check-in link, in practice
For streamed events, this is where the calendar file becomes more than a reminder – it becomes a functional join link. A check-in button is automatically added to the .ics description when the calendar content is left empty, using the streaming provider’s join URL under the hood. If you’ve written custom calendar content, you can still get this behaviour back deliberately by adding your own button or link pointing to the {{msevtmgt_checkin_url}} wildcard, which resolves to a personalized check-in link for that specific contact when they download the file.
A few real-world behaviours worth knowing before you rely on this for attendance tracking:
- Only the Join in Teams button in the email itself, or the Add to Calendar Join link, produces a check-in record. A raw Teams URL, a forwarded link, or someone joining from their own Teams/Outlook calendar entry bypasses the check-in flow entirely – so a contact can genuinely attend and still show up as a no-show in your reporting if they didn’t use the personalized link.
- If someone clicks the join link more than 120 minutes before the event starts, no check-in is created. This is intentional and can’t be configured – it exists specifically to stop early “does this link work?” clicks from registering as attendance.
- Check-out (leave) times are only generated automatically for events streamed through Teams webinars specifically, not other formats.
- Expect up to a four-hour delay after the event ends before check-ins appear in the app, so don’t panic if your post-event “thank you vs. we missed you” journey branch looks empty in the first hour or two.
- Test Send and Preview don’t substitute a real registration code into the link, so testing the check-in flow this way won’t produce a valid check-in – you’ll need to register with a separate test email address to see the real behaviour end-to-end.
Prerequisites
- Contacts must be registered for the event or session referenced in the button – unregistered recipients simply won’t see the button at all (it’s conditionally rendered, not just non-functional).
- Streamed event check-in wildcarding requires the event to be configured as a streamed event with a supported provider (e.g., Teams webinar) – it isn’t available for standard in-person events.
HTML Customization in Practice
The two-pane structure
The Calendar content section under Event planning → your event → Additional information splits into two independent panes, and it’s worth treating them as two separate authoring surfaces rather than one description with a fallback:
To customize the calendar descriptions:
- Open the event in Event planning.
- Go to Additional information → Calendar content.
- Edit the HTML description (for Outlook) and the plain-text description (for Gmail/Apple Calendar) separately.
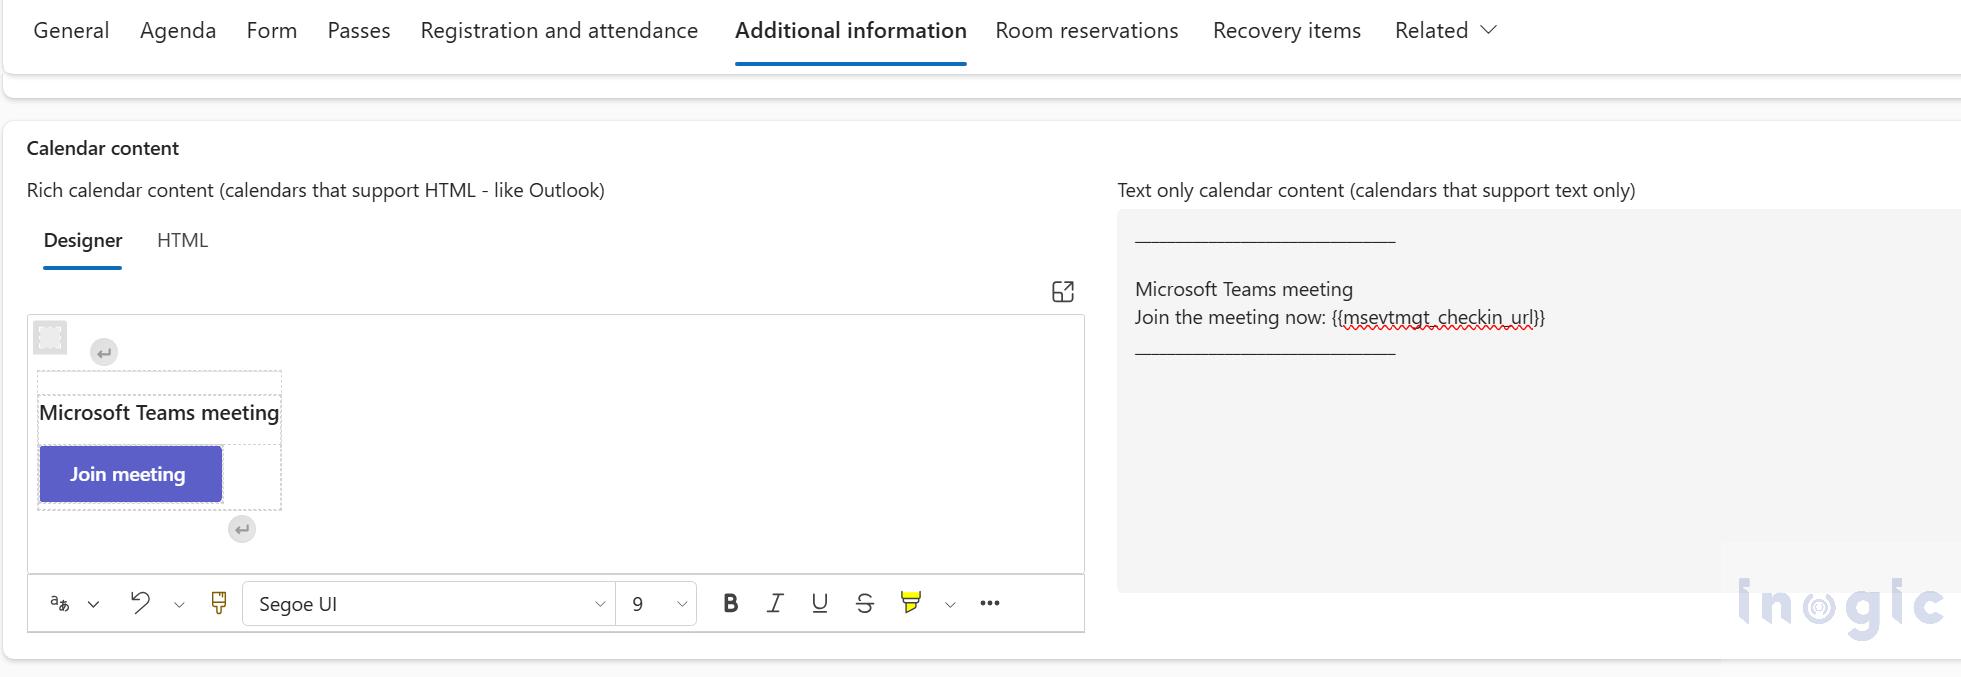
- Left pane (HTML) – rendered by calendar clients that support HTML descriptions, primarily Outlook. This is where formatting, inline links, and buttons display as designed.
- Right pane (plain text) – rendered by clients that only support text, primarily Gmail and Apple Calendar. Anything here needs to work as readable plain text on its own, since there’s no formatting fallback.
Because these are edited and stored separately, a change to one doesn’t propagate to the other – if you update the HTML pane with new venue details or a new join link, you need to make the matching edit in the plain-text pane, or Gmail/Apple users will see stale or missing information.
What you can customize
Static content. Both panes accept normal descriptive text – agenda notes, venue/parking instructions, what to bring, dress code, a support contact. This is genuinely free form; there’s no character limit enforced by the designer beyond what’s reasonable for a calendar app to render.
The check-in button. As covered in Part 2, leaving the content empty on a streamed event auto-populates a check-in button. Once you add your own content, that auto-behaviour stops, so if you still want the join/check-in function you need to explicitly place a link or button using the {{msevtmgt_checkin_url}} wildcard. This is the main piece of “customization” most organizers need: replacing the generic auto-generated button with branded text (“Join the Livestream” instead of a default label) while keeping the underlying check-in tracking intact.
Personalization tokens. Because the .ics file is generated per contact at download time, wildcards resolve to that specific registrant’s data – this is what makes the check-in link personalized rather than a shared meeting URL. In practice, this means you can build calendar descriptions that feel individually tailored (their specific session, their specific join link) without maintaining separate emails per session.
Conclusion
The Add to Calendar button in Customer Insights – Journeys helps attendees save events and improve engagement. It is registration-aware and dynamically generated, creating a personalized .ics file based on event or session registration. For streamed events, personalized check-in links can also connect calendar activity with attendance tracking.
FAQs
How does Add to Calendar work in Dynamics 365 Customer Insights – Journeys?
Dynamics 365 Customer Insights – Journeys generates a personalized .ics file based on the contact’s event or session registration.
How do you set up Add to Calendar in Dynamics 365 Customer Insights?
In Dynamics 365 Customer Insights – Journeys, add a button to the email, select Link to → Add to Calendar, and choose the event or sessions.
Does Dynamics 365 Customer Insights support Outlook and Google Calendar?
Yes. Dynamics 365 Customer Insights – Journeys generates an .ics file that contacts can download and import into Outlook or Google Calendar.
Can Dynamics 365 Customer Insights track event check-ins?
Yes. For streamed events, Dynamics 365 Customer Insights – Journeys can use a personalized check-in link to connect event participation with attendance tracking.