Microsoft recently introduced us to a new set of event handlers, which can be used to register or deregister a function when an output parameter of a PCF control is changed. By using the OnOutputChange method, seamless communication between PCF control & Client API can be established. It is quite interesting to know that this works with standard as well as a virtual component. More on a virtual component can be checked here.
Let’s look at the event handlers that are introduced first. They are as follows –
- AddOnOutputChange – This will add an event handler to the OutputChange event of the selected control. The syntax is as below –
var control = formContext.getControl("<name>");
control.addOnOutputChange(myFunction);
- RemoveOnOutputChange – This will remove the event handler from the OutputChange event of the selected control. The syntax is as below –
var control = formContext.getControl("<name>");
control.removeOnOutputChange(myFunction);
- GetOutputs – This will return all the event handlers registered on the output change event of the selected control. The syntax is as below –
var control = formContext.getControl("<name>");
control.getOutputs();
Below is what the getOutputs() returns –
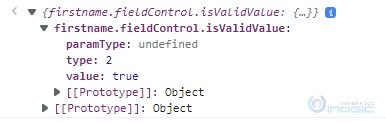
A key thing to know here is, the execution context will be passed automatically to the event handler when output is changed in the PCF control to easily acquire the formContext.
Let’s quickly look at the demonstration of the same. For demonstration purposes, I’m creating a PCF control for the firstname field/column of the Contact entity/table which will show a field-level notification if the first name consists of any numeric values.
We’ll follow the below steps to achieve the aforementioned –
1. Create a Virtual PCF component by using the below command –
pac pcf init –namespace <namespace> –name <controlName> –template field –framework react
2. After the component is created, install npm packages using
npm install.
3. Add the properties like the below in ControlManifest.xml–
<property name="textField" display-name-key="Text Field" description-key="Select Text Field which should be checked" of-type="SingleLine.Text" usage="bound" required="true" />

<property name="isValidValue" display-name-key="String Value validation result" description-key="String Value validation result" of-type="TwoOptions" usage="output"/>
4. Make changes to the index.ts file as per below. We are reading the value from the text field, and checking it against a regex which checks if the input string contains any numeric character. We will pass the Input Changed function as a callback function to our main component’s props. And in the getOutputs, we will set the output parameters.
public init(

context: ComponentFramework.Context<IInputs>,

notifyOutputChanged: () => void,

state: ComponentFramework.Dictionary

): void {

this.notifyOutputChanged = notifyOutputChanged;

this.currentFieldValue = context.parameters.textField.raw!;

this.isValidString = this.validateStringField(this.currentFieldValue);

}


/**

* This function will check the string passed to it and will return if the string contains any numerical value

* @param currentFieldValue value to be checked

* @returns true or false based on regex checking

*/

validateStringField(currentFieldValue: string): boolean {

let isValid:boolean = false;

let checker = new RegExp('^[A-z]*$');

try {

isValid = checker.test(currentFieldValue);

} catch (error) {

console.log(error);

}

return isValid;

}


/**

* Called when any value in the property bag has changed. This includes field values, data sets, global values such as container height and width, offline status, and control metadata values such as label, visible, etc.

* @param context the entire property bag is available to control via Context Object; It contains values as set up by the customizer mapped to names defined in the manifest, as well as utility functions

* @returns ReactElement root react element for the control

*/

public updateView(context: ComponentFramework.Context<IInputs>): React.ReactElement {

const props: IStringChekerProps = {

defaultValue: context.parameters.textField.raw!,

onInputChanged: (event: React.FormEvent<HTMLInputElement | HTMLTextAreaElement>, newValue?: string | undefined) => {

this.currentFieldValue = newValue!;

this.isValidString = this.validateStringField(this.currentFieldValue);

this.notifyOutputChanged();

}

}

return React.createElement(

StringCheker, props

);

}


/**

* It is called by the framework prior to controlling receiving new data.

* @returns an object based on nomenclature defined in the manifest, expecting object[s] for a property marked as “bound” or “output”

*/

public getOutputs(): IOutputs {

return {

textField:this.currentFieldValue,

isValidValue : this.isValidString

};

}

5. Our main components should look something like this –
import * as React from ‘react’;
import { Label, TextField } from '@fluentui/react';


export interface IStringChekerProps {

defaultValue?: string;

onInputChanged: ((event: React.FormEvent<HTMLInputElement | HTMLTextAreaElement>, newValue?: string | undefined) => void) | undefined

}


export class StringCheker extends React.Component<IStringChekerProps> {

public render(): React.ReactNode {

return (

<TextField

defaultValue={this.props.defaultValue}

placeholder='---'

onChange={this.props.onInputChanged}

/>

)

}

}
- We might also need to make changes to the d.ts file similar to those below to include the Input & Output interfaces.
/*

*This is auto-generated from the ControlManifest.Input.xml file

*/


// Define IInputs and IOutputs Type. They should match with ControlManifest.

export interface IInputs {

textField: ComponentFramework.PropertyTypes.StringProperty;

}

export interface IOutputs {

textField?: string;

isValidValue?: boolean;

}
7. We are all set from the PCF side. Please go ahead and type in
npm run build
and once the build is completed, type in
pac pcf push –publisher-prefix <publisherName>
8. After the PCF is pushed successfully, we will first configure it and then move to the JavaScript part. The field configuration will look like the below –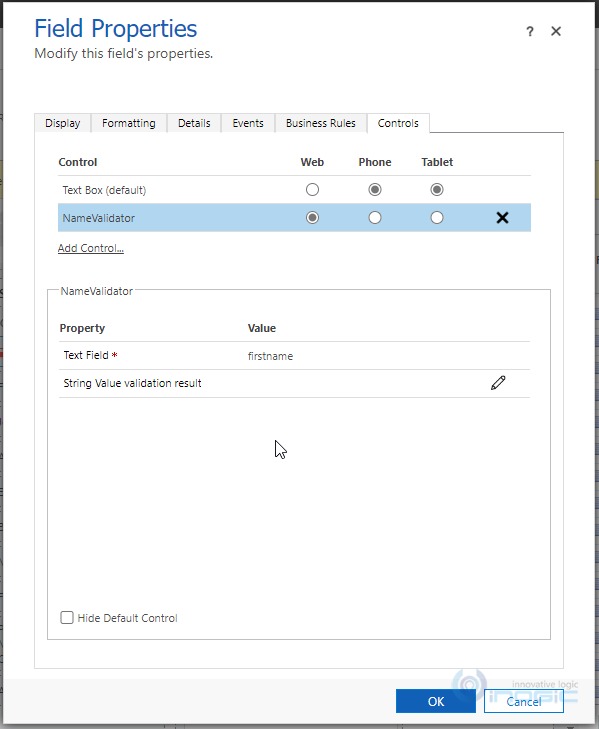
9. In JavaScript, we will add the event handler to the OnOutputChange event of firstname control. It should look something like the below –
namespace IKL {

export namespace PCF {

export class RibbonLibrary {

/**

* This function will run onload of form and register validateName to the output change event of firstname

* @param context

*/

onLoad = (context:any):void => {

//get formContext

let formContext = context.getFormContext();

//get control

var control = formContext.getControl("firstname");

//add validator function on output change event

control.addOnOutputChange(this.validateName);

}


/**

* This function will check if the firstname has any other values than alphabets

* @param OnOutputChangeContext

*/

validateName = (OnOutputChangeContext?:any):void => {

//get the attribute

let attribute = OnOutputChangeContext.getEventSource();

//get formContext

let formContext = OnOutputChangeContext.getFormContext();

try {

//we've included a switch so that the same function can be used further for other fields

switch (attribute.getName()) {

case 'firstname':

let firstnameControl = formContext.getControl('firstname');

let firstnameControlOutput = firstnameControl.getOutputs();

let isValidFirstname = firstnameControlOutput["firstname.fieldControl.isValidValue"].value;

//if the first name is invalid, show a notification

if(!isValidFirstname){

firstnameControl.setNotification('Firstname should not contain digits','firstnameControlNotification');

}

//else clear it

else {

firstnameControl.clearNotification('firstnameControlNotification');

}

break;

default:

break;

}

} catch (error) {

console.log(error);

}

}

}

}

}

let contactLib = new IKL.PCF.RibbonLibrary();
Note: From the above code we can see, where the method validateName is defined we have directly captured the PCF control’s context as OnOutputChangeContext.
10. Register the script on the load event of the contact form and we are done. It will look like the below in action –

Conclusion:
This is how we can use the OnOutputChange event for a PCF control.