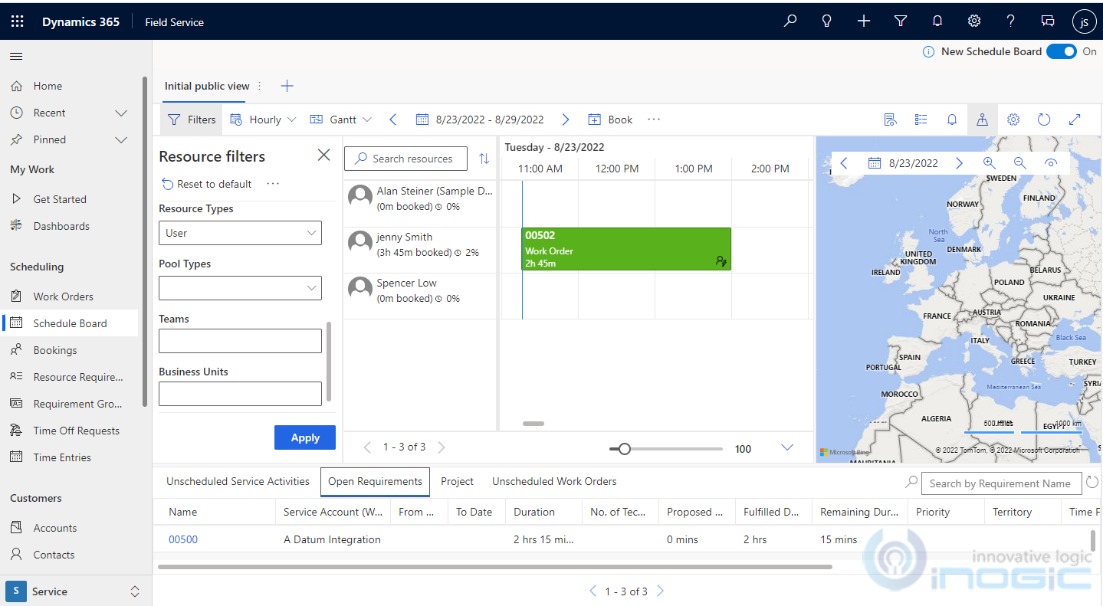
The Dynamics 365 Schedule Board provides an ability to view resources and schedule/book them for particular Work Items. As per the business scenarios, the preferences for the dispatcher differ in the real-world scenarios, and Field Service within Dynamics 365 allows us to be flexible and customize the Schedule Board as per the business need.
Dynamics 365 Field Service Schedule board now has a new and improved User Experience, which makes Dispatchers efficiently and accurately assign the Resources to their work.
In this blog, we will walk through to check how to customize our schedule board and make it more efficient for Dispatcher, by adding Custom Controls to the Filter Layout and filtering the Resource based on those filters. This will help dispatchers easily find suitable Resources in order to accomplish the Work in all aspects.
We will add different types of controls such as Textbox, Lookup, Option set, Multi-Select Option set, Number, etc. on the Filters Panel on the left-hand side of the schedule board and filter the Resources on the Schedule Board.
This requires changes in the “Filter Layout Query” and “Retrieve Resources Query” XML Queries in the Schedule Board Settings, which uses Unified Fetch XML language to build the queries.
Now, let’s see how to achieve our requirement by modifying the Queries in CRM.
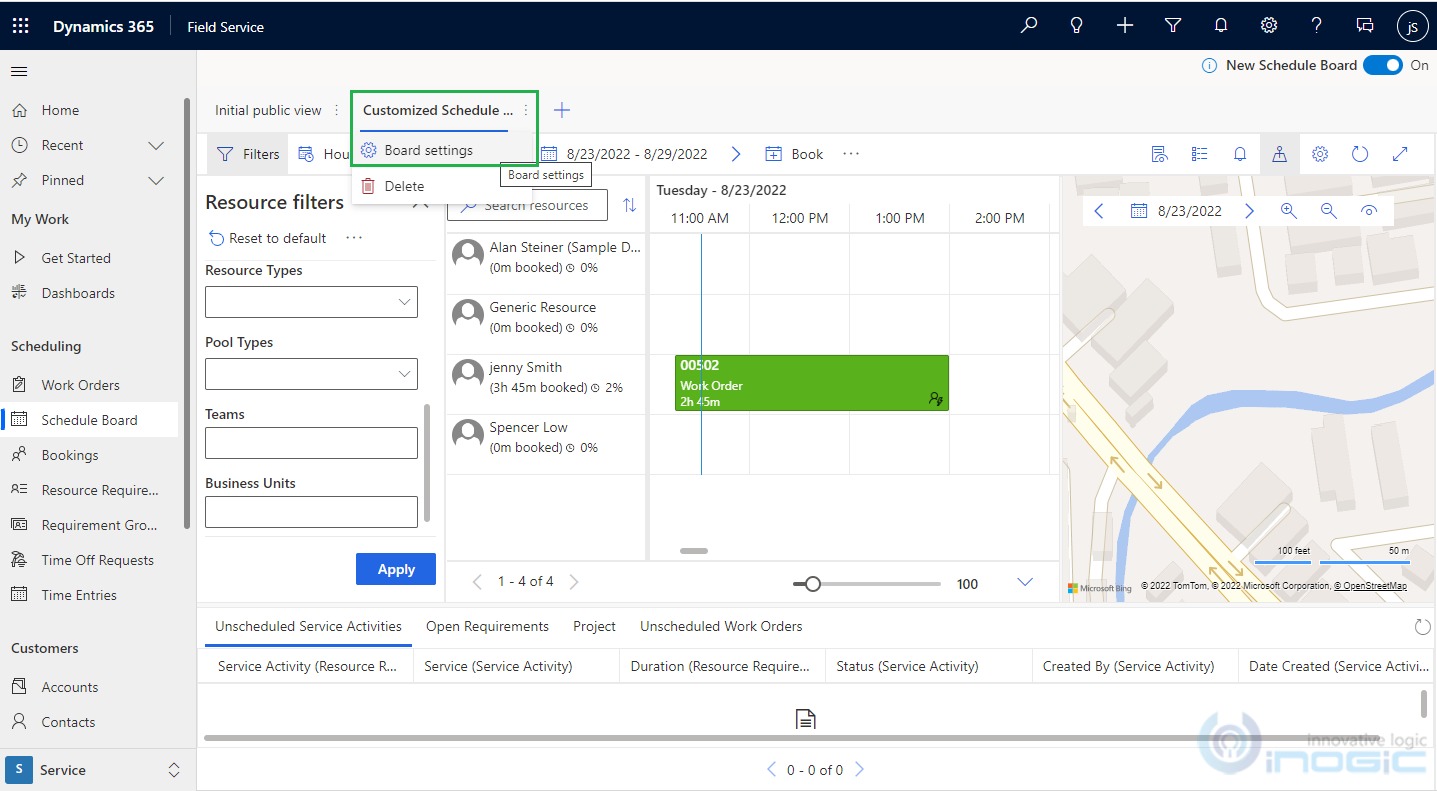
Note: As we know there is an OOB Initial Public View Schedule Board tab on the Dynamics365 Field Service Schedule Board and it is recommended not to update the Queries of this Schedule Board tab, we will add a new Custom Schedule Board tab, and customize the same as per the business requirements.
Please follow the below-listed steps in order to customize the New Schedule Board tab in the Dynamics 365 CRM:
1. Navigate to the Schedule Board’s tab “Customized Schedule Board” and click on Board Settings as shown in the below screenshot.
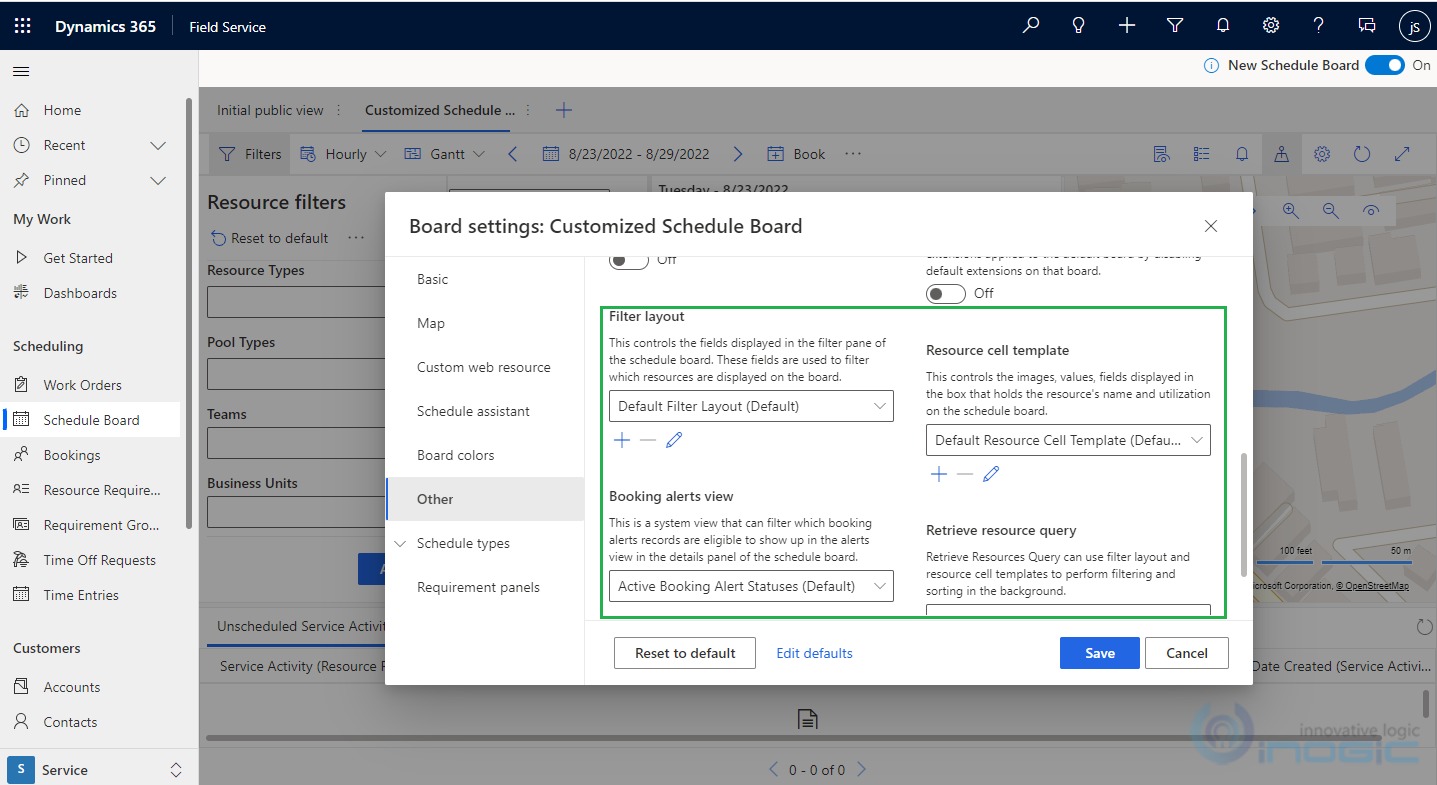
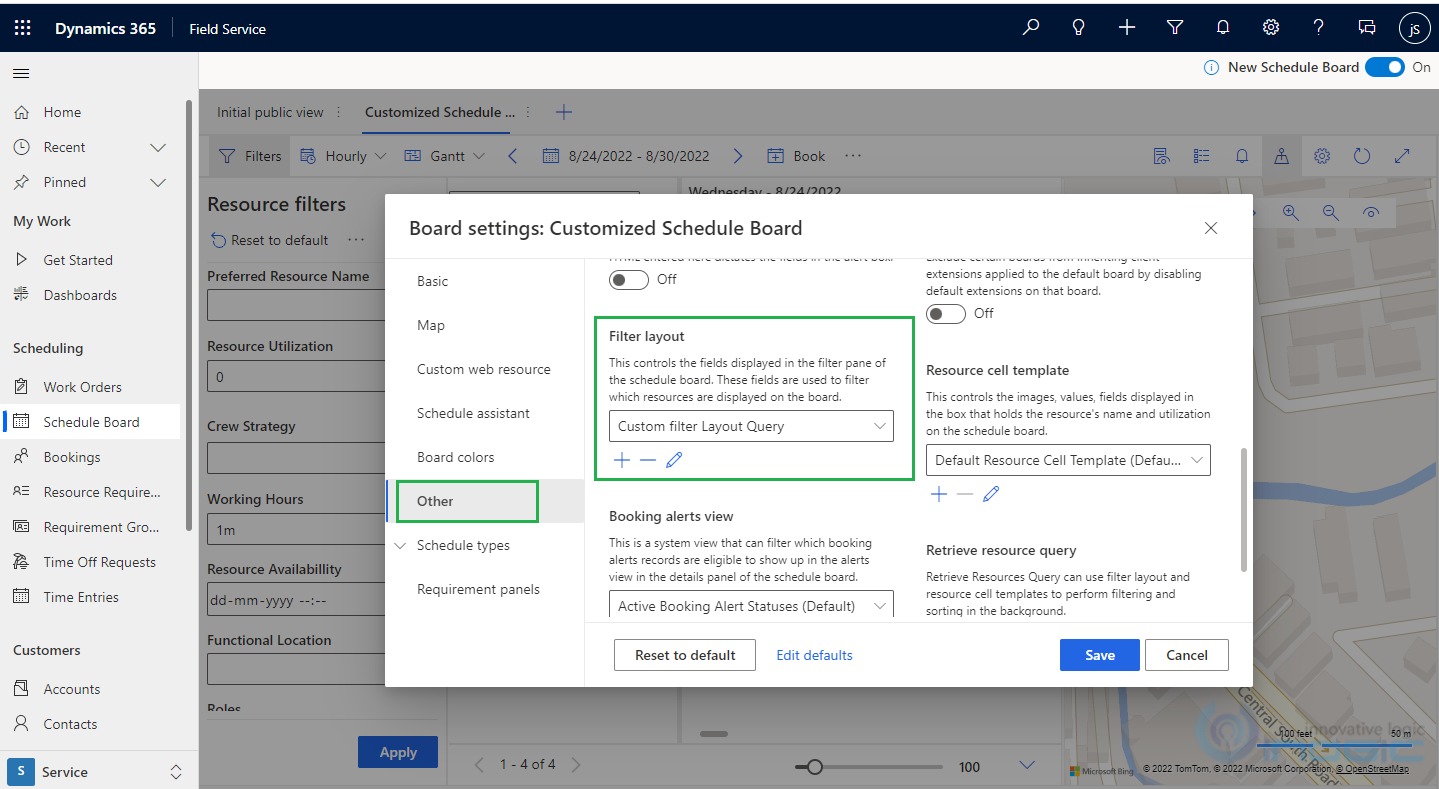
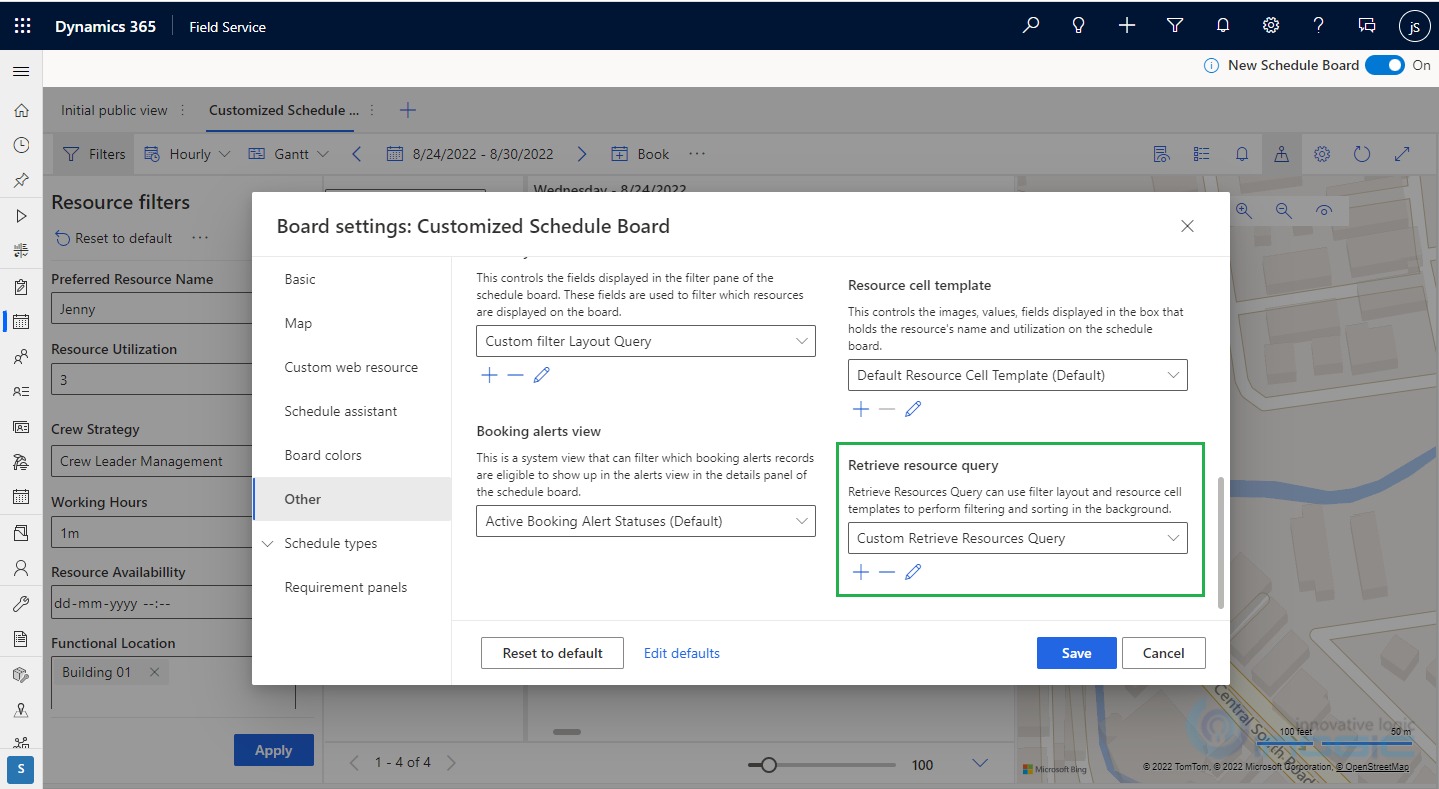
2. In the Board Settings window, click on the Other option where we can see the settings for Filter Layout, Resource Cell Template, Retrieve Resource Query, etc.
Please refer to the below screenshot for the same.
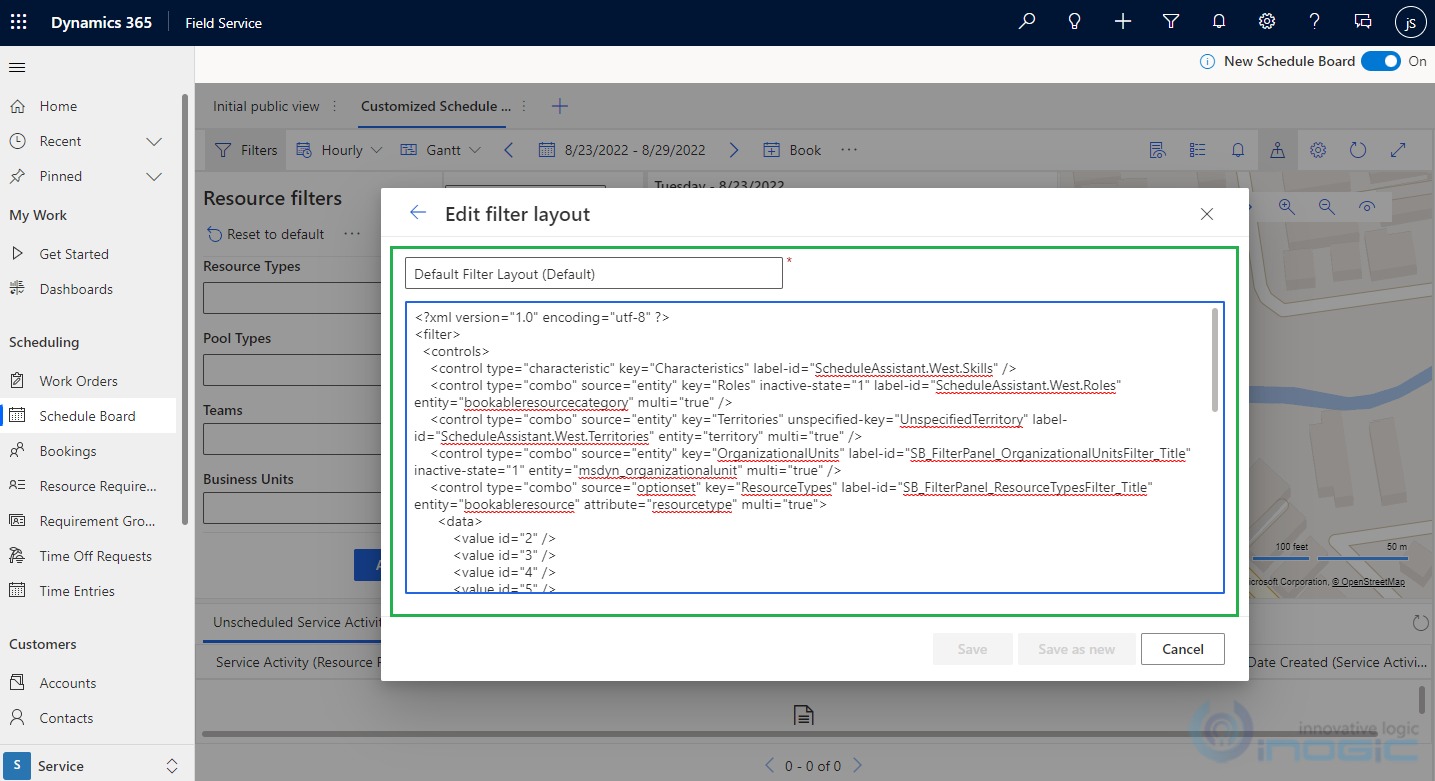
3. Now we will update the Filter Layout Query in order to add our additional custom control to the Filter Layout Panel. (Instead of updating the default OOB queries, we will copy the default Query and create a custom query with additional required changes).
Click on the Edit symbol for the “Default Filter Layout (Default)” Query and copy the XML shown in the below screenshot.
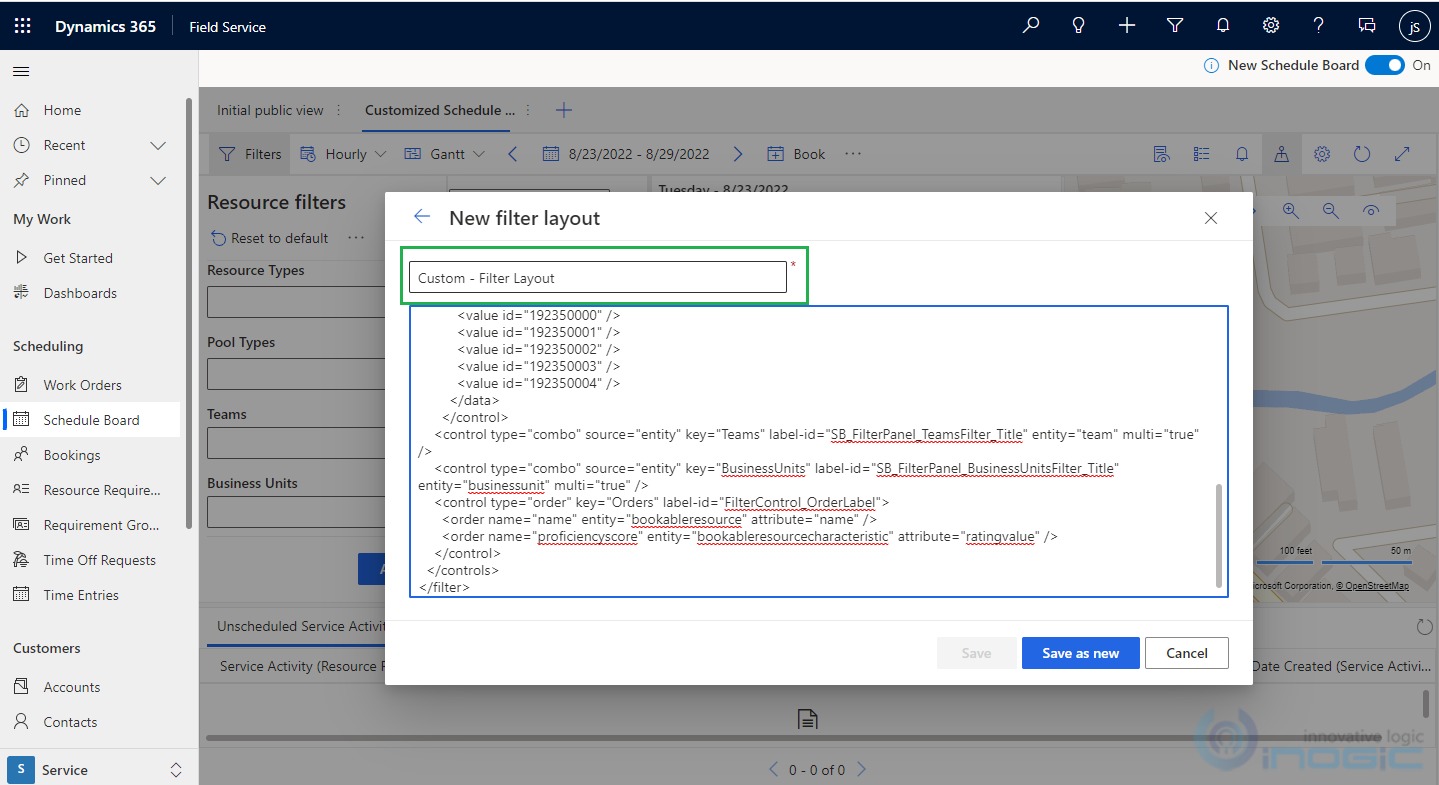
4. Now, we will create New Filter Layout by clicking on the + symbol and pasting the XML Query as we have in the default Filter Layout Query.
Please refer to the below screenshot for the same.
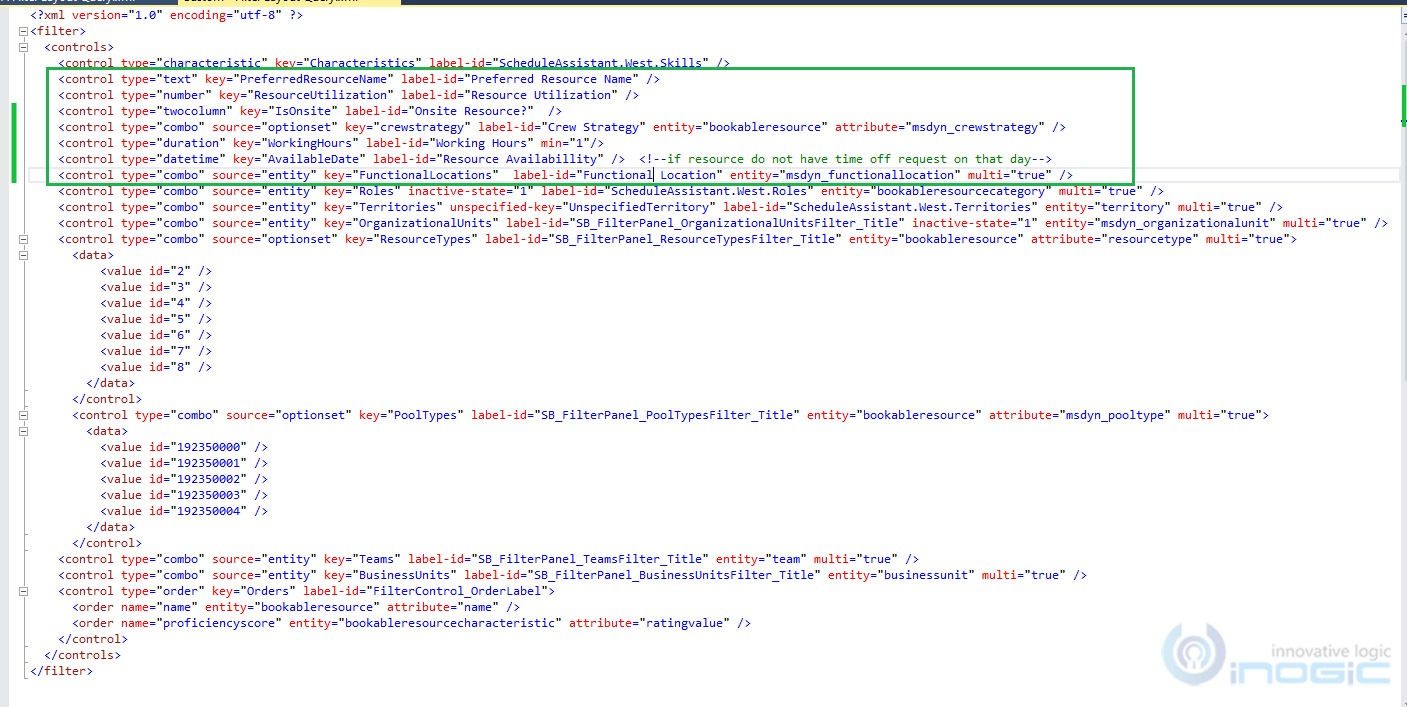
5. We will add various types of controls in the Filter Panel by adding the below listed Control tags in the Filter Layout Query XML.
– Textbox control for “Preferred Resource Name”: This will be used to filter out particular resources by name.
<control type="text" key="PreferredResourceName" label-id="Preferred Resource Name" />
– Number control “Resource Utilization”: This will be for filtering resources based on the Target Utilization attribute of the Bookable Resource.
<control type="number" key="ResourceUtilization" label-id="Resource Utilization" />
– Two Option control “Onsite Resource?”: This will be for filtering resources that are Onsite based on Resource Location.
<control type="boolean" key="IsOnsite" label-id="Onsite Resource?" />
– Option Set control for “Crew Strategy”: This will filter the Crew type resource with specified Crew Strategy. Note that in order to use the multi-select option set will add a multi-property of the same control as true.
<control type="combo" source="optionset" key="crewstrategy" label-id="Crew Strategy" entity="bookableresource" attribute="msdyn_crewstrategy" multi="true">

<data>

<value id ="192350000" />

<value id ="192350001" />

<value id ="192350002" />

</data>

</control>
The Data tag will include all values with optionset value from the “msdyn_crewstrategy” field in the CRM.
– Duration control for “Working Hours”: For this control, we have added a custom column attribute “Working Hours” on the Bookable Resource and this control’s value will be used to filter resources on the schedule board.
<control type="duration" key="WorkingHours" label-id="Working Hours" min="1"/>
– Date Time control for “Resource Availability”: This will be used to check for Resources whose are not added a Time Off r on the selected date.
<control type="datetime" key="AvailableDate" label-id="Non Available Resource" />
– Lookup control for “Functional Location”: For this, we have added a custom N: N relationship for Functional Location and the Bookable Resource entities. In addition, this control will be used to filter out resources based on the Functional locations selected in the filter panel.
<control type="combo" source="entity" key="FunctionalLocations" label-id="Functional Location" entity="msdyn_functionallocation" multi="true" />
Therefore, after adding these controls to the “Custom – Filter Layout Query”, the final XML Query will look as shown in the below screenshot.
6. Now, will add this filter Layout Query XML in the Board Setting for the “Customized Schedule Board” schedule board tab.
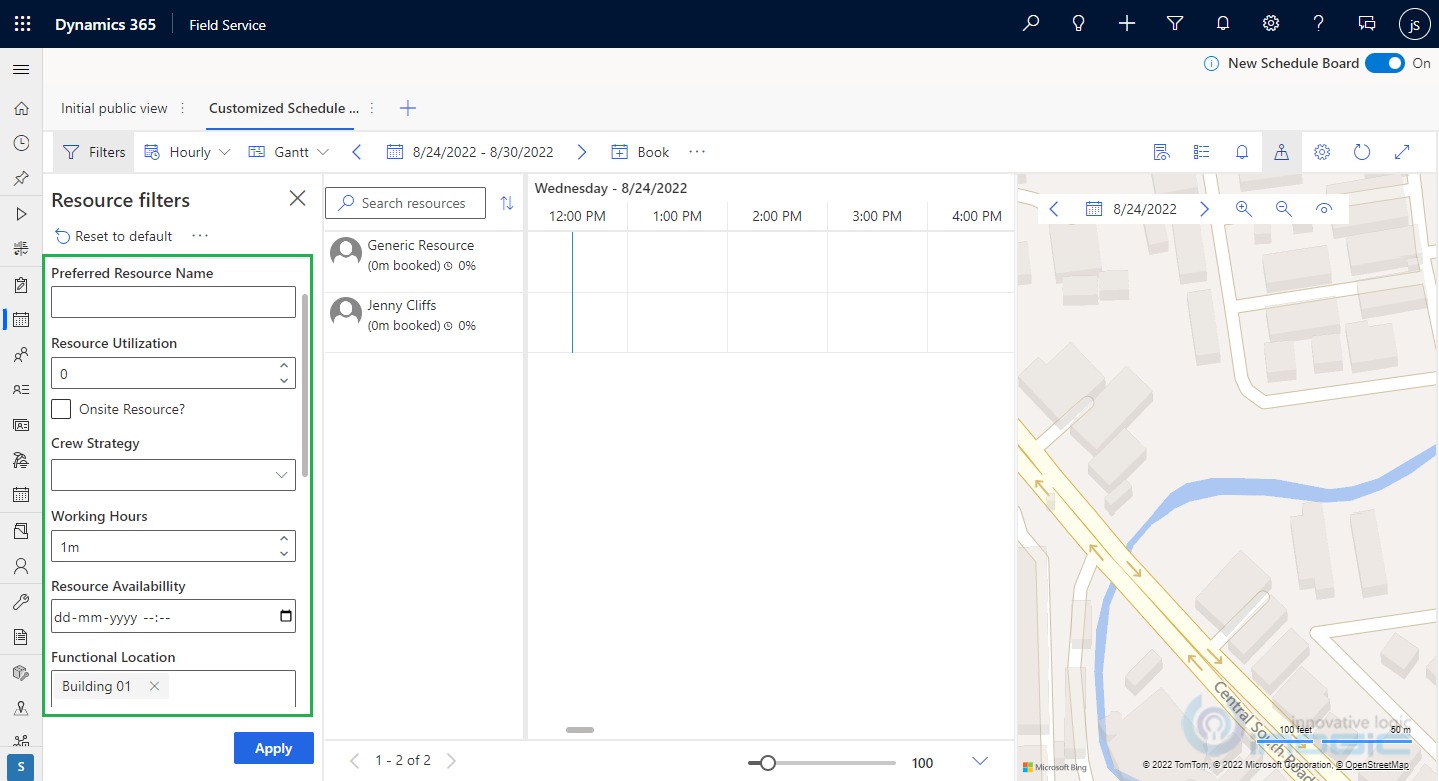
Once we save the query and refresh the schedule board, all the above-listed controls will be added to the Filter Panel. Please refer to the below screenshot for the same.
7. We have now done adding the controls in the Filter Panel, but we have to work on filtering the Resources based on the control values when we click Apply button.
So, will take a copy of the default Retrieve Resources Query and update it to an XML query with the below-listed conditions for each control from Filter Panel:
– Preferred Resource Name: This will filter the Resource having the name same as specified in the filter control. For this will add the below condition in the XML.
<condition attribute="name" operator="eq" ufx:if="$input/PreferredResourceName">

<ufx:value select="$input/PreferredResourceName" attribute="value" />

</condition>
Note that ufx: if is used to mention this filter condition will be applied only if the PreferredResourceName control has values. (PreferredResourceName is the value that we added in the Key attribute within the control tag of “Filter Layout Query”)
– Resource Utilization: This will filter Resources having Target Utilization greater than the provided value in the filter control.
<condition attribute="msdyn_targetutilization" operator="gt" ufx:if="$input/ResourceUtilization" >

<ufx:value select="$input/ResourceUtilization" attribute="value" />

</condition>
– Onsite Resource?: This filter will check if the Resource’s Start Location is not equal to Location Agnostic.
<condition attribute="msdyn_startlocation" operator="ne" value="690970002" ufx:if="$input/IsOnsite = 'true'" />
– Crew Strategy: This will filter the Resources having the Crew Strategy with any of the options from the values selected in the Filter control.
<condition attribute="msdyn_crewstrategy" operator="in" ufx:if="$input/crewstrategy/bag/option">

<ufx:apply select="$input/crewstrategy/bag/option">

<value>

<ufx:value select="$input/crewstrategy/bag/option" />

</value>

</ufx:apply>

</condition>
– Working Hours: This filter will search for Resources having working hours equal to the specified duration in the “Working Hours” control of the Filter Panel.
<condition attribute="new_workinghours" operator="lt" ufx:if="$input/WorkingHours">
       <ufx:value select="$input/WorkingHours" attribute="value" />
</condition>
– Non-Available Resource: This filter will check the resources not having the Time Off Request on the Date, which is selected in the filter control on the schedule board.
<link-entity name="msdyn_timeoffrequest" from="msdyn_resource" to="bookableresourceid" link-type="inner" alias="ae" ufx:if="$input/AvailableDate">
<filter type="and">
<condition attribute="msdyn_starttime" operator="on" ufx:if="$input/AvailableDate">
<ufx:value select="$input/AvailableDate" attribute="value"/>
</condition>
</filter>
</link-entity>
– Functional Location: For this scenario, we have created an N: N relationship between Resource and Functional Location entities and associated the Functional Locations with various Bookable Resources in CRM.
This filter will retrieve the resource having any Functional Locations selected in the control on the schedule board.
<link-entity name="new_br_msdyn_functionallocation" from="bookableresourceid" to="bookableresourceid" visible="false" intersect="true" ufx:if="$input/FunctionalLocations/bag">
<link-entity name="msdyn_functionallocation" from="msdyn_functionallocationid" to="msdyn_functionallocationid" alias="FLocations" ufx:if="$input/FunctionalLocations/bag">
         <filter type="and">
<condition operator="in" attribute="msdyn_functionallocationid" ufx:if="$input/FunctionalLocations/bag">
                <ufx:apply select="$input/FunctionalLocations/bag">
                  <value>
                    <ufx:value select="@ufx-id"/>
                  </value>
                </ufx:apply>
              </condition>
          </filter>
          </link-entity>
   </link-entity>
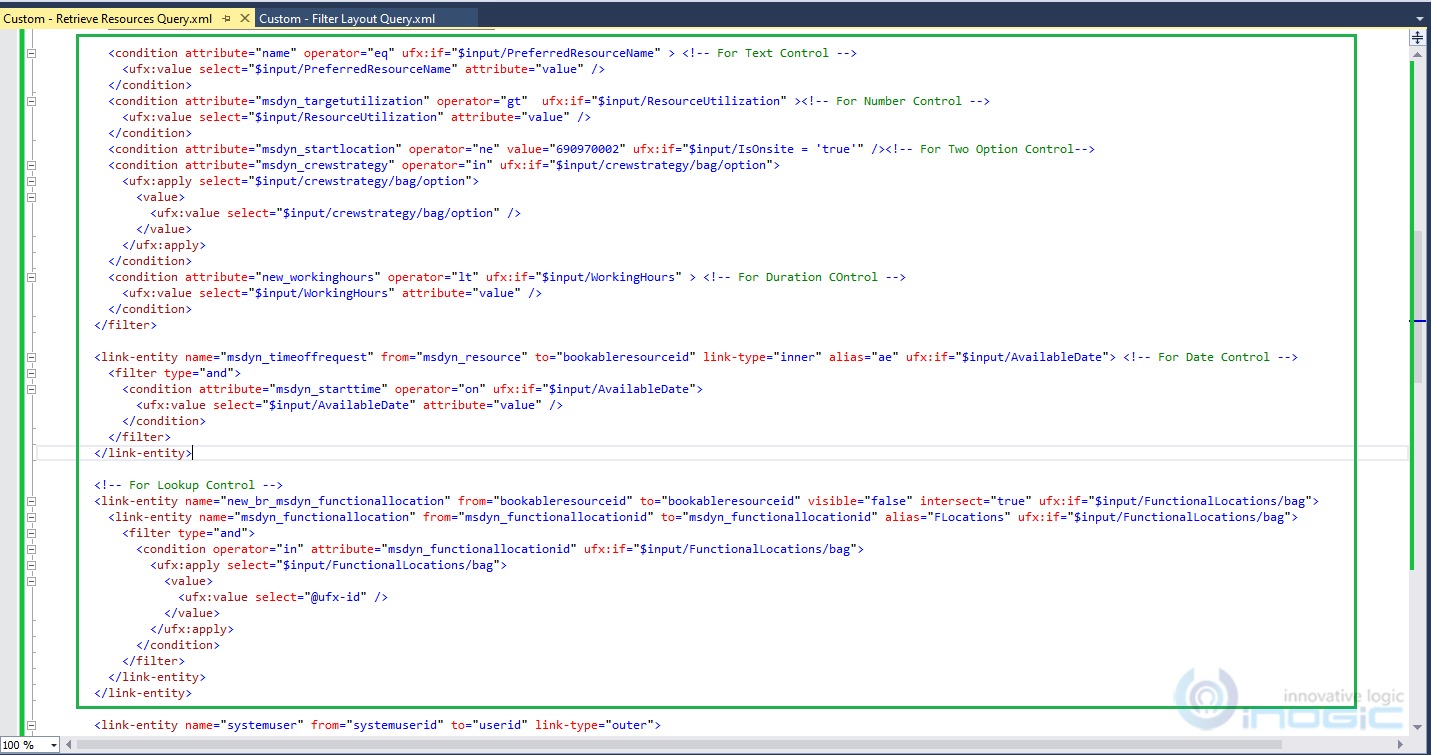
Therefore, the Overall Retrieve Resource Query includes changes as per the above-listed control filters as shown in the below screenshot.
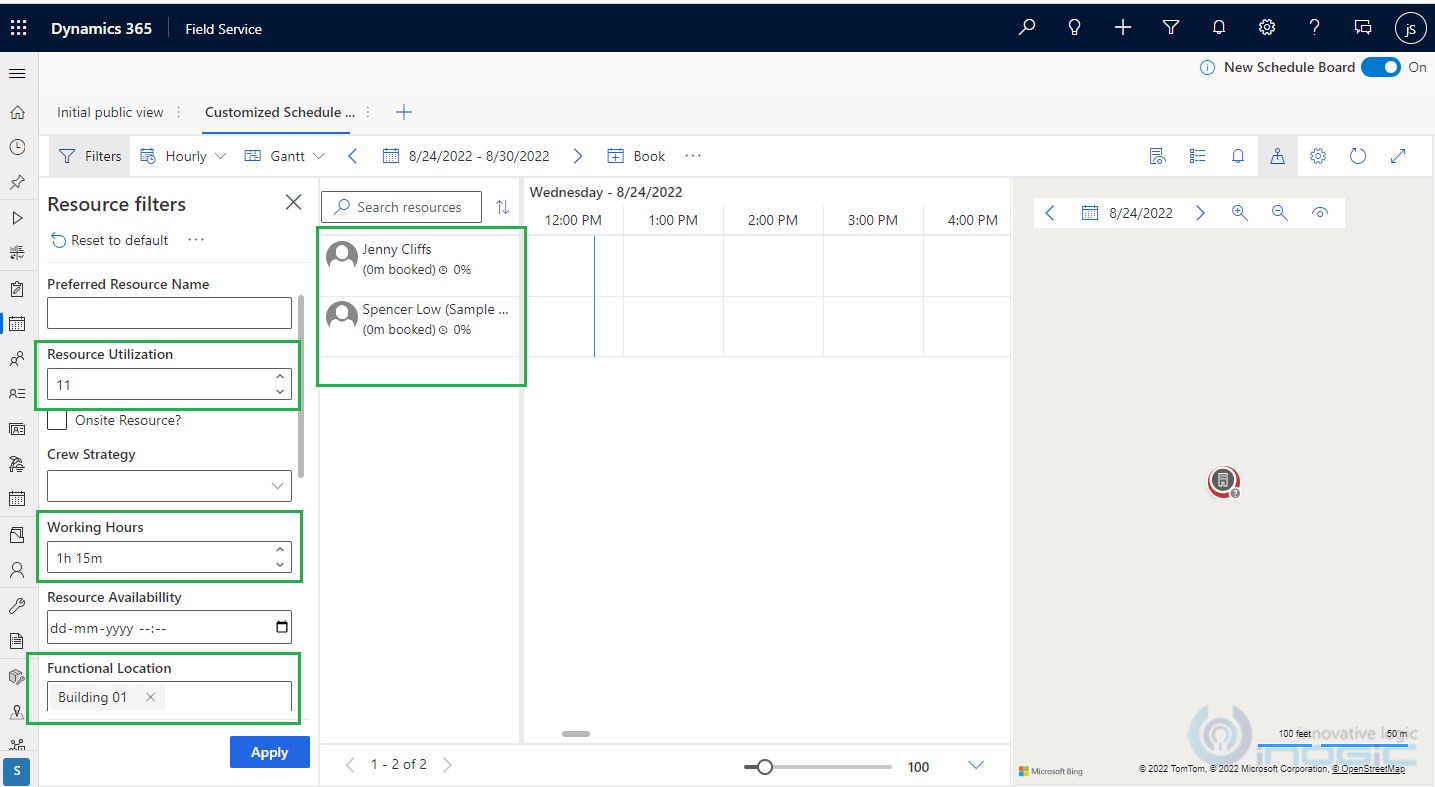
8. Save the changes and Refresh the Schedule Board. Now we can try various combinations based on the filters added in the Filter Panel to retrieve the required Resource on the Schedule Board.
Please refer to the below screenshot for the same.
Conclusion
These Filter Layout Query, and Retrieve Resources Query allow us to extend the features of the Schedule Board by adding additional controls required for business requirements.