Introduction
The release of Power Platform Wave 2 2021 has brought in some amazing features and functionalities. One of which is the Side Panes and the ability to incorporate multiple panels in it.
In the earlier article we discussed how the panels are now capable of displaying entity forms, lists and even web resources and dashboards in the panels with multiple panels possible, you can show more than one of these simultaneously.
In this blog, we will be using sidePanes multi-panel to show a preview pane for the selected record and yes as a bonus we have also included the steps to get outlook style reading pane for emails.
Show Selected Record details using sidePanes
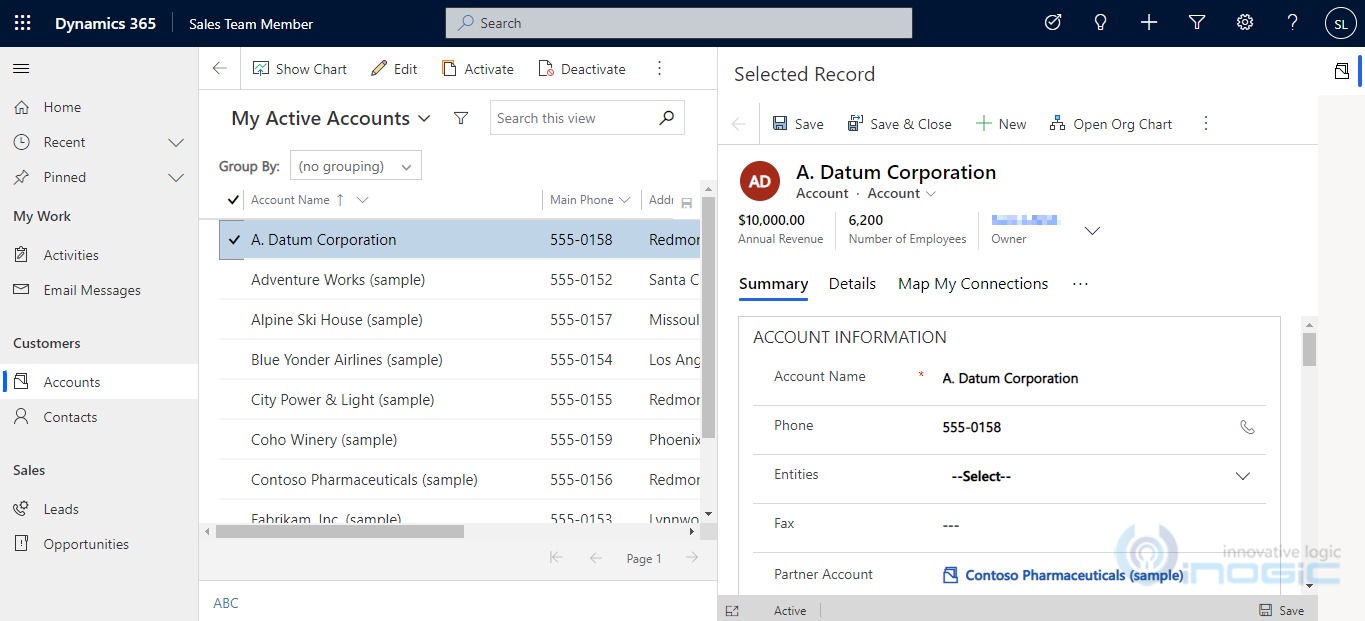
Here, we are creating a panel in the sidePane in which we will show the selected account record. When a record is selected from the view, we will create a pane and open the record in the same.

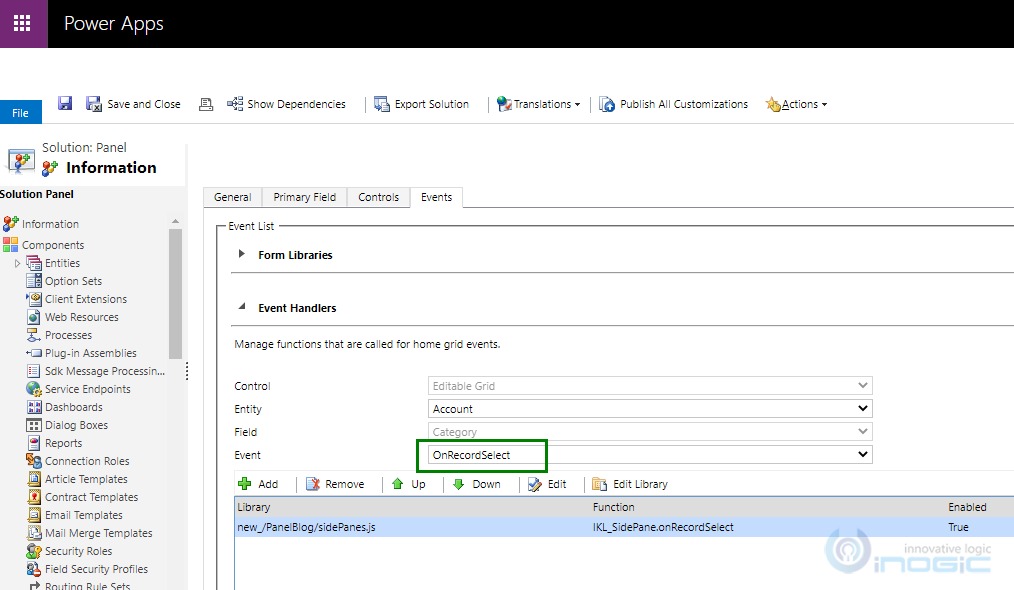
As we need to trigger it on select of the record, we will be using Editable grid. In this grid, we get the onRecordSelect event on which will call our method.
Below is the systematic guide to achieve the above.
Step 1:
Start by creating an asynchronous function and initializing the required variables. Get the selected record and its Id from execution context.
From global context, we get the client URL i.e. CRM URL of the user.
public async onRecordSelect(executionContext: any) {
let selectedRecord = executionContext.getFormContext().data.entity;
let selectedRecordId = selectedRecord.getId().replace("{", "").replace("}", "");
let globalContext = parent.Xrm.Utility.getGlobalContext();
let clientUrl = globalContext.getClientUrl();
let sidePanes = parent.Xrm.App.sidePanes;
sidePanes.state = 1;
We get the sidePanes from parent.Xrm.App.sidePanes in which we will be creating the panels.
sidePanes.state is the method to expand or collapse the panel.
Step 2:
In the next step, we check if the pane already exist or not with getPane method. If it exist then we will close or delete it, preventing duplicate error.
if (sidePanes.getPane("selectedRecordPane") != undefined) {
let existingPanel = sidePanes.getPane("selectedRecordPane");
existingPanel.close();
}
Step 3:
In this step, we will create the pane. As shown in the below code, selectedRecordPane is the panel object consisting of panel properties as explained below.
title: The title of the pane. Used in pane header and for tooltip.
paneId: The unique ID of the pane. If the value is not pass, the ID value is auto-generated.
imageSrc: The path of the icon to show in the panel switcher control.
width: The width of the pane in pixels.
alwaysRender: Prevents the pane from unmounting when it is hidden.
There are several more properties in pane, which you can find here.
let selectedRecordPane = {
title: "Selected Record",
imageSrc: clientUrl + "/_imgs/svg_1.svg",
badge: true,
alwaysRender: false,
paneId: "selectedRecordPane",
width: 600
}
let recordPanel = await sidePanes.createPane(selectedRecordPane);
By createPane method we created the panel in the sidePane.
Step 4:
In the last step, we will create a pageInput object to open the record from navigate method.
This navigate method works same as navigateTo method.
let selectedRecordPageInput = {
pageType: "entityrecord",
entityName: selectedRecord.getEntityName(),
entityId: selectedRecordId
};
await recordPanel.navigate(selectedRecordPageInput);
}
selectedRecord.getEntityName() gives the entity name and selectedRecordId is the guid of the record.
Below is the entire Code:
public async onRecordSelect(executionContext: any) {
//get the selected record
let selectedRecord = executionContext.getFormContext().data.entity;
//get the selected record id
let selectedRecordId = selectedRecord.getId().replace("{", "").replace("}", "");
//get client URL from globalContext
let globalContext = parent.Xrm.Utility.getGlobalContext();
let clientUrl = globalContext.getClientUrl();
//take sidePanes in a variable
let sidePanes = parent.Xrm.App.sidePanes;
//Here we set the sidePanes state to 0 to keep the panel closed by default.
// 0 – collapsed, 1 - expanded
sidePanes.state = 1;
//on Record first we will close the existing panel if there is any
if (sidePanes.getPane("selectedRecordPane") != undefined) {
let existingPanel = sidePanes.getPane("selectedRecordPane");
existingPanel.close();
}
//create panel object
let selectedRecordPane = {
title: "Selected Record",
imageSrc: clientUrl + "/_imgs/svg_1.svg", // account icon url
badge: true, // show the badge i.e. account icon image
alwaysRender: false,
paneId: "selectedRecordPane", //panel unique id
width: 600 // width of the panel when opened
}
// create panel in the sidePane
let recordPanel = await sidePanes.createPane(selectedRecordPane);
//pageInput object decides which records to open
let selectedRecordPageInput = {
pageType: "entityrecord",
entityName: selectedRecord.getEntityName(),
entityId: selectedRecordId
};
//open the selected record
await recordPanel.navigate(selectedRecordPageInput);
}
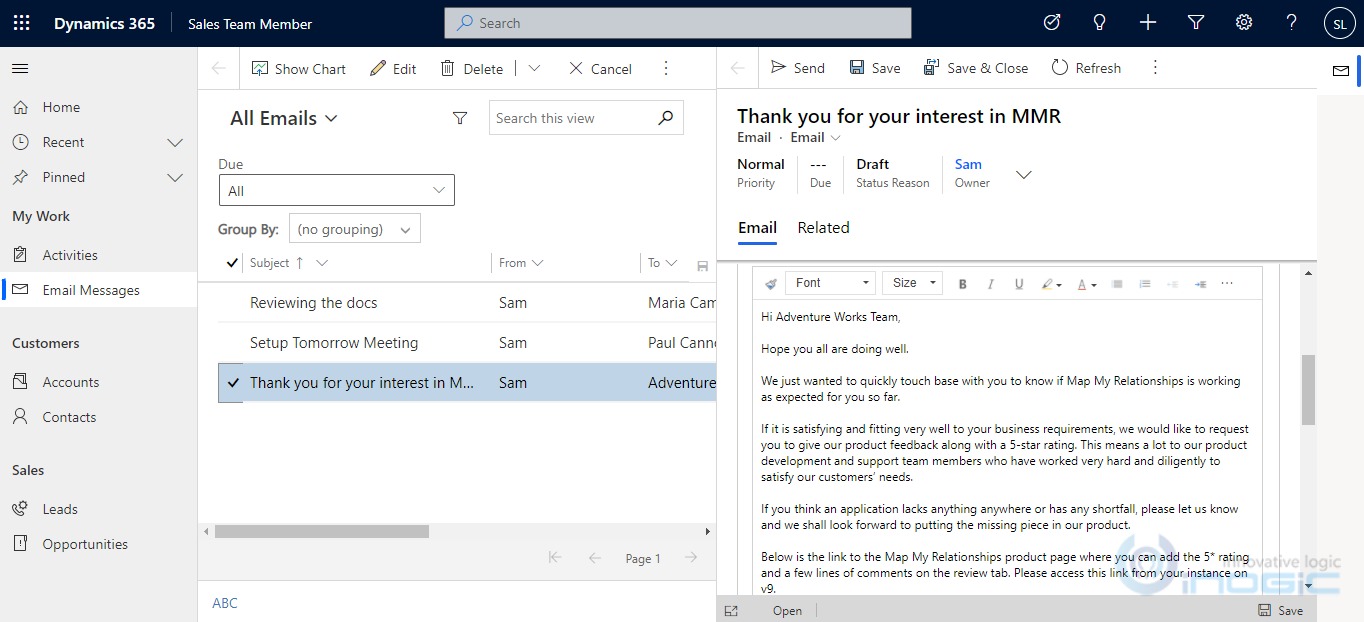
Create an Email Reading Pane with sidePanes
The next cool thing you can do with the sidePane is to create a reading pane of the emails.
Just like the Outlook design, all emails are shown on the left, clicking on an email results in opening of that email on the right side. Similarly, we will be recreating it in our CRM.
For record selection event, we will again use the Editable Grid, which will give us the onRecordSelect event. On select of an email, the email details will appear on the right side of the screen.

When the email from the view is selected it opens up a panel on the right side of the screen, displaying us the details of the email.
Below is the entire code to achieve the Outlook design for Emails in CRM.
public async onEmailSelect(executionContext: any) {
// get selected record id
let selectedRecord = executionContext.getFormContext().data.entity;
let selectedRecordId = selectedRecord.getId().replace("{", "").replace("}", "");
//get client URL i.e. CRM URL
let globalContext = parent.Xrm.Utility.getGlobalContext();
let clientUrl = globalContext.getClientUrl();
//get the sidePanes in a variable
let sidePanes = parent.Xrm.App.sidePanes;
// panel should be expanded on create so value 1.
sidePanes.state = 1;
//checking if panel already exist
if (sidePanes.getPane("selectedRecordPane") != undefined) {
//if panel exist then close / delete it.
let existingPanel = sidePanes.getPane("selectedRecordPane");
existingPanel.close();
}
//create panel with the panel object and createPane method
let selectedEmailPane = {
imageSrc: clientUrl + "/_imgs/svg_4202.svg",
badge: true,
alwaysRender: false,
paneId: "selectedRecordPane",
width: 600,
hideHeader: true
 }
let emailPanel = await sidePanes.createPane(selectedEmailPane);
// open the selected email record with navigate method
let selectedEmailPageInput = {
pageType: "entityrecord",
entityName: selectedRecord.getEntityName(),
entityId: selectedRecordId
};
await emailPanel.navigate(selectedEmailPageInput);
}
Note: If no title is provided in the panel object, it will take the primary field as the title. If you want to hide the title then use hideHeader property in the panel object as used in the email panel.
Conclusion
With this new panel feature showing contextual information and designing preview panes that has been an ask for a while is a simple task. The panels work on the tablet as well.