Introduction
With the introduction of PowerApps Component Framework, Microsoft has provided a way to replace OOB grid and Entity fields with custom controls.
These controls are reusable and can be designed in any form using web development technologies (HTML, CSS, Javascript) to show the CRM records like showing records in a form of Kanban Board, Sentiment analysis control, and many more.
Apart from basic web development technologies (HTML, CSS, Javascript), we can also use various modern frameworks and libraries which expands the scope of development implementation.
In this blog, we will see the basic of PCF (PowerApps Component Framework) dataset control i.e. replace OOB grid with our custom PCF grid and also the offerings which are provided to us in PCF context.
To keep dataset designing simple and easy to understand we will be using the React Fluent UI (previously known as React Fabric UI) framework’s “DetailsList – Basic “ control in our example.
It is not necessary that you have to use “DetailsList – Basic“ control or any other react designing framework. You can also use simple HTML, JavaScript, and CSS for your dataset grid as the designing is based on developers.
Prerequisites
- Microsoft PowerApps CLI should be installed.
- React JS basic knowledge.
- Should be familiar with PCF control lifecycle methods e.g. init(), updateView(), and ControlManifest.Input.xml file.
PCF Overview
Step 1: Creating a PCF project.
Follow the following link for creating the boilerplate React project.
Before coding let us see some of the important aspects of PCF control.
When you create a PCF project you will see there are four methods i.e. init, updateView, getOutputs, destroy which are already present in the index.ts file and a couple of them have parameters as shown in the below screenshot.
We will walk through some of them which we will be using in our details list.

Context: In the init and the updateView view you will get the function parameter as a context object.
It provides all the properties and methods available in the PowerApps Component Framework i.e. Webapi methods, Utility, Navigation, Device Info, Client Info, etc.
Container: Container variable is used to append our custom grid over OOB grid.
Now the question arises on how to get and use CRM data in our control?
How to get CRM data?
By default, in a context variable we get all the columns and record info that is available/can be seen in the OOB grid as a parameter. To access/use it we need to use attributes that are provided in the context variable. Given below are the few commonly used attributes in PCF dataset control.
Columns information:
Context.parameters.sampledataset – This attribute will give you all the OOB grid information like columns, page records, paging info, etc.
Below is a screenshot of the context properties which you can check while debugging.
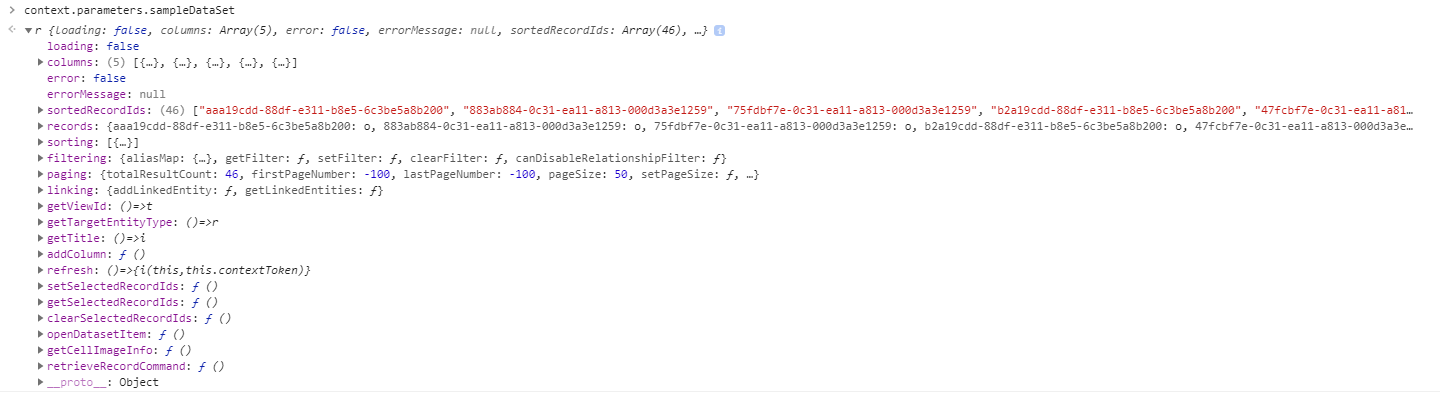
Context.parameters.sampledataset.columns – It will give us an array of objects which contain all the column information including Logical name, Display name datatype of the column.

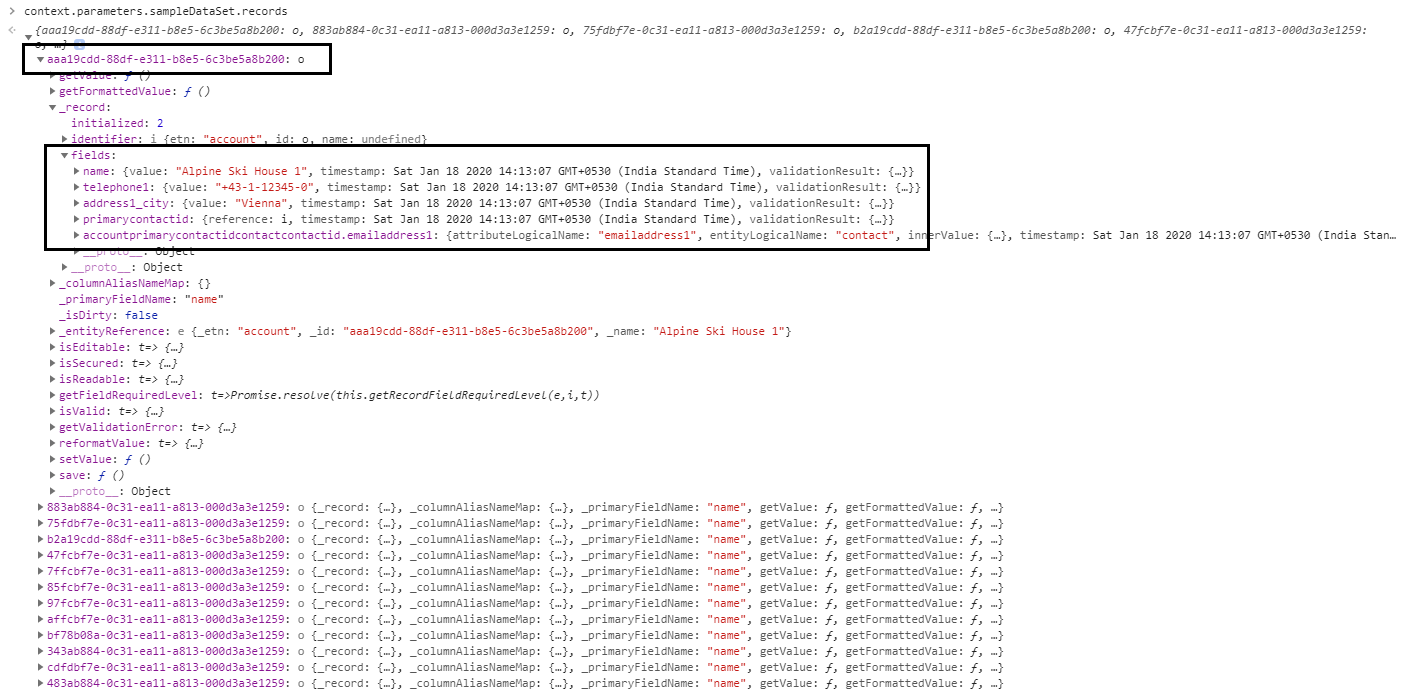
Context.parameter.sampleDatset.records – As you can see in the below screenshot, it will give all the page records value which was in OOB column views.
If the default paging size is 50 then you will get 50 records that are present on the page. Similarly, if the paging size is 100 you will get 100 records using context.parameter.sampleDatset.records-
Code Implementation
For using “DetailsList – Basic“ control we have to just pass parameters (props) in a certain format which will then load our custom grid.
Here is the code for loading custom grid (DetailsList – Basic) –
Index.ts
1. Add the below import in your index.ts file. You don’t need to install react and react-dom since it would be already installed when you create a project.
import * as React from ‘react’;
import * as ReactDOM from ‘react-dom’;
//React component which we will create
import { DetailsListGrid } from “./components/DetailsListGrid”;
2. Declare a global variable which will store the default CRM grid object
private _container: any
3. In the init function, we will initialize the global variable with the default CRM grid object.
public init(context: ComponentFramework.Context<IInputs>, notifyOutputChanged: () => void, state: ComponentFramework.Dictionary, container: HTMLDivElement) {
this._container = container
}
4. In updateView, we will write all the logic to append our custom grid over default CRM’s OOB grid.
public updateView(context: ComponentFramework.Context<IInputs>): void {
let functionName: string = “updateView”;
// all columns which are on views(Eg Active account)
let columnsOnView = context.parameters.sampleDataSet.columns;
let mappedcolumns = this.mapCRMColumnsToDetailsListColmns(columnsOnView);
let pageRows = this.getAllPageRecords(columnsOnView, context.parameters.sampleDataSet)
try {
this.renderDatasetGrid(context, mappedcolumns, pageRows)
} catch (error) {
console.log(functionName + ” + error);
}
}
/**
* Render DetailsListGrid
*/
public renderDatasetGrid(context: ComponentFramework.Context<IInputs>, mappedcolumns: any, pageRows: any) {
let functionName = ‘renderDatasetGrid’;
let appProps: any
try {
// props to be passed to component.
appProps = {
mappedcolumns: mappedcolumns, // formatted columns for details list
pageRows: pageRows, // page records value
pcfContext: context // pcf context
};
ReactDOM.render(React.createElement(DetailsListGrid, appProps), this._container);
} catch (error) {
console.log(functionName + ” + error);
}
}
/**
* Get all page record column value.
* @param columnsOnView
* @param gridParam
*/
public getAllPageRecords(columnsOnView: DataSetInterfaces.Column[],
gridParam: DataSet) {
let functionName = ‘loadPagingRecords’;
let pagingDataRows: any = [];
let currentPageRecordsID = gridParam.sortedRecordIds;
try {
for (const pointer in currentPageRecordsID) {
pagingDataRows[pointer] = {}
pagingDataRows[pointer][“key”] = currentPageRecordsID[pointer];
columnsOnView.forEach((columnItem: any, index) => {
pagingDataRows[pointer][columnItem.name] = gridParam.records[currentPageRecordsID[pointer]].getFormattedValue(columnItem.name);
});
}
} catch (error) {
console.log(functionName + ” + error);
}
return pagingDataRows;
}
/**
* Convert our columns in a format which is accepted by DetailsList grid
* @param columnsOnView columns available on views
*/
public mapCRMColumnsToDetailsListColmns(columnsOnView: any): any {
let functionName = ‘mapCRMColumnsToDetailsListColmns’;
let mappedColumn = []
try {
// loop thorugh all columns
for (const pointer in columnsOnView) {
mappedColumn.push({
key: pointer,
name: columnsOnView[pointer].displayName,
fieildName: columnsOnView[pointer].name,
minWidth: 150,
maxWidth: 200,
isResizable: true,
onColumnClick: () => {
alert(`Column ${columnsOnView[pointer].displayName} clicked`);
},
data: “string”,
onRender: (item: any) => {
return React.createElement(‘span’, null, item[columnsOnView[pointer].name])
}
})
}
} catch (error) {
console.log(functionName + ” + error);
}
return mappedColumn;
}
5. We will remove the control from DOM when it is not required which will be handled by the destroy function that is invoked automatically.
public destroy(): void {
ReactDOM.unmountComponentAtNode(this._container);
}
}
DetailsListGrid.tsx (Create this React component with name)
Create a file with extension .tsx in your project e.g. DetailsListGrid.tsx and copy the below code:
1. Install React fluent UI library using integrated terminal – npm i office-ui-fabric-react @fluentui/react
import * as React from “react”;
import {
DetailsList,
DetailsListLayoutMode,
Selection
} from “office-ui-fabric-react/lib/DetailsList”;
import { MarqueeSelection } from “office-ui-fabric-react/lib/MarqueeSelection”;
import { Fabric } from “office-ui-fabric-react/lib/Fabric”;
export interface IDetailsListBasicExampleItem {
key: number;
name: string;
value: number;
}
export interface IDetailsListBasicExampleState {
items: any;
}
export class DetailsListGrid extends React.Component<
any,
IDetailsListBasicExampleState
> {
private _selection: Selection;
private _allItems: any = this.props.pageRows;
private _columns: any = this.props.mappedcolumns;
private _pcfContext = this.props.pcfContext;
private _allSelectedCards: any = [];
constructor(props: {}) {
super(props);
this._selection = new Selection({
onSelectionChanged: () => {
// @ts-ignore
this.onRowSelection(this._selection._anchoredIndex);
}
});
// Populate with items for demos.
this.state = {
items: this._allItems
};
}
public render(): JSX.Element {
const { items } = this.state;
return (
<Fabric>
<MarqueeSelection selection={this._selection}>
<DetailsList
items={items}
columns={this._columns}
setKey=”set”
layoutMode={DetailsListLayoutMode.justified}
selection={this._selection}
selectionPreservedOnEmptyClick={true}
ariaLabelForSelectionColumn=”Toggle selection”
ariaLabelForSelectAllCheckbox=”Toggle selection for all items”
checkButtonAriaLabel=”Row checkbox”
onItemInvoked={this._onItemInvoked}
/>
</MarqueeSelection>
</Fabric>
);
}
/**
* Function to change the ribbon bar of CRM.
*/
private onRowSelection = (rowIndex: number) => {
let functionName: string = “onRowSelection”;
let selectedRowId: string;
let selectedCardIndex: number;
try {
selectedRowId = this.props.pageRows[rowIndex].key;
// check if selected row is alrady seelected
selectedCardIndex = this._allSelectedCards.findIndex((element: any) => {
return element == selectedRowId;
});
// if card is already clicked remove card id
if (selectedCardIndex >= 0) {
this._allSelectedCards.splice(selectedCardIndex, 1);
} else {
// store all selected card in array
this._allSelectedCards.push(selectedRowId);
}
// update ribbon bar
this._pcfContext.parameters.sampleDataSet.setSelectedRecordIds(
this._allSelectedCards
);
} catch (error) {
console.log(functionName + “” + error);
}
};
/**
* Call function to open Entity record
*/
private _onItemInvoked = (item: IDetailsListBasicExampleItem): void => {
// function to open entity record
this.openEntityRecord(item.key);
};
/**
* Open selected entity record
* @param event
*/
private openEntityRecord(recordID: any): void {
let functionName: string = “onCardDoubleClick”;
try {
if (recordID != null || recordID != undefined) {
let entityreference = this._pcfContext.parameters.sampleDataSet.records[
recordID
].getNamedReference();
let entityFormOptions = {
entityName: entityreference.LogicalName,
entityId: entityreference.id
};
/** Using navigation method */
this._pcfContext.navigation
.openForm(entityFormOptions)
.then((success: any) => {
console.log(success);
})
.catch((error: any) => {
console.log(error);
});
}
} catch (error) {
console.log(functionName + “” + error);
}
}
}
Final Component
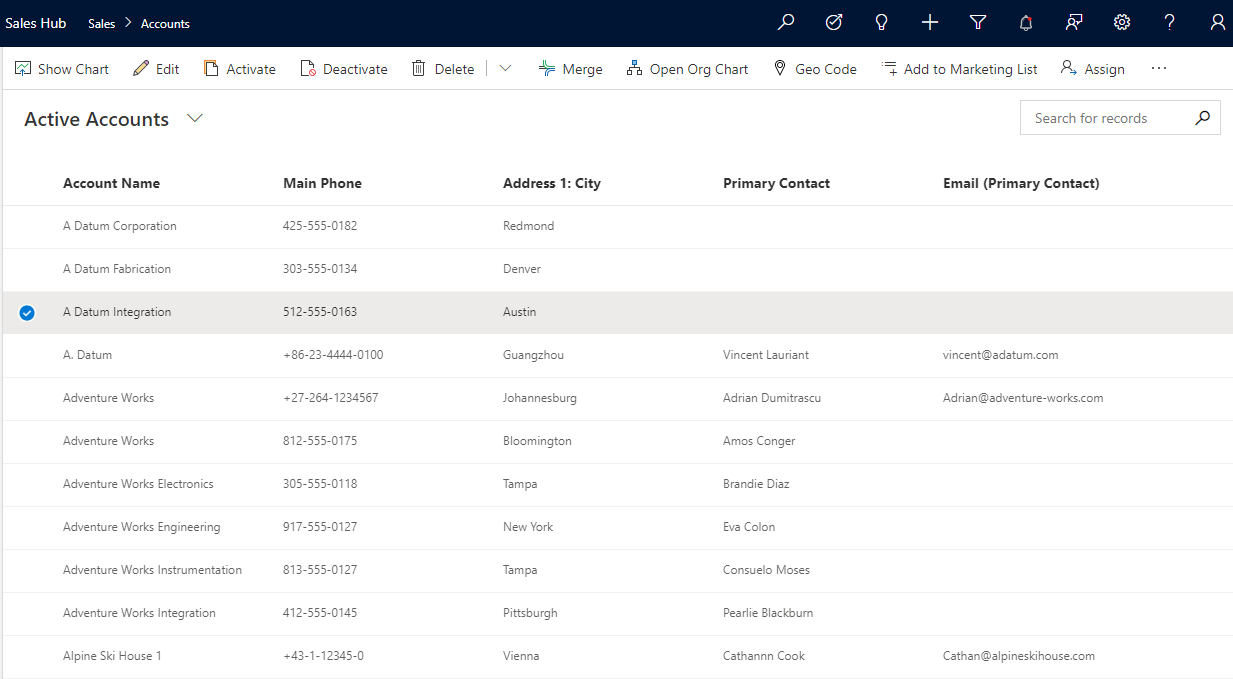
After deploying your control and configuring it on the entity you will see the OOB Grid has been replaced with our own React Fluent UI Detail List Grid.
Conclusion
As illustrated above, you can now easily work with PCF Dataset Control using Fluent UI’s Detail List.
One Pic = 1000 words! Analyze data 90% faster with visualization apps!
Get optimum visualization of Dynamics 365 CRM data with –
Kanban Board – Visualize Dynamics 365 CRM data in Kanban view by categorizing entity records in lanes and rows as per their status, priority, etc.
Map My Relationships – Map My Relationships – Visualize connections and relationships between Dynamics 365 CRM entities or related records in a Mind Map view.
Hi,
Could you please tell me. How to show/hide the columns in run time?
Thanks.
Hi,
Before rendering the page records, we will call our remove Column function that will remove the respective column from the view.
this.removeColumn(“createdon”, columnsOnView);
Here we have mentioned column name as createdon, so our function will find the createdon column and delete it from the column array.
Function:
removeColumn(columnName: string, columnsOnView: any[]) {
let matchIndex: number = -1;
matchIndex = columnsOnView.findIndex((column: any) => {
return column.name == columnName });
matchIndex != -1 ? columnsOnView.splice(matchIndex, 1) : null;
}
Before:


After:
Hope this helps!
Thanks
Hi,
Can you please let me know how can we refresh the grid control, when we delete any record or click on refresh button from the ribbon? The behavior I noticed is the record does get deleted from the database, but does not reflect on the grid. It only reflects when I refresh the browser page.
Hi Moiz,
The reason your deleted record is not reflecting on your PCF control is that you might have written your HTML creation logic in the init() which is called only once when the browser is refreshed.
The PCF framework calls the init() first then after init() the updateView() is called automatically.
When you perform the OOB ribbon action then after the process is completed the updateView() of the PCF is invoked automatically, not the init().
So to refresh your control you can just add the HTML creation logic in the updateView() rather than in init() so that every time the OOB action like a refresh of grid/ Delete button is clicked, your updateView will be called and your control would be created from scratch.
To perform the OOB ribbon action from your PCF control you need to pass the selected rows in a PCF method called as selected row index. To know more please follow this link: https://docs.microsoft.com/en-us/powerapps/developer/component-framework/reference/dataset/setselectedrecordids We have already used the method in our blog.
If you want to programmatically refresh your dataset control then you can call the below function which will call the updateView();
Context.parameter..refresh();
Hope this solves your query!
Thanks for the tutorial. I’ve got it working but was wondering if it’s possible to put a custom filter on the dataset. I’ve used a setFilter on the init method that seems to reduce the amount of records in the dataset, but when the render is called it isn’t displaying the records found but all the records from the original dataset
Hi,
The best way to filter record would be to add the setFilter() inside the updateView() and then call the context.parameters.sampleDataSet.refresh() to get the filtered result.
The updateVIew() method get called every time when there are some changes in the dataset.
To know more about how to use the setFilter(), please follow this link.
Hope this helps.
Thanks!