Further to our earlier blog in which talked about Public/Private Queues in brief with some UI changes in them, this blog will walk you through the features such as how to route queued Item, how to Assign, Pick, and Release features of Queue and important points to be taken note of.
Read more: Queue Enhancements in Microsoft Dynamics CRM ‘LEO’ release – Part 1
On the command bar, you will notice buttons like Route, Pick, Release, and Remove. This allows the ease of dealing with work items from the grid area itself. The detailed feature of each button is explained below:
1. Route: This button routes the queue item to another queue or another user/ team. However, in background it actually changes the queue and Work by respectively.
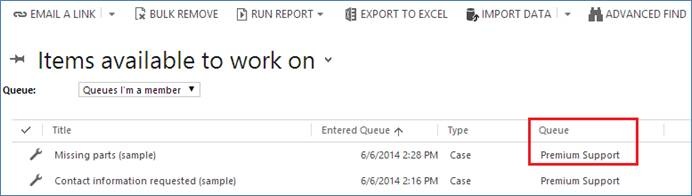
Before clicking on Route:
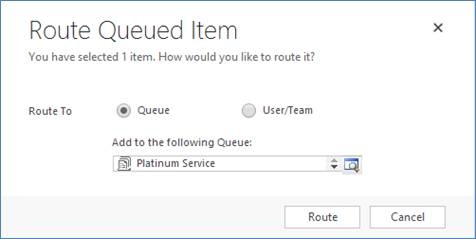
When user clicks on the Route Button for this Queue item, the “Route Queued Item” window appears which allows the user to route a case to Queue or User/Team. By Default, Queue option is selected which changes the queue of the Queue Item.
After clicking on Route:
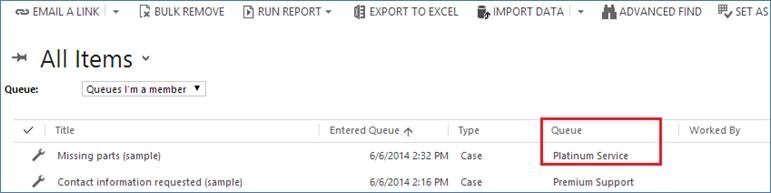
As you can see in above screenshot, it does not change in the “Worked By” value.
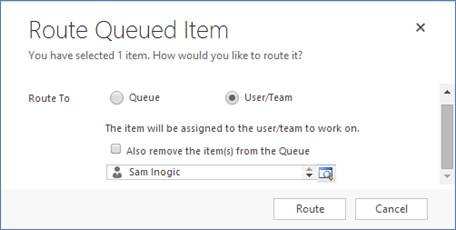
To select/change Worked By, you can select User/Team option in the Route window to have a user working on this item. Due to this, “Worked By” changes as well as the “Owner” of the record in that item.
Here if you choose “Also remove the item(s) from the queue” then that queue item will be removed from the list altogether and you will have to add that to queue again to appear in the list.
Note: When user/ team is selected, the look-up only shows users and not team for selection which may be a bug; whereas after opening the queue item, you can edit the Worked By and it shows the option to select either user or team.
2. Pick: Once the Cases have been added to the queue, individual users can Pick up the cases they would be working on. So, here “Worked By” of the Queue Item as well as owner of the record changes to logged in user clicking Pick button.
Before selecting Pick Option:

You have option to remove that from queue items here as well
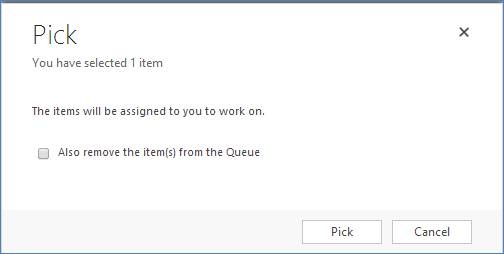
After choosing Pick Option:
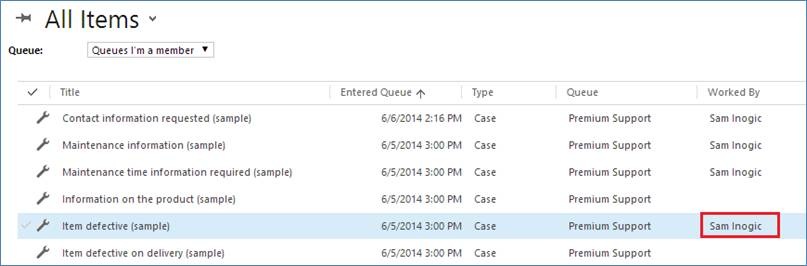
The Worked By is changed as above and owner is also changed as below:

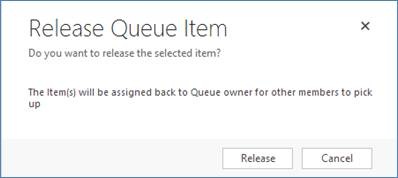
3. Release: This allows the ability to say that you no longer are working on this item. Due to this, the Worked By will be cleared and the record in the queue item will be assigned to owner of queue so that someone else can Pick that item to work upon.
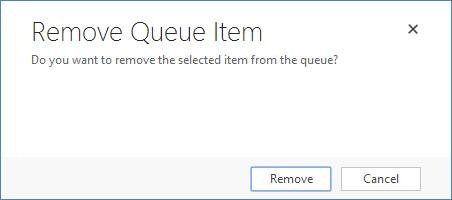
4. Remove: This option removes the Case from the Queue altogether and you will then be required to add it back to queue using “Add to queue” option.
Important Points to note:
– If you select more than 2 Queue Items at a time and click on the Route Button then it will simply allow to Route to Queue. It does not show the option to select User/team.
– Also, in Route Option when user tries to Route Queue Item to User/Team, the Lookup CRM displays and allows only those users who are members of the selected Queue Item’s Queue.
– If you select one or more queue item and click on the Pick Button to pick the Queue Item but if the Current User is not a member of selected Queue Item’s Queue then it does not allow to pick the Queue Item.
Conclusion:
This option is available to deal with queue and queue items which makes it easier for the users to work on their allotted jobs in an organized way. There is an ease to work with items from the view without a need of actually opening your item and changing the values.