Introduction:
Recently we came across a request from a customer that they wanted to show/hide a few activity field labels and data that are displayed in the timeline by default.
We then started exploring timeline configuration capabilities in 2021 release wave 2 by following this doc. Here we came across a new enhanced feature for configuring the activities in the timeline. It provides the leverage to show/hide the activity field label and activity data that is displayed over the timeline as per the business needs.
As we all know while displaying activity information in the timeline there are two options available – “Default form” or “Card form”. Both forms can be configured easily with the configuration form setting which is explained in detail later in this blog.
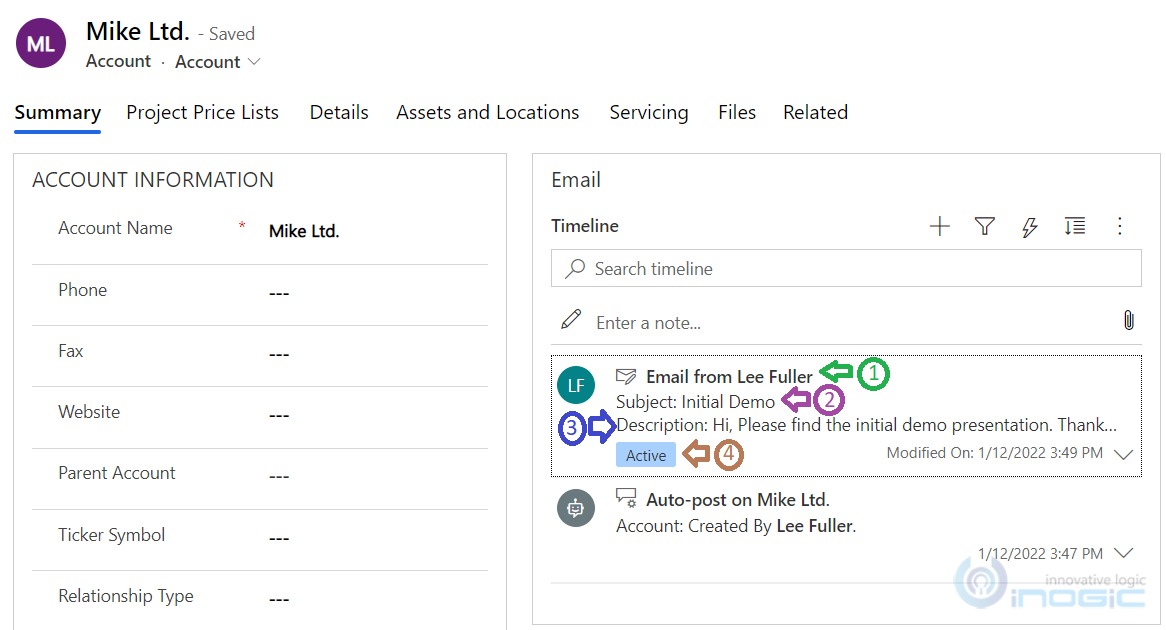
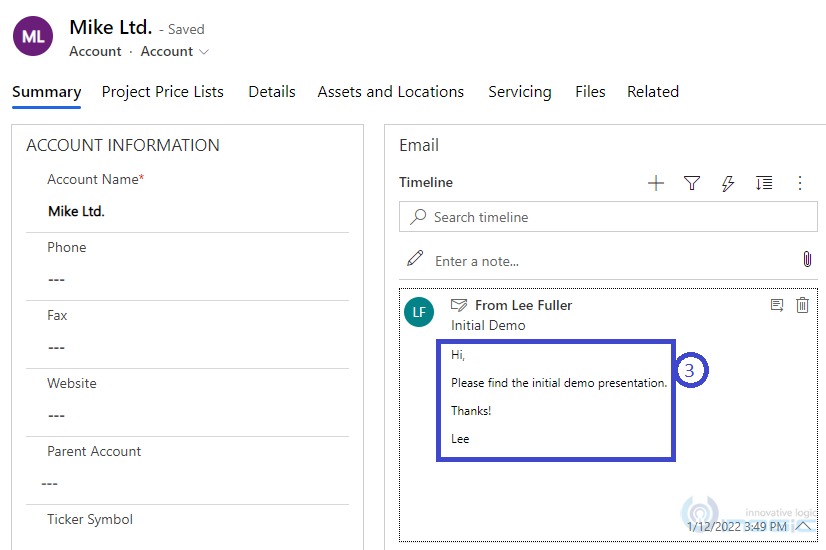
On the Account entity timeline, by default the Email activity information is displayed as follows:
Let us consider one business scenario where the customer has a request to modify the timeline configuration as given below:
1. Change the header label from “Email From” to “From” (e.g. “Email From” is the default label shown, refer to the screenshot above).
2. Hide the “Subject” label and show data present in the “Subject” field as it is (e.g. “Initial Demo” is the data present, refer to the screenshot above).

3. Hide the “Description” label and hide the data present in the “Description” field as well, showing the “Description” data only if the user expands the activity record in the timeline. (e.g. “Description” label and value are by default shown (without expanding) but the customer needs to hide them and show them after expanding, refer to the screenshot above).
4. Hide the “Status” (e.g. “Active” status shown, refer to the screenshot above).
5. Hide the “Modified On” footer label and show it only after the mouse hovers. Also show data present in the “Modified On” field as it is (e.g. “Modified On” date value present in the footer along with the “Modified On” label, refer to the screenshot above).
You can follow the below steps for accommodating the above changes while configuring the timeline:
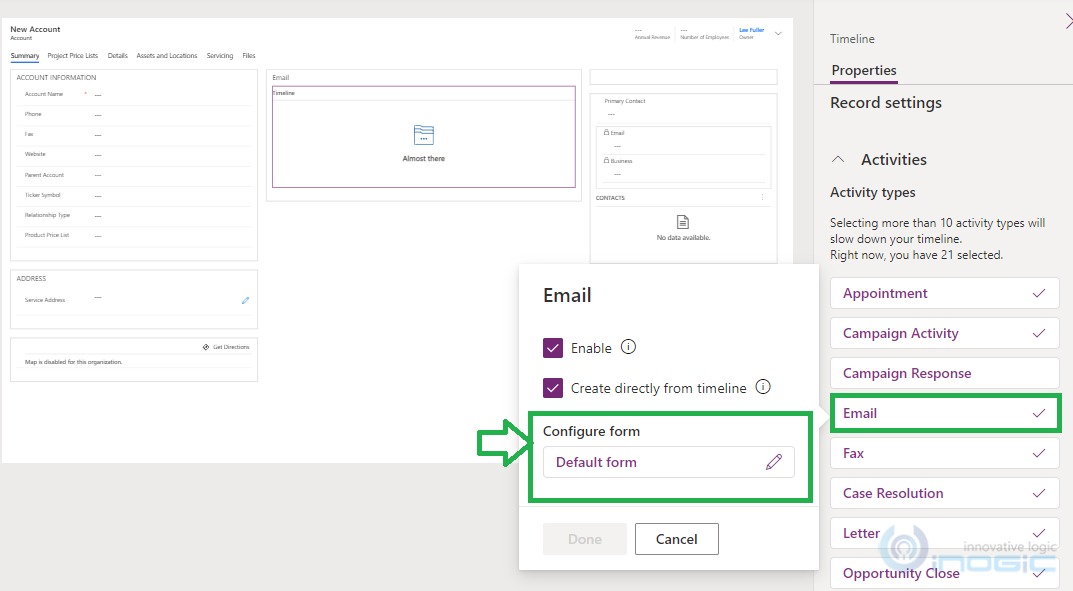
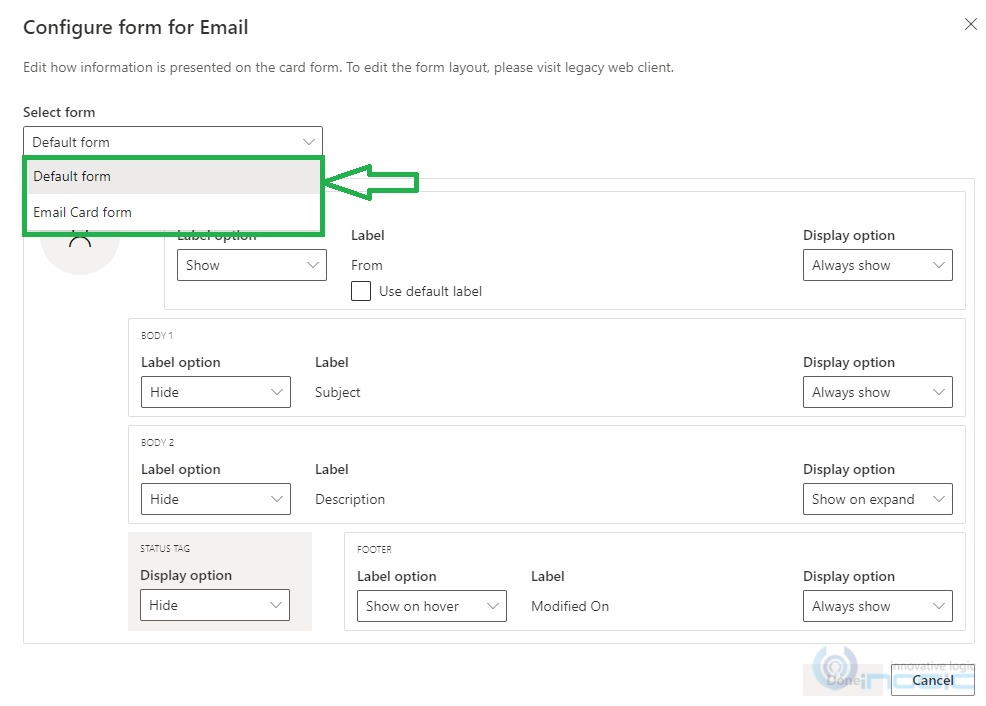
1. Go to https://make.powerapps.com/–>Select an Account entity–> Under Forms–>Select the “Account” Main form.
2. When you select the timeline then the “Properties” tab opens up to the right side, where you can click on the appropriate activity that you want to configure. I clicked on Email activity and as you can see by default there is “Default Form” selected in the “Configure form” window as shown below:
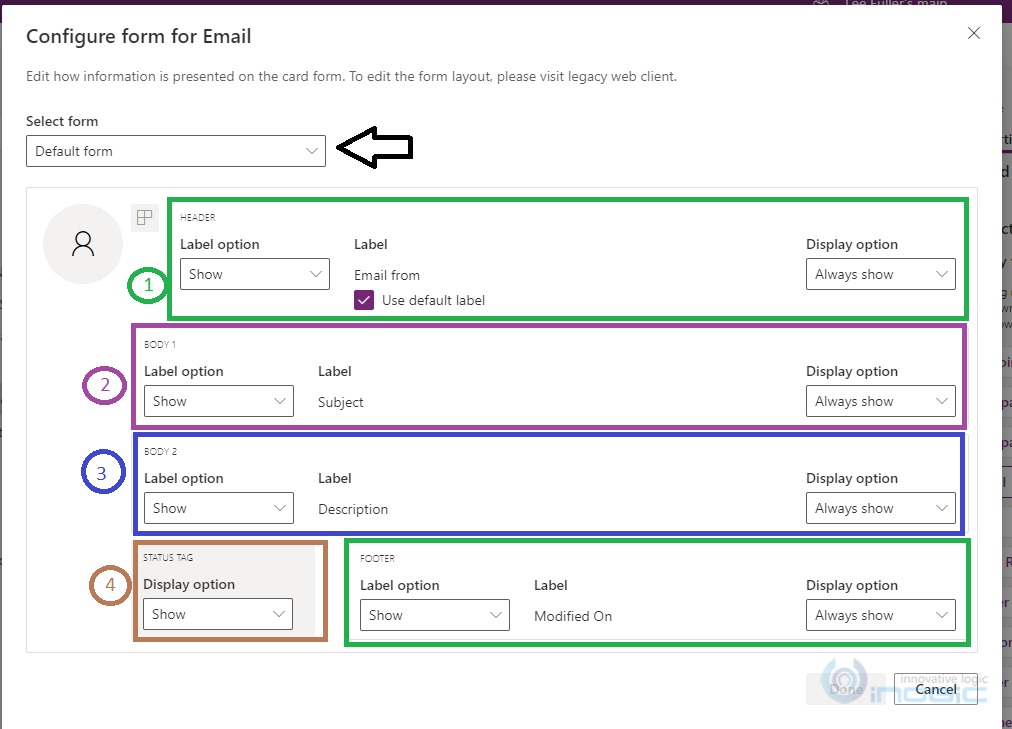
3. When you click on it, the Default form opens up with default setting as shown below:
4. Now, let us configure the above Default form to incorporate the customer request as stated above.
5. On “Default form”, below fields “Label option” and “Display option” are configured to match the above customer need:
HEADER: Uncheck the “Use default label” checkbox to show “From” as label in the header.
Note: If the “Use default label” checkbox is checked “Email From” label is displayed in the header and vice versa.
BODY1: To hide “Subject” label, select “Label option” dropdown option as Hide.
BODY2: To hide “Description” label, select “Label option” dropdown option as Hide. And to hide “Description” field value and show it after expanding, select the “Display option” dropdown as Show on expand.
STATUS TAG: To hide “Status”, select “Display option” dropdown option as
FOOTER: To hide “Modified On” label and show after mouse hover, select the “Label option” dropdown as Show on hover.
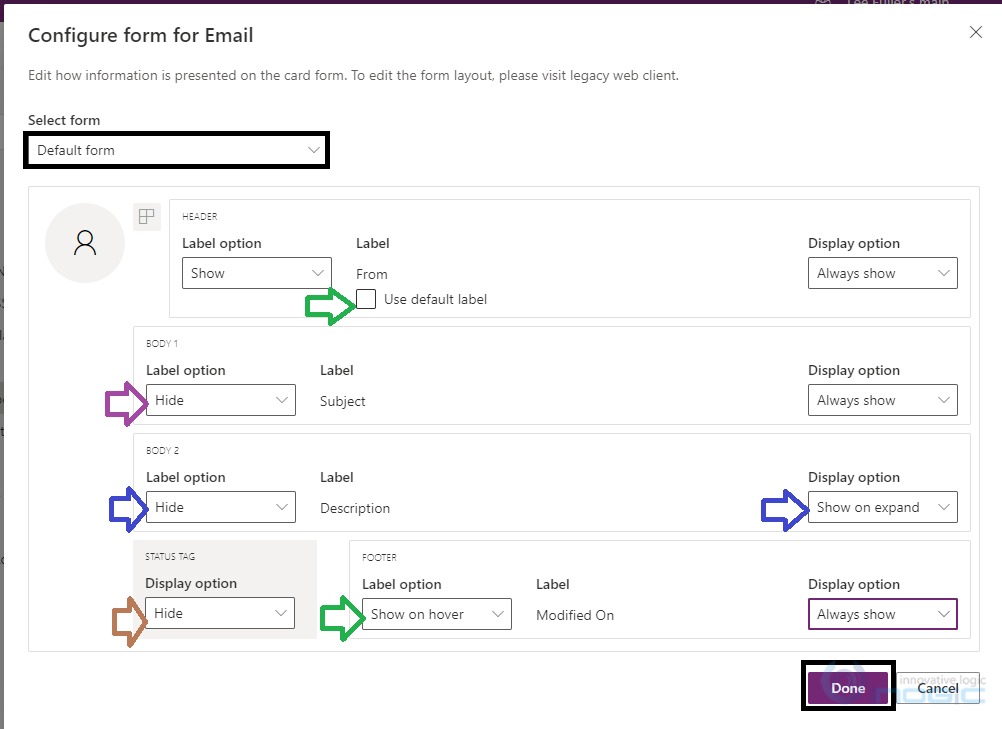
Once done with the above configuration, click on the “Done” button. Once you save and publish it, you will observe the changes in the timeline as below:

You can refer the above screenshot where post configuration you can observe below changes in the timeline:
1. Header label changed to “From”.
2. “Subject” label is hidden from the Body1 and only “Subject” field data is shown.
3. After expanding you will observe “Description” label is hidden and only “Description” field data is shown in the Body2 as shown below:
4. Notice that Status is hidden and moreover by hovering mouse on the Footer you will observe “Modified On” label shown as shown below:

Email Card form configuration:
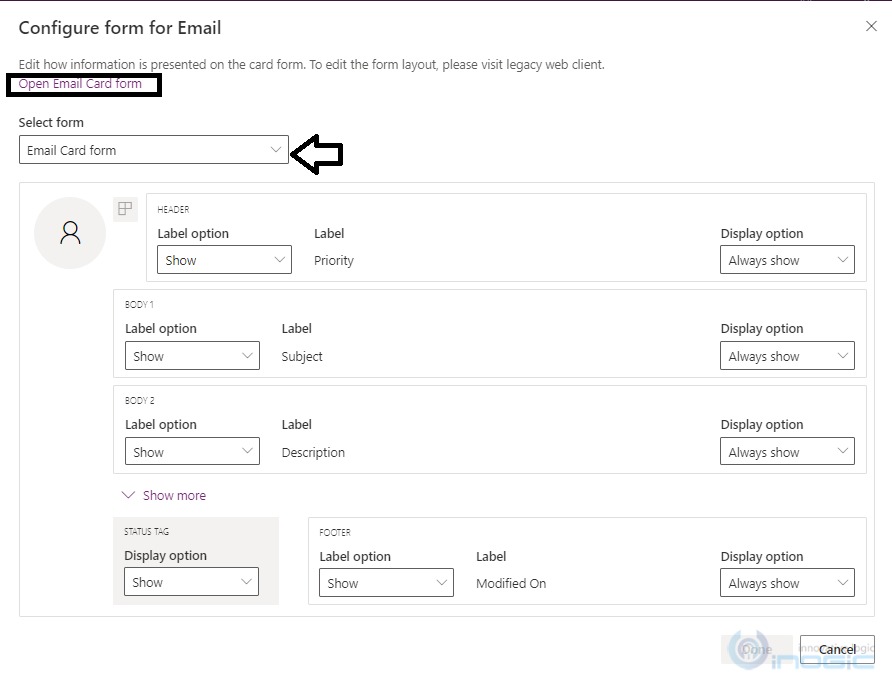
Similar to the “Default form” configuration explained above, there is facility to change the Default form to Email card form at any time. For this, there is a form switcher available as shown below:
Once you select the Email Card Form from the above form switcher, the fields are available for configuration are as per the Email card form. By clicking on “Open Email Card form” you will be navigated to the Email card form which you can customize as per your need.
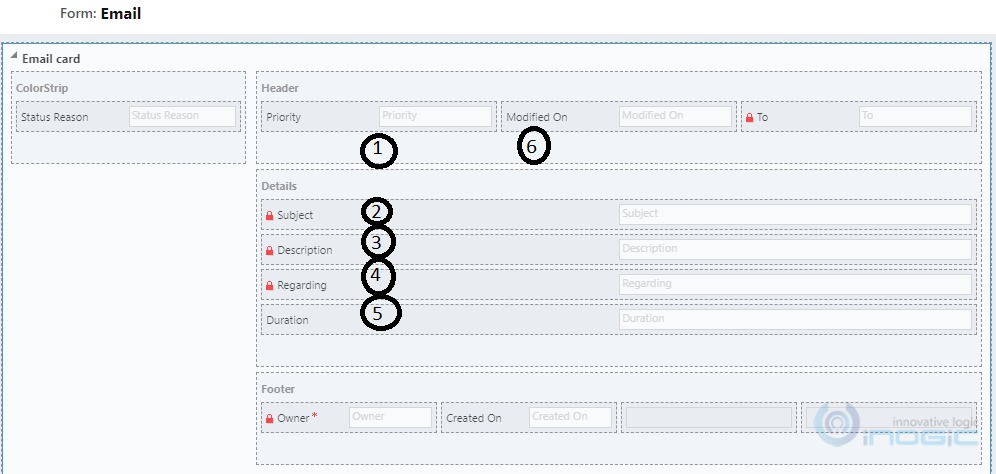
Email card form design available for customization appears as below:
Once you save and publish it, you will observe the changes in the timeline as per the card form as shown below:

NOTES:
- Some of the activity records have existing card forms (like Appointment, Email, Case Resolution, Phone call, Service Activity, Social Activity, Task, Conversation, Outbound message, Session, Customer voice alert, Customer voice survey Invite, Customer voice survey response). You can either edit the existing card form or you can create your custom card and use the same.
- The ColorStrip and Footer section of the Card form does not appear on the timeline record.
- From the header section of the card form only the first two fields will be seen on the timeline record.
Conclusion:
With the help of this enhanced timeline configuration, we can easily show and hide the timeline activities information which will ultimately deliver a more personalized experience while displaying bulk activity records in the timeline.
Save 1-2 hours or $800 monthly on scheduling and managing business travel with a geo-mapping App!
Maplytics – Integrate Map with Dynamics 365 CRM and visualize data on the map, manage sales territories, auto-schedule appointments, get optimized travel routes, track field reps in real-time, and more
Sorry, after following your procedure, I was able to hide the label in Card form too. Thank you so much