 We spend a lot of time working inside Dynamics 365 CRM forms. Accounts, Opportunities, Cases and other commonly used entities. One area that always had room for improvement was how data gets presented within those forms. For example, if a sales manager wants to see the pipeline breakdown for a specific Account, they typically have to switch to a dashboard or open Power BI. If they need a sales proposal for an Opportunity, it has to be created manually outside the record. All of this happens outside the context of the record they are already working in.
This led us to explore better approaches, and that is when we came across the Code Interpreter PCF control. The idea was simple: the form itself could generate that content on the fly. Not a static chart, not a pre-built template, but something that pulls live CRM data, reasons over it, and renders the output right there inside the form. We tested this across two scenarios: an interactive Opportunity Pipeline chart on the Account form, and an AI-generated Sales Proposal PDF on the Opportunity form. This blog walks through both scenarios end to end.
What Is the Code Interpreter in the Power Platform Context?
Before moving forward with the build, it is worth clarifying what ‘Code Interpreter’ means here, as the term is often used loosely.
In the Power Platform world, Code Interpreter is a capability that can be enabled on prompts created through AI Hub or Copilot Studio. When enabled, it allows the prompt to dynamically generate and run Python code on the server side for tasks like data analysis, chart generation, and document creation. Depending on what the Python code produces, the prompt can return either text, such as raw HTML, or files like PDFs or Word documents.
What Microsoft released as a sample is a PCF (Power Apps Component Framework) field control that acts as the front-end consumer of those prompts. It sits on a Model-Driven App form, calls the Dataverse Predict API against the configured prompt, and renders the response, whether that is an interactive HTML chart or a downloadable PDF.
Note: The key architectural point here is separation of concerns: the PCF control handles rendering; the prompt handles intelligence. You do not need to modify the You do not need to modify the PCF code to switch between generating charts and documents. The same control adapts dynamically based on what the prompt returns.
The Two Scenarios We Built
We wanted to test both output paths the PCF supports, so we set up two concrete use cases:
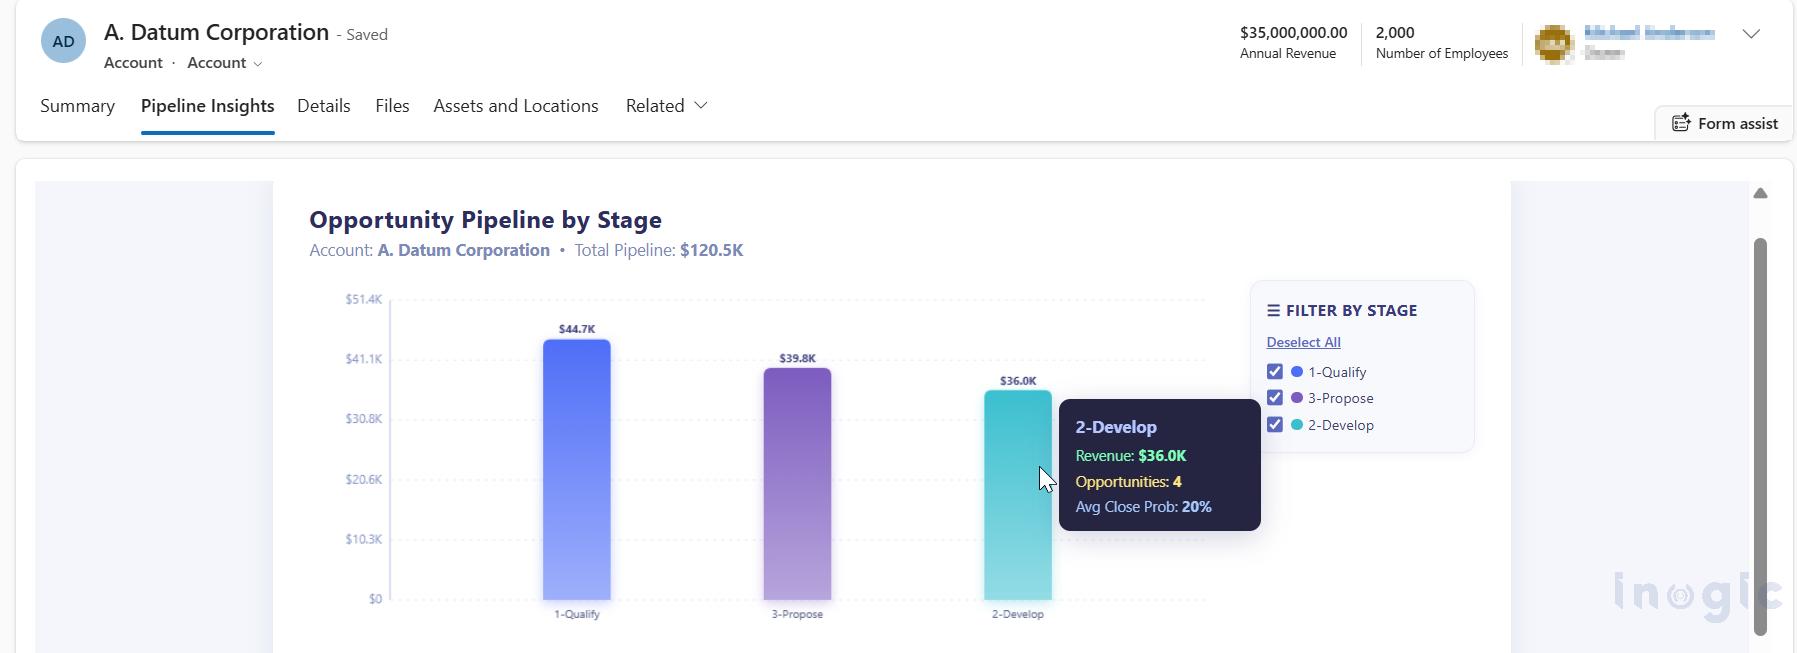
Scenario 1 Pipeline Chart on the Account Form: When a user opens an Account record with related Opportunities, the control fetches those Opportunities, groups them by sales stage, and renders an interactive bar chart with hover tooltips and stage-level filtering all inline on the form.
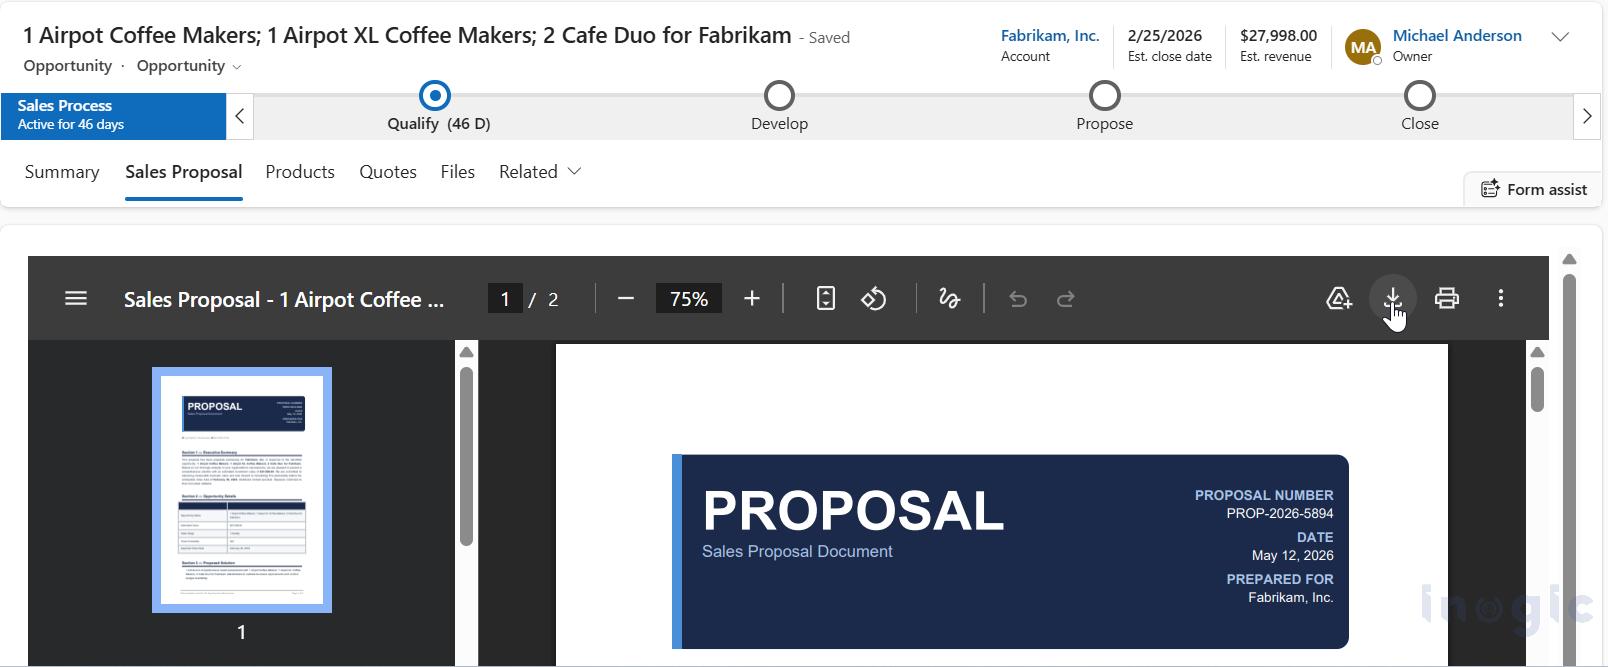
Scenario 2 Sales Proposal PDF on the Opportunity Form: When a user opens an Opportunity, the control generates a professional PDF proposal pulling details like estimated revenue, close probability, and the parent Account’s information. The PDF renders as an embedded preview with a download button, right inside the form.
Both scenarios share the same PCF control code. The only difference is which prompt and therefore which AI Model GUID is wired up on each form.
Prerequisites
Before starting, make sure these are in place:
- Code Interpreter enabled at the environment level: Power Platform Admin Center → Copilot → Settings → turn on Code generation and execution in Copilot Studio.
- AI Builder capacity: The Predict API consumes AI Builder credits. If you run out, you will hit a 403 EntitlementNotAvailable Make sure you have sufficient credits available before proceeding further.
- js and PAC CLI: Both needed to build and deploy the PCF control. Run pac auth create to connect your CLI to the target environment.
- Dataverse connector access: Your prompts query Dataverse tables (Opportunity, Account), so the connector needs to be added in the prompt configuration.
Scenario 1: Interactive Pipeline Chart on the Account Form
Step 1: Create the Prompt
Navigate to make.powerapps.com → your environment → AI Hub → Prompts → Create a custom prompt.
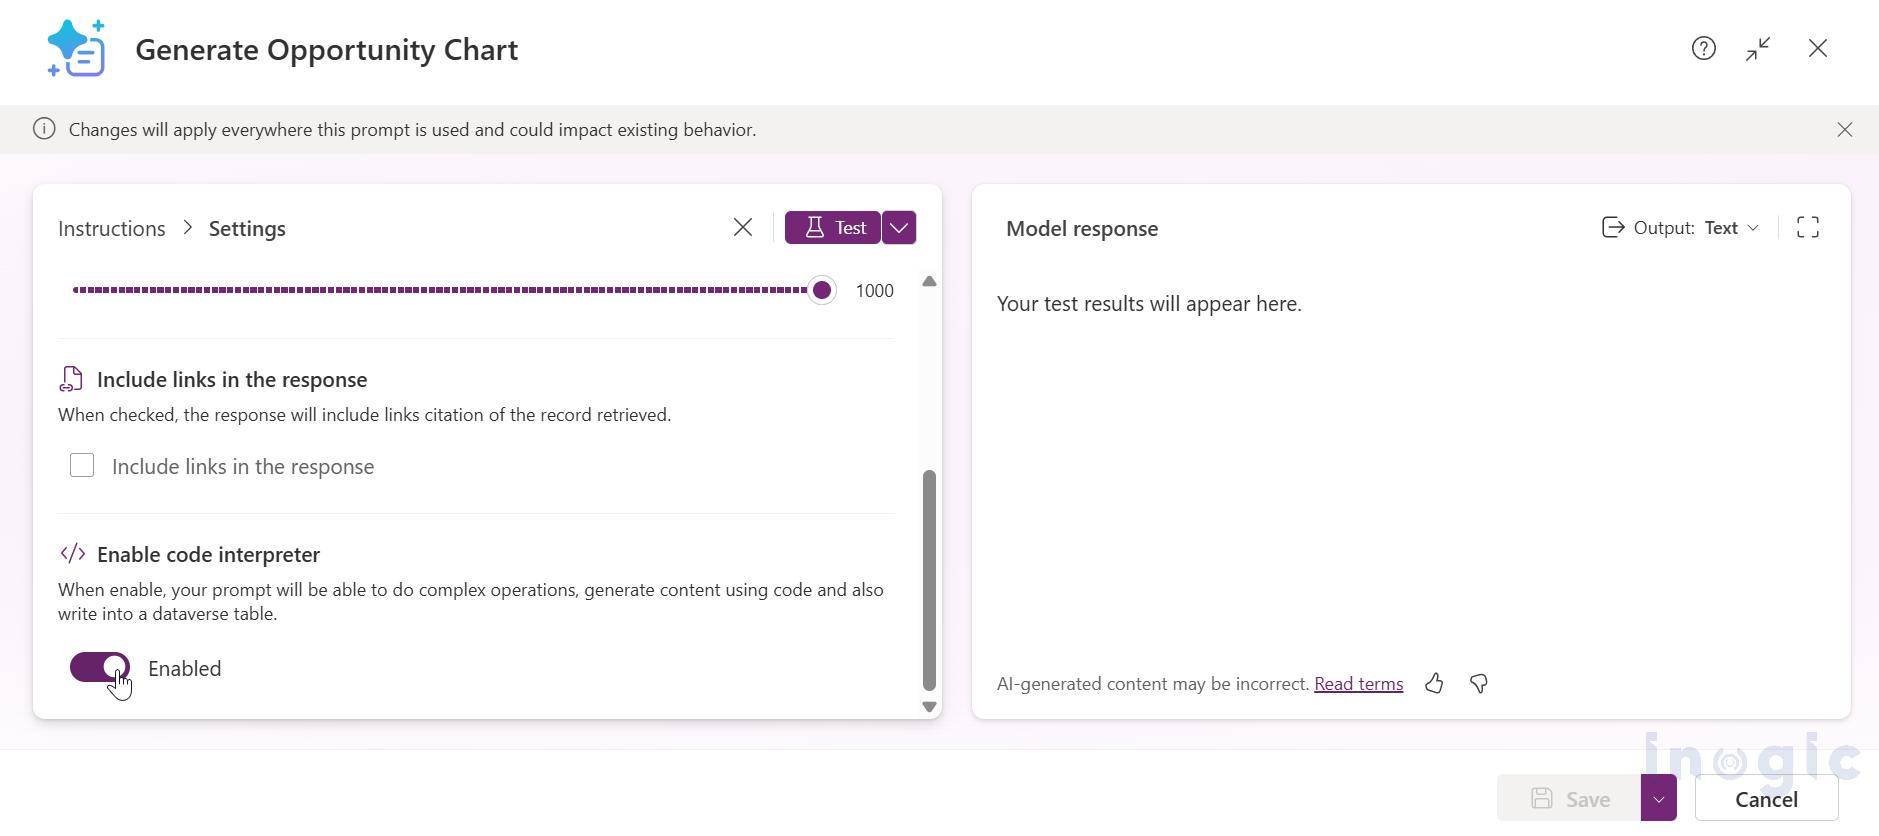
Name it something like “Generate Opportunity Chart” and toggle Code Interpreter ON in the prompt settings as shown in the image below.
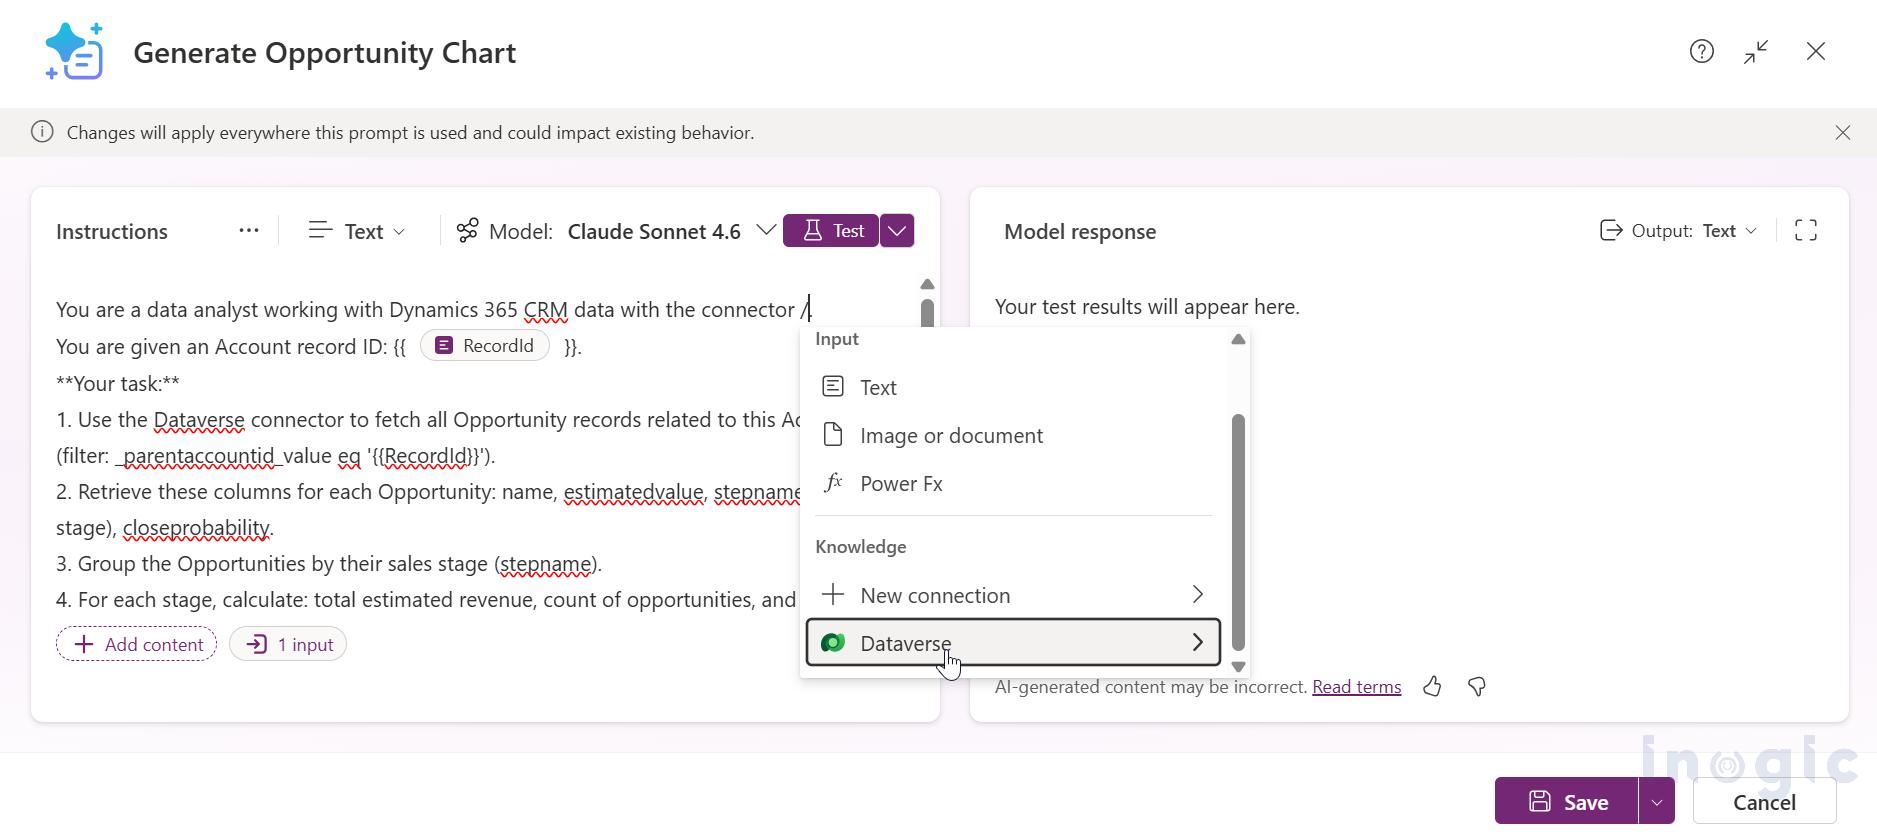
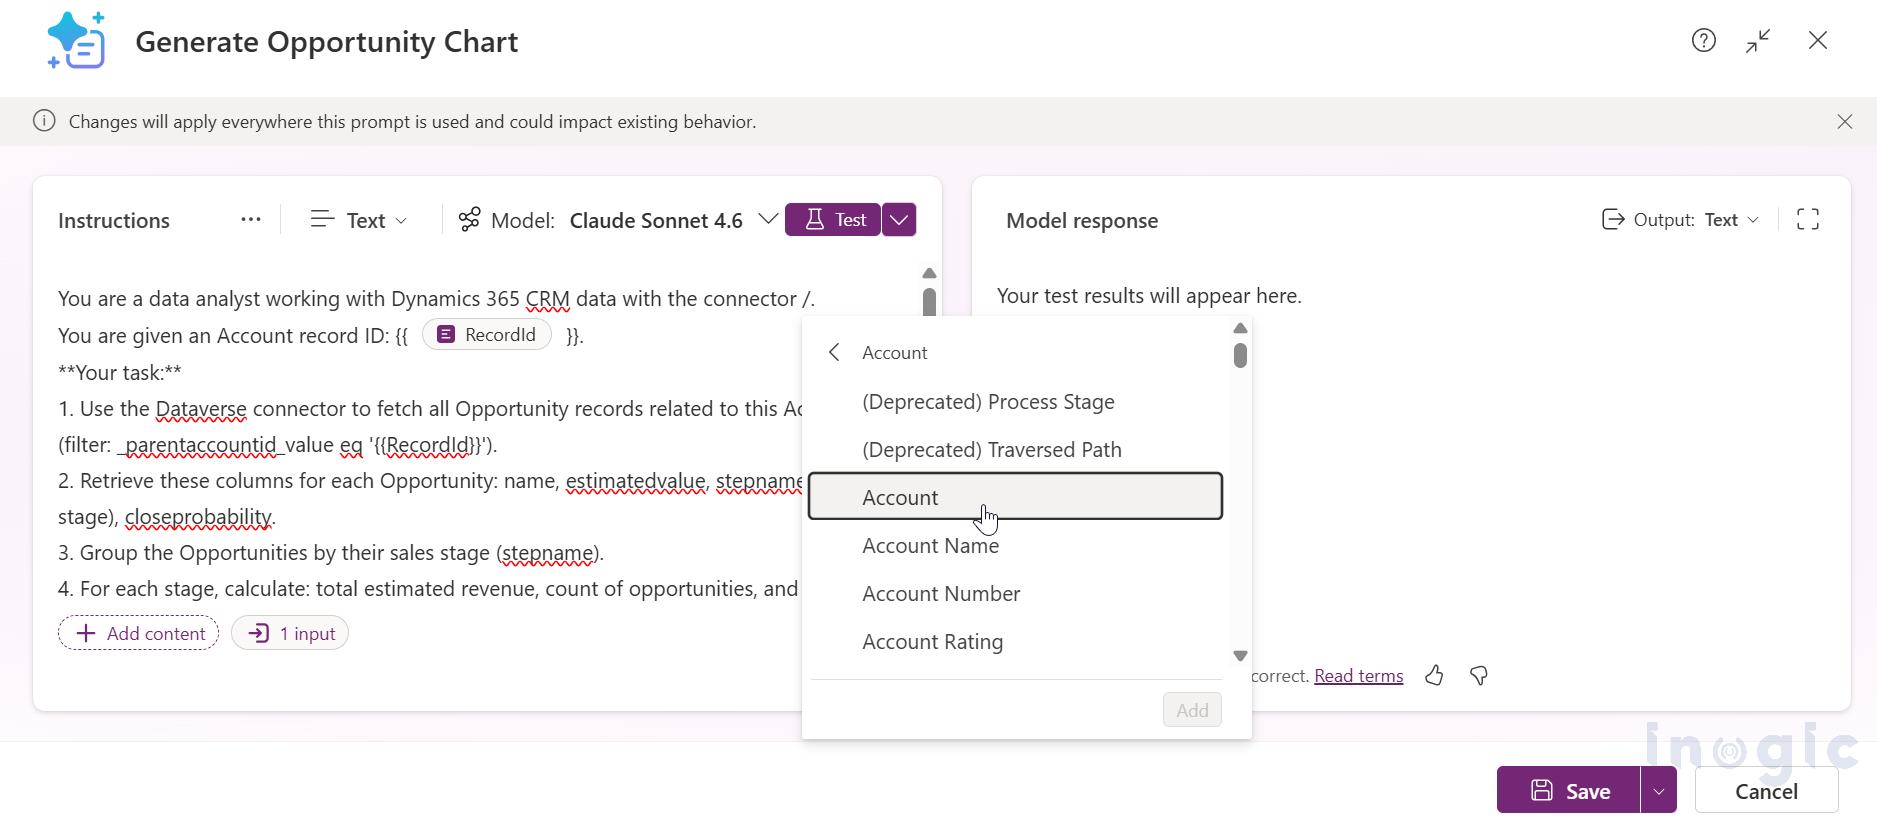
Add Dataverse connectors for the Opportunity and Account tables, as the prompt needs access to both. To add a Dataverse connector, navigate to the input section and select Dataverse as the knowledge source. From there, select the relevant entity and choose any field from it to establish the connection. In this case, the Account entity is selected with one of its fields, as shown in the images below.
Here’s the prompt we used:
You are a data analyst working with Dynamics 365 CRM data.
You are given an Account record ID: {{ RecordId }}.
Your task:
1. Use the Dataverse connector to fetch all Opportunity records related
to this Account (filter: _parentaccountid_value eq '{{RecordId}}').
2. Retrieve these columns: name, estimatedvalue, stepname (sales stage),
closeprobability.
3. Group the Opportunities by their sales stage (stepname).
4. For each stage, calculate: total estimated revenue, count of opportunities,
and average close probability.
Your output:
Generate a complete, self-contained HTML page with an interactive chart.
Requirements:
- Use inline JavaScript and CSS only. No external CDN or library references.
- Draw a bar chart using HTML5 Canvas or pure SVG showing each sales stage
on the X-axis and total estimated revenue on the Y-axis.
- Use a modern color palette (gradient blues/purples). Add rounded bar corners.
- On hover, show a tooltip with: stage name, total revenue (currency formatted),
number of opportunities, and average close probability as percentage.
- Include title: "Opportunity Pipeline by Stage" and subtitle with Account name
and total pipeline value.
- Add smooth fade-in animation on page load.
- Make it responsive to fit any container width.
The Record ID here is coming dynamically from the PCF control. To handle that, go to the input section, select Text and rename that field to RecordId.
Why force inline HTML instead of an image? Because the PCF control injects the response directly into an iframe via srcdoc, all interactivity works out of the box. Hover effects, tooltips, and animations run natively inside it. If the prompt returns a PNG instead, all of that is lost.
Step 2: Get the AI Model GUID
Every prompt in AI Hub creates a corresponding record in the msdyn_aimodel Dataverse table. The PCF control needs this GUID to know which prompt to call.
Run this in your browser (replace with your org URL):
https://[your-org].crm.dynamics.com/api/data/v9.2/msdyn_aimodels
?$filter=msdyn_name eq 'Generate Opportunity Chart'
&$select=msdyn_aimodelid,msdyn_name

Copy the msdyn_aimodelid value from the response.
Step 3: Build and Deploy the PCF Control
Option 1 — Use the Microsoft Sample: Clone the ready-made sample directly from GitHub: https://github.com/microsoft/PowerApps-Samples/tree/master/component-framework/CodeInterpreterControl.
This gives you the complete PCF project with all the rendering logic already built. No setup from scratch needed.
Option 2 — Create Your Own PCF Project: If you prefer to start fresh and build the control into an existing solution, initialize a new PCF project using:
pac pcf init –namespace YourNamespace –name CodeInterpreterControl –template field npm install
Then wire in the prompt call and rendering logic manually based on the sample as reference. For this blog, we are going with Option 1. Clone the sample and run:
cd CodeInterpreterControl

npm install

npm run build

pac pcf push --publisher-prefix <your-prefix>
The control gets pushed directly to your environment. No solution packaging needed for dev/testing.
Step 4: Configure on the Account Form
- Create a Single Line Text or Multi Line Text column on the Account table (e.g., chartoutput). This is just an anchor field the PCF doesn’t actually store data in it.
- Open the Account form in the form designer.
- Add the column to the form, then go to Properties → Components → Add Component → choose Code Interpreter Control.
- Set Model ID as a static value → paste the AI Model GUID.
- Set Record ID as a static value → enter 00000000-0000-0000-0000-000000000000 (we explain this below).
- Save and publish the form. Add the field to a dedicated tab we named it “Pipeline Insights”.
The Result
When a user opens an Account with related Opportunities, the control renders an interactive bar chart inline grouped by sales stage, with hover tooltips and filter checkboxes. No navigation away from the Account record as shown in the image below.
Scenario 2: PDF Sales Proposal on the Opportunity Form
Step 1: Create the Prompt
Same process new prompt, Code Interpreter ON, Dataverse connectors for Opportunity and Account tables.
Prompt name: “Generate Sales Proposal”:
You are a document specialist working with Dynamics 365 CRM data.
You are given an Opportunity record ID: {{ RecordId }}.
Your task:
1. Fetch the Opportunity record with this ID. Retrieve: name, estimatedvalue,
stepname, closeprobability, description, estimatedclosedate.
2. Fetch the related Account using _parentaccountid_value. Retrieve: name,
address1_city, address1_stateorprovince, telephone1, emailaddress1.
3. Generate a professional Sales Proposal PDF document with:
- Header: Styled "PROPOSAL" banner, current date, proposal number
(format: PROP-YYYY-XXXX).
- Section 1 Executive Summary: Professional paragraph covering the
opportunity, Account name, deal value, and expected close date.
- Section 2 Opportunity Details: Formatted table with name, estimated value,
sales stage, close probability, and expected close date.
- Section 3 Proposed Solution: 3-4 AI-generated recommendations relevant
to the opportunity.
- Section 4 Investment Summary: Pricing table with estimated value,
10% discount row, and final total.
- Section 5 Next Steps: 3 actionable steps based on the current sales stage.
- Footer: "Valid for 30 days" notice with page number.
Styling: Navy blue (#1B2A4A) headers, clean layout, professional fonts,
horizontal dividers between sections.
Output: Generate this as a PDF file. Return the PDF file as your output.
Step 2: Get Model GUID and Configure
Follow the same steps as Scenario 1. Query msdyn_aimodels to get the GUID for the “Generate Sales Proposal” prompt, add the PCF control to the Opportunity form’s “Sales Proposal” tab, and set the Model ID.
The Result
When a sales rep opens an Opportunity, the PDF proposal generates automatically with an embedded preview and a download button right on the form as shown in the image below.
Under the Hood: How the PCF Control Works
What makes this PCF control particularly interesting is that a single control handles both HTML rendering and file previews using a clean branching pattern. Here’s how the key files work
The Entry Point index.ts
The control’s lifecycle starts in init(), which calls loadContent():
private async loadContent(): Promise<void> {

this.uiManager.setContent("");

const validation = this.validationHandler.validateInputs();

if (!validation.isValid) {

this.uiManager.setContent(

this.errorHandler.createErrorHtml(validation.errorMessage!)

);

return;

}

this.uiManager.showSpinner();

try {

const response = await retrievePromptResponse({

baseUrl: validation.baseUrl!,

modelId: validation.modelId!,

requestInputs: { RecordId: validation.recordId! },

});

this.uiManager.hideSpinner();

await this.handleResponse(response);

} catch (error: unknown) {

this.uiManager.hideSpinner();

this.handleError(error);

}

}
The handleResponse method is where the branching happens:
private async handleResponse(data: RetrievePromptResponseOutput): Promise<void> {

if (data.error) {

const errorMessage = this.errorHandler.getErrorMessage(

data.error.status, data.error.message

);

this.uiManager.setContent(this.errorHandler.createErrorHtml(errorMessage));

return;

}

// File output takes priority

const file = data?.responsev2?.predictionOutput?.files?.[0];

if (file) {

await this.handleFileOutput(file);

return;

}

// Otherwise, render as text/HTML

this.handleTextOutput(data?.responsev2?.predictionOutput?.structuredOutput?.text);

}
Notice the priority: files first, then text. If the Code Interpreter generates a PDF (Scenario 2), the files array is populated and the control renders a preview. If it returns HTML (Scenario 1), structuredOutput.text carries the chart markup.
The API Layer: retrievePromptResponse.ts
This handles the actual HTTP call to the Dataverse Predict endpoint:
export async function retrievePromptResponse({

baseUrl,

modelId,

requestInputs,

}: RetrievePromptResponseInput): Promise<RetrievePromptResponseOutput> {

const url = `${baseUrl}/api/data/v9.0/msdyn_aimodels(${modelId})/Microsoft.Dynamics.CRM.Predict`;

const body = {

version: "2.0",

requestv2: {

"@odata.type": "#Microsoft.Dynamics.CRM.expando",

...requestInputs,

},

};

const response = await fetch(url, {

method: "POST",

headers: { "Content-Type": "application/json" },

body: JSON.stringify(body),

});

const data = (await response.json()) as RetrievePromptResponseOutput;

return data;

}
The endpoint follows the Dataverse bound action pattern: msdyn_aimodels({modelId})/Microsoft.Dynamics.CRM.Predict. The requestv2 body uses the expando OData type essentially an open dictionary so you can pass any key-value pairs your prompt expects. In our case, that’s RecordId.
File Handling: filePreviewHandler.ts
When the prompt returns a file (Scenario 2), this handler takes over:
public async generatePreview(

base64Content: string,

mimeType: string,

fileName: string

): Promise<FilePreviewResult> {

if (mimeType === "application/pdf") {

return this.generatePdfPreview(base64Content, fileName);

} else if (mimeType.includes("wordprocessingml") || mimeType.includes("msword")) {

return this.generateDocxPreview(base64Content, fileName);

} else if (mimeType.includes("spreadsheetml") || mimeType.includes("ms-excel")) {

return this.generateXlsxPreview(base64Content, fileName);

}

}
For PDFs it creates a blob URL from the base64 content and loads it in an iframe. For Word documents, mammoth converts .docx content to HTML. For Excel files, SheetJS (xlsx) handles the conversion. The control also generates a download button alongside the preview automatically.
UI Rendering: uiManager.ts
Text output (Scenario 1) goes through setContent(), which sets the srcdoc attribute on an iframe:
setContent(content: string): void {

if (!content) {

this.iframe.srcdoc = "";

return;

}

this.iframe.srcdoc = content;

}
This is what makes interactive charts possible. The entire HTML page with inline JavaScript, CSS animations, and event handlers runs inside a sandboxed iframe. Hover effects, filter toggles everything works because it’s a living HTML page, not a static image.
A Practical Issue We Hit: Binding the Record ID
While setting up the control on the form, we noticed that the PCF manifest declares entityId (Record ID) as a SingleLine.Text input property. Since primary keys are GUID values, they do not appear in the text field dropdown during form configuration. when configuring the control on the form. To handle this, we made a small tweak in validationHandler.ts to directly read the record ID from the form context at runtime instead of relying on the bound field value:
let recordId = this.context.parameters.entityId.raw ?? "";

const dummyGuid = "00000000-0000-0000-0000-000000000000";

if (!recordId || !this.guidRegex.test(recordId) || recordId === dummyGuid) {

try {

const xrmPage = (Xrm as unknown as {

Page?: { data?: { entity?: { getId?: () => string } } }

})?.Page;

const xrmId = xrmPage?.data?.entity?.getId?.()

?.replace(/[{}]/g, "") ?? "";


if (xrmId && this.guidRegex.test(xrmId)) {

recordId = xrmId;

} else {

errors.push(this.context.resources.getString("Error_RecordId_Required"));

}

} catch {

errors.push(this.context.resources.getString("Error_RecordId_Required"));

}

}
With this in place, you set Record ID to 00000000-0000-0000-0000-000000000000 in the form designer, and the control reads the actual record ID at runtime from Xrm.
Things to Keep in Mind
A few important observations from working with this setup in a live environment:
Response time varies: The Predict call involves server-side Python execution so expect 5–15 seconds depending on data volume and prompt complexity.
AI Builder capacity matters: Each Predict call consumes AI Builder credits. For a high-traffic org, this adds up. Monitor consumption in the Power Platform Admin Center.
Prompt engineering matters: Getting the chart to look right proper bar sizing, tooltip positioning, responsive layout took several iterations. The PCF code itself didn’t need changes; all the tuning was in the prompt text.
One PCF, multiple purposesThe same deployed control can support entirely different use cases simply by changing the Model ID and prompt configuration. Swap the Model ID on a different form, point it to a different prompt, and you get entirely different output. The control is genuinely scenario-agnostic.
Conclusion:
Through this implementation, we learned that the Code Interpreter PCF control is not just limited to charts or proposals. Any scenario where you need live, context-aware content generated directly on a Dynamics 365 form is a valid use case. Think case summaries on a Case record, contract drafts on a Quote record, or account health reports on an Account record. As long as the prompt has access to the right Dataverse tables and Code Interpreter is enabled, the same control can support completely different experiences simply by swapping the Model ID.