 Customer Insights – Journes Forms work well for capturing lead and contact information, but handling document uploads can require additional customization.
A common requirement is to let a visitor attach documents such as quotes, ID proofs, spreadsheets, or supporting files while submitting a form. Ideally, those files should remain associated with the original form submission and also be available directly on the related Contact or Lead record.
This article shows how to implement that workflow using a custom HTML file input, JavaScript, and two Power Automate flows.
The solution works in the following sequence:
- The user selects one or more files and submits the form.
- JavaScript captures the files after a successful form submission and sends their details to Power Automate.
- The first flow identifies the corresponding form submission and stores the uploaded files in Dataverse.
- The second flow retrieves those files and adds them to the related Contact or Lead timeline as notes.
The result is an end-to-end file upload workflow without building a custom plugin or relying on external file storage.
Now let’s build it, step by step.
Step 1: Add the File Upload Control to the Form
First, give the customer a way to attach files. Open your form in Customer Insights – Journeys > Forms. Switch to the HTML view and add a div and a script where you want the upload control to appear. In our scenario, we placed it just below the Email field.
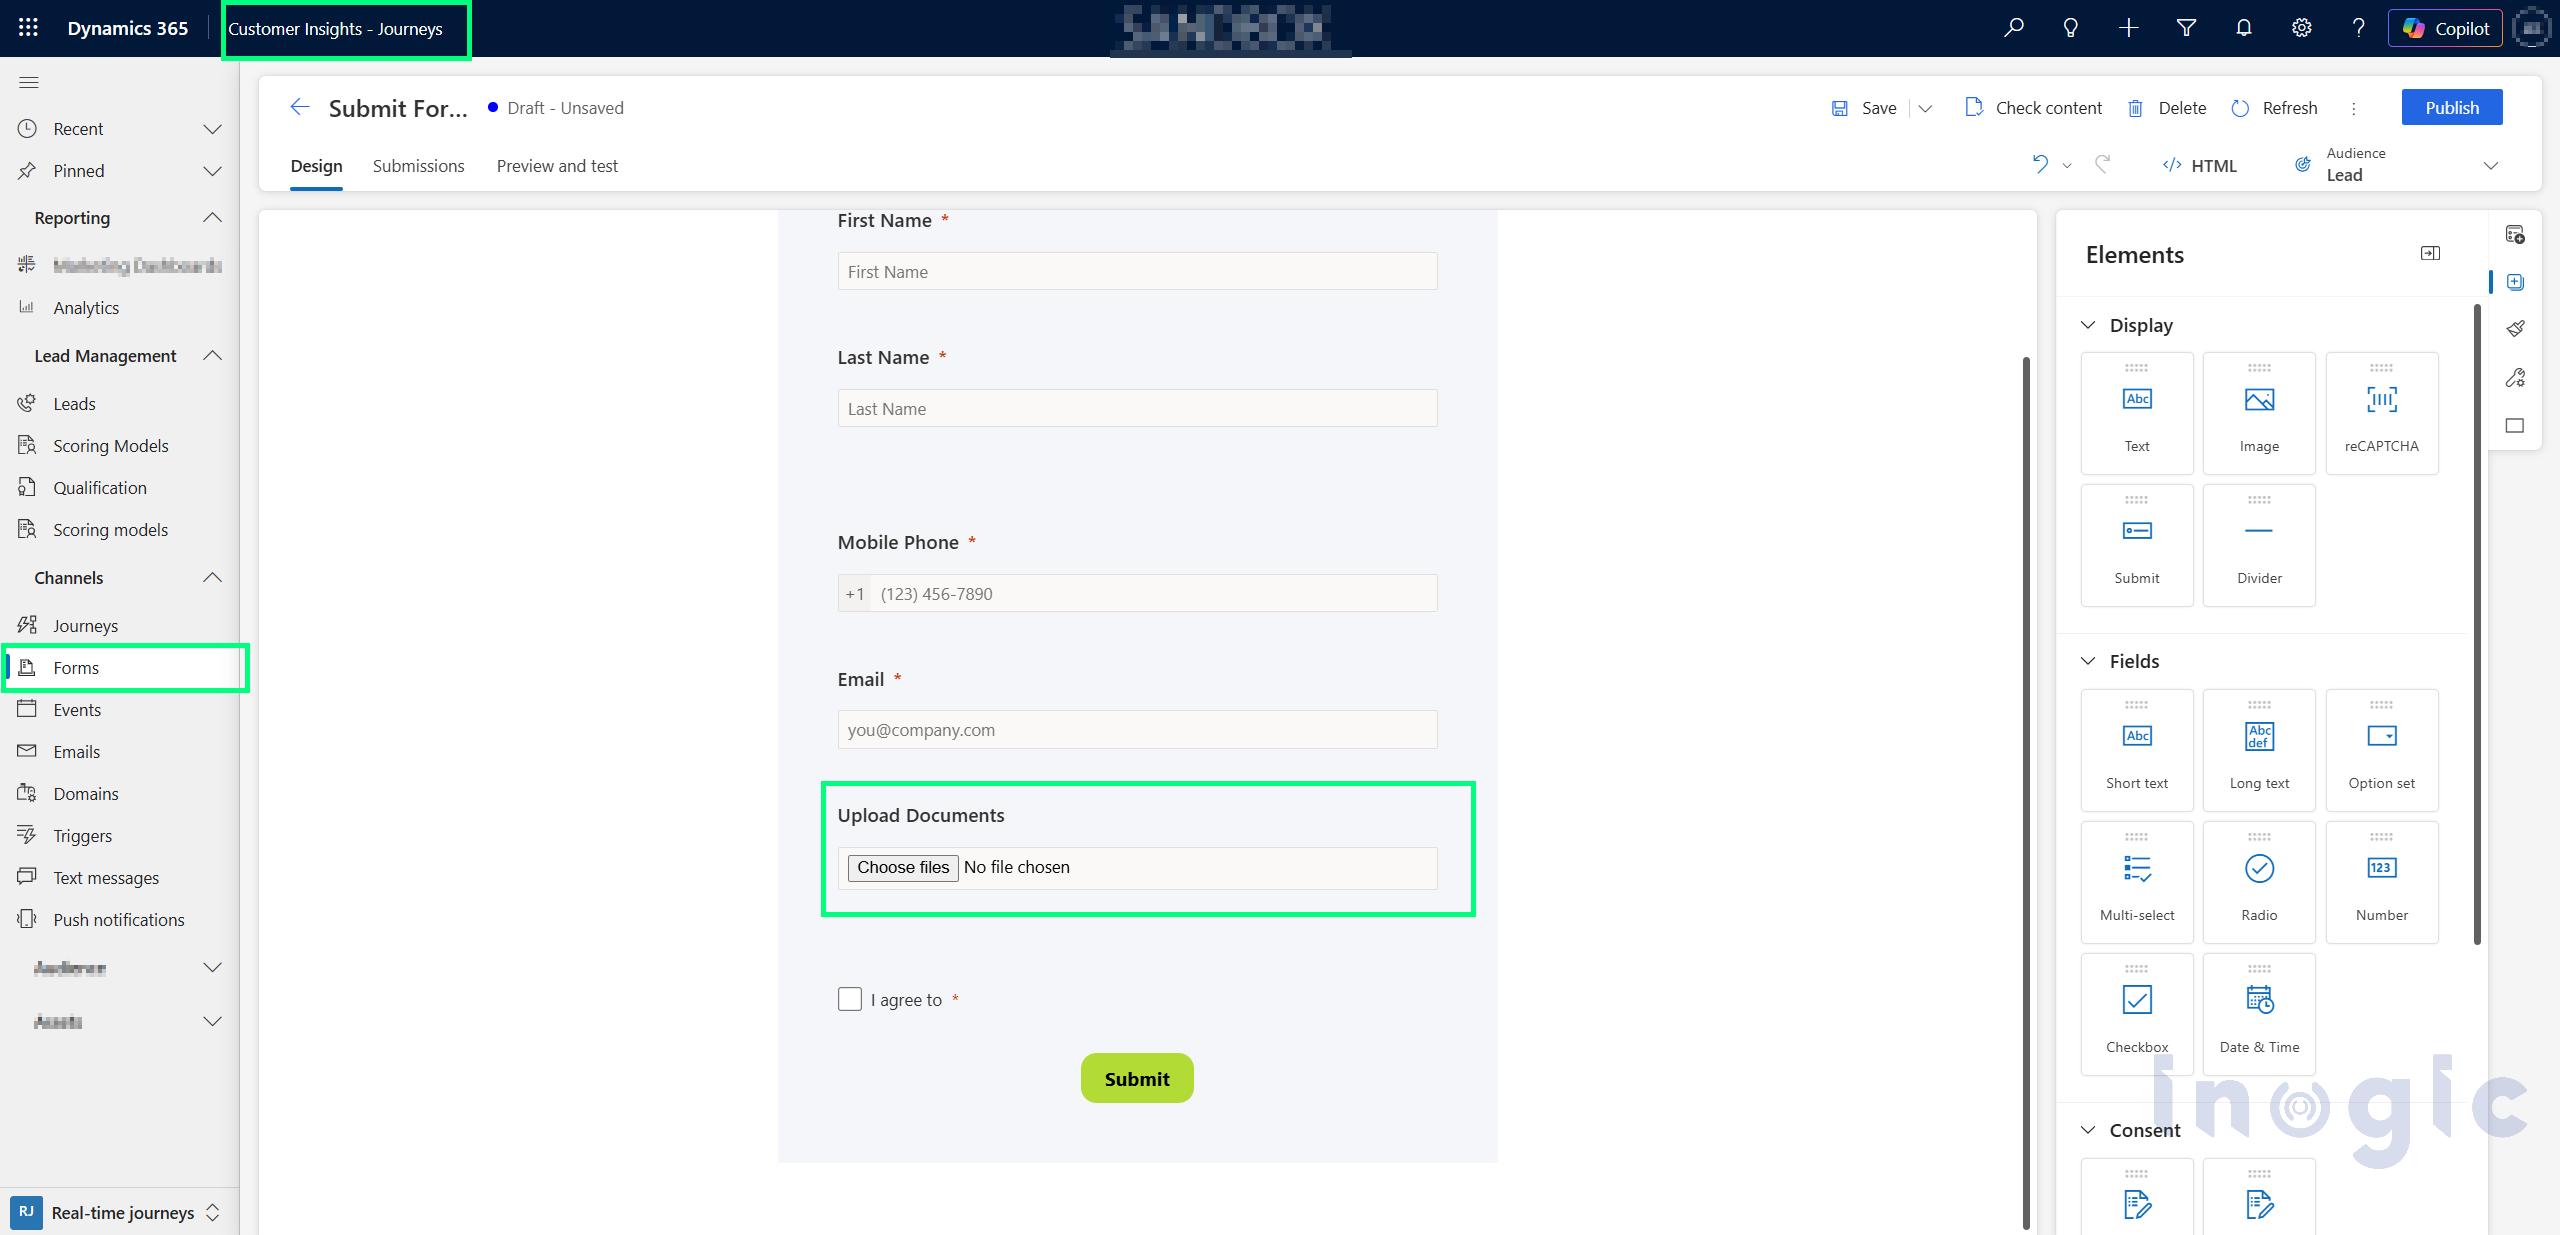
Form designer with the Upload Documents control added below the Email field
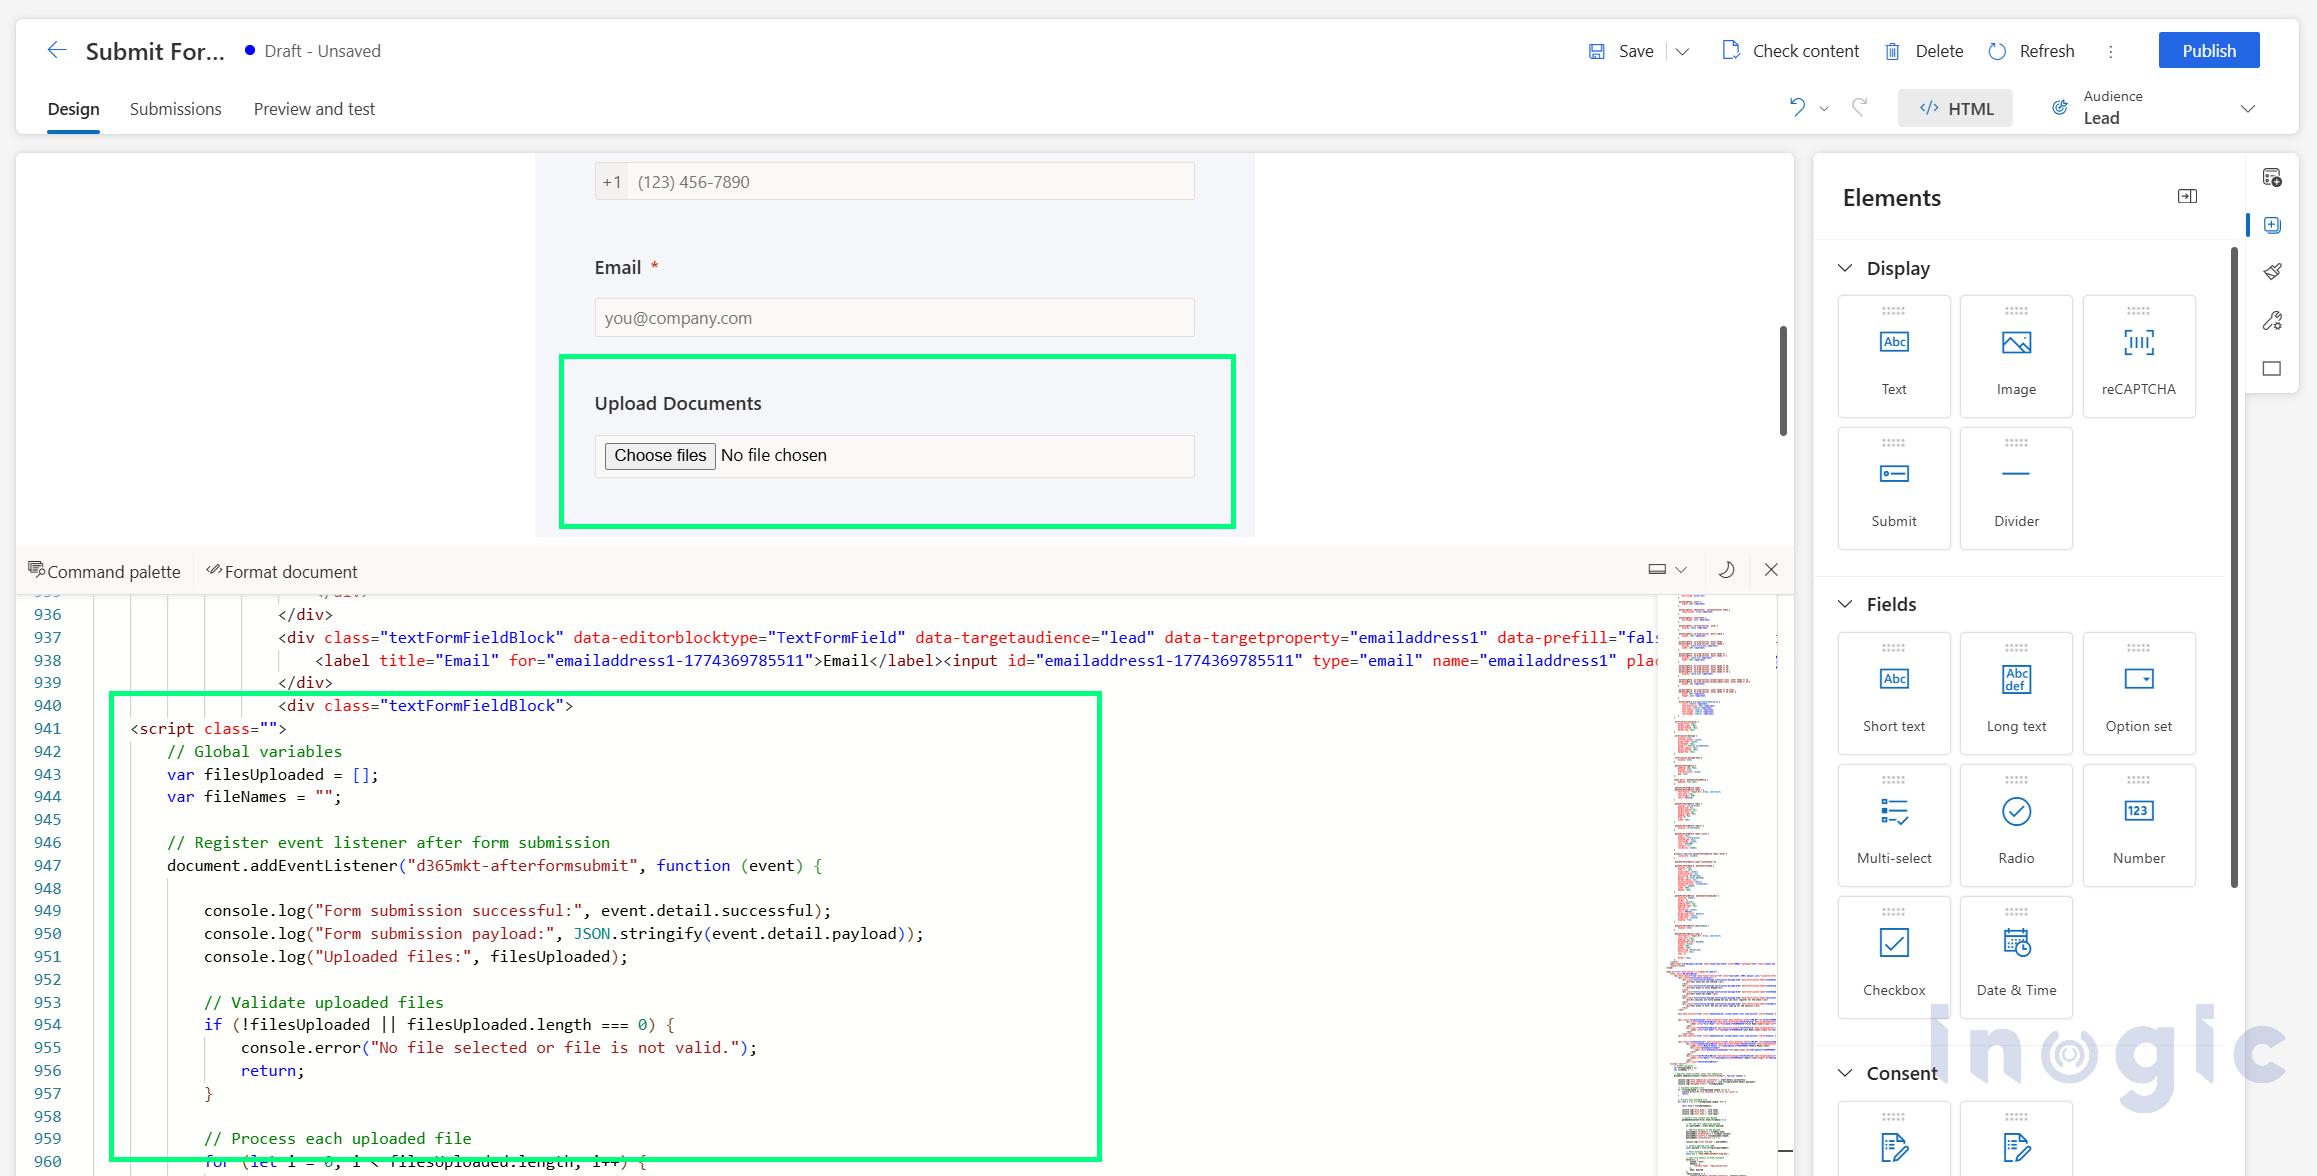
HTML view of the form with the script added
The HTML adds a standard file input that allows multiple files, plus a small area that lists the selected file names.
HTML – File Upload Control
<div class="textFormFieldBlock">

    <label title="Upload Documents" for="fileuploadform">

        Upload Documents

    </label>

    <input

        id="fileuploadform"

        type="file"

        multiple

        onchange="handleFileChange()"

    >

    <div id="fileList"></div>

</div>
The JavaScript does three jobs:
- Remembers the files the customer selected
- Waits for the form’s d365mkt-afterformsubmit event, so files are sent only after the submission succeeds
- Converts each file to Base64 and posts it, along with the form payload, to a Power Automate flow
JavaScript – Upload Multiple Files from a Dynamics 365 Marketing Form and Send Them to Power Automate
Replace YOUR_POWER_AUTOMATE_FLOW_URL with the HTTP POST URL you will get in Step 3.
// Global variables

var filesUploaded = [];

var fileNames = "";


// Register event listener after form submission

document.addEventListener("d365mkt-afterformsubmit", function (event) {


    console.log("Form submission successful:", event.detail.successful);

    console.log("Form submission payload:", JSON.stringify(event.detail.payload));

    console.log("Uploaded files:", filesUploaded);


    // Validate uploaded files

    if (!filesUploaded || filesUploaded.length === 0) {

        console.error("No file selected or file is not valid.");

        return;

    }


    // Process each uploaded file

    for (let i = 0; i < filesUploaded.length; i++) {


        const file = filesUploaded[i];


        // Convert file content into Base64

        getNameAndContent(file).then((fileData) => {


            // Get the form submission payload

            var payloadObj = event.detail.payload;


            // Add file details to the payload

            payloadObj["fileName"] = fileData.name;

            payloadObj["fileContent"] = fileData.content;

            payloadObj["count"] = filesUploaded.length;

            payloadObj["currentFile"] = i + 1;


            console.log("Final Payload:", payloadObj);


            // Convert payload into JSON

            const payload = JSON.stringify(payloadObj);


            // Power Automate Flow URL

            const url = "YOUR_POWER_AUTOMATE_FLOW_URL";


            // Send file details to Power Automate

            fetch(url, {

                method: "POST",

                headers: {

                    "Content-Type": "application/json"

                },

                body: payload

            })

            .then(response => {

                console.log("Power Automate response:", response.status);

            })

            .catch(error => {

                console.error("Error sending file to Power Automate:", error);

            });


        });

    }

});


// Function to convert file into Base64

async function getNameAndContent(file) {


    // Read file stream

    const fileStream = file.stream();

    const reader = fileStream.getReader();


    // Read file content

    const res = await reader.read();


    // Convert binary data into a string

    let fContent = "";


    res.value.forEach((byte) => {

        fContent += String.fromCharCode(byte);

    });


    // Encode file content into Base64

    fContent = btoa(fContent);


    console.log("Base64 Encoded File Content:", fContent);


    // Return file name and content

    const nameAndContent = {

        name: file.name,

        content: fContent

    };


    return nameAndContent;

}


// Function to handle file selection

function handleFileChange() {


    console.log("File selection changed.");


    // Get selected files

    let files = document.getElementById("fileuploadform").files;


    console.log("Selected files:", files);


    if (files) {


        filesUploaded = files;

        fileNames = "";


        // Collect selected file names

        for (let i = 0; i < files.length; i++) {

            fileNames += files[i].name + ", ";

        }


        // Remove trailing comma and space

        fileNames = fileNames.slice(0, -2);


        // Display selected file names

        document.getElementById("fileList").innerText =

            "Uploaded Files: " + fileNames;

    }

}
Step 2: Create the Fields to Store the Upload Details
Next, we need a place in Dataverse to keep track of the files.
On the Form Submission table, create two columns:
| Column | Type |
| Has Uploaded Files | Boolean (Yes/No) |
| Uploaded Files Count | Decimal |
On the Field Submission table, create one column to store each uploaded file:
| Column | Type |
| Uploaded File | File |
Step 3: Build the HTTP Trigger Flow That Receives the File
This is the flow that catches everything our script sends. Create an instant cloud flow with the trigger When an HTTP request is received and paste in the JSON schema below. Copy the HTTP POST URL that is generated and place it in the script from Step 1.
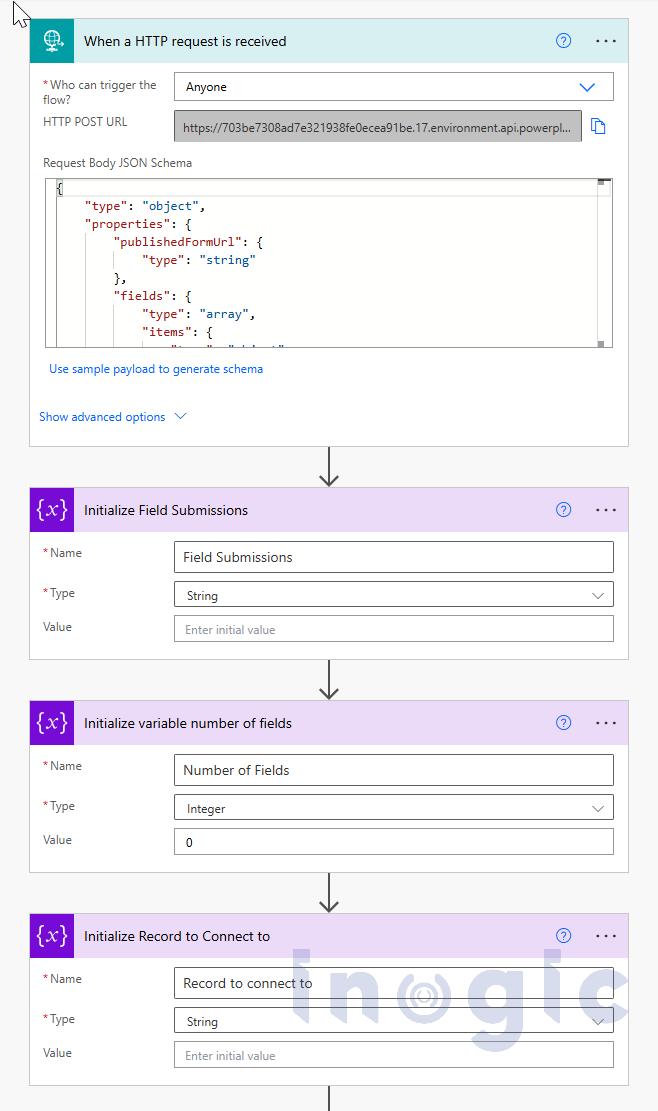
HTTP trigger with the variables initialised at the start of the flow
JSON Schema
{

    "type": "object",

    "properties": {

        "publishedFormUrl": {

            "type": "string"

        },

        "fields": {

            "type": "array",

            "items": {

                "type": "object",

                "properties": {

                    "key": {

                        "type": "string"

                    },

                    "value": {

                        "type": "string"

                    },

                    "details": {

                        "type": "string"

                    }

                },

                "required": [

                    "key",

                    "value"

                ]

            }

        },

        "fileName": {

            "type": "string"

        },

        "fileContent": {

            "type": "string"

        },

        "count": {

            "type": "integer"

        },

        "currentFile": {

            "type": "integer"

        }

    }

}
Here is what the flow does, in plain words:
- Finds the right submission. It runs a FetchXML query on the form submission table, matches the published form URL, and picks the latest one.
- Builds the field filter. For each field in the payload, it adds a link-entity condition (field name and value) so the correct submission is matched.
- Prepares the file. It converts the Base64 content into an application/octet-stream object.
- Checks the file number. On the first file, it updates the submission with Has Uploaded Files = Yes and the Uploaded Files Count.
- Saves the file. It creates a new Field Submission (name FileUpload, value = file name) and uploads the file into the Uploaded File column.
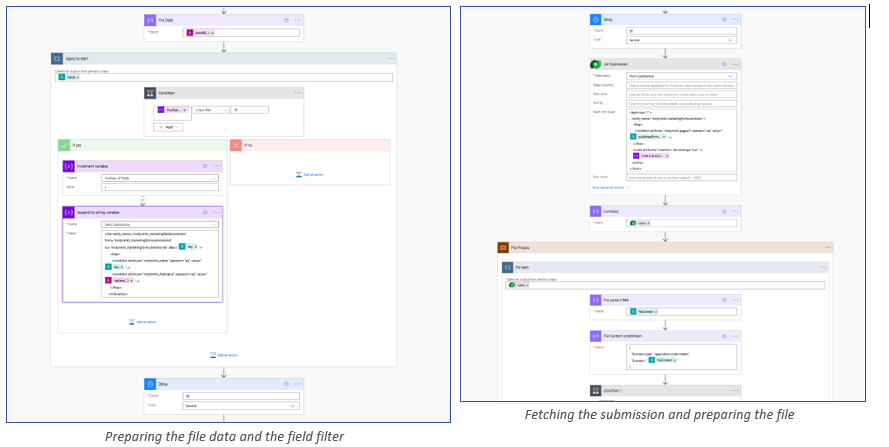
File data
base64(triggerBody()?['fileContent'])
Append to String Variable
<link-entity name="msdynmkt_marketingfieldsubmission" from="msdynmkt_marketingformsubmissionid" to="msdynmkt_marketingformsubmissionid" alias="@{items('Apply_to_each')?['key']}">
<filter>
<condition attribute="msdynmkt_name" operator="eq" value="@{items('Apply_to_each')?['key']}" />
<condition attribute="msdynmkt_fieldvalue" operator="eq" value="@{replace(
replace(
items('Apply_to_each')?['value'],
'&',
'&'
),
'"',
'"'
)}" />
</filter>
</link-entity>
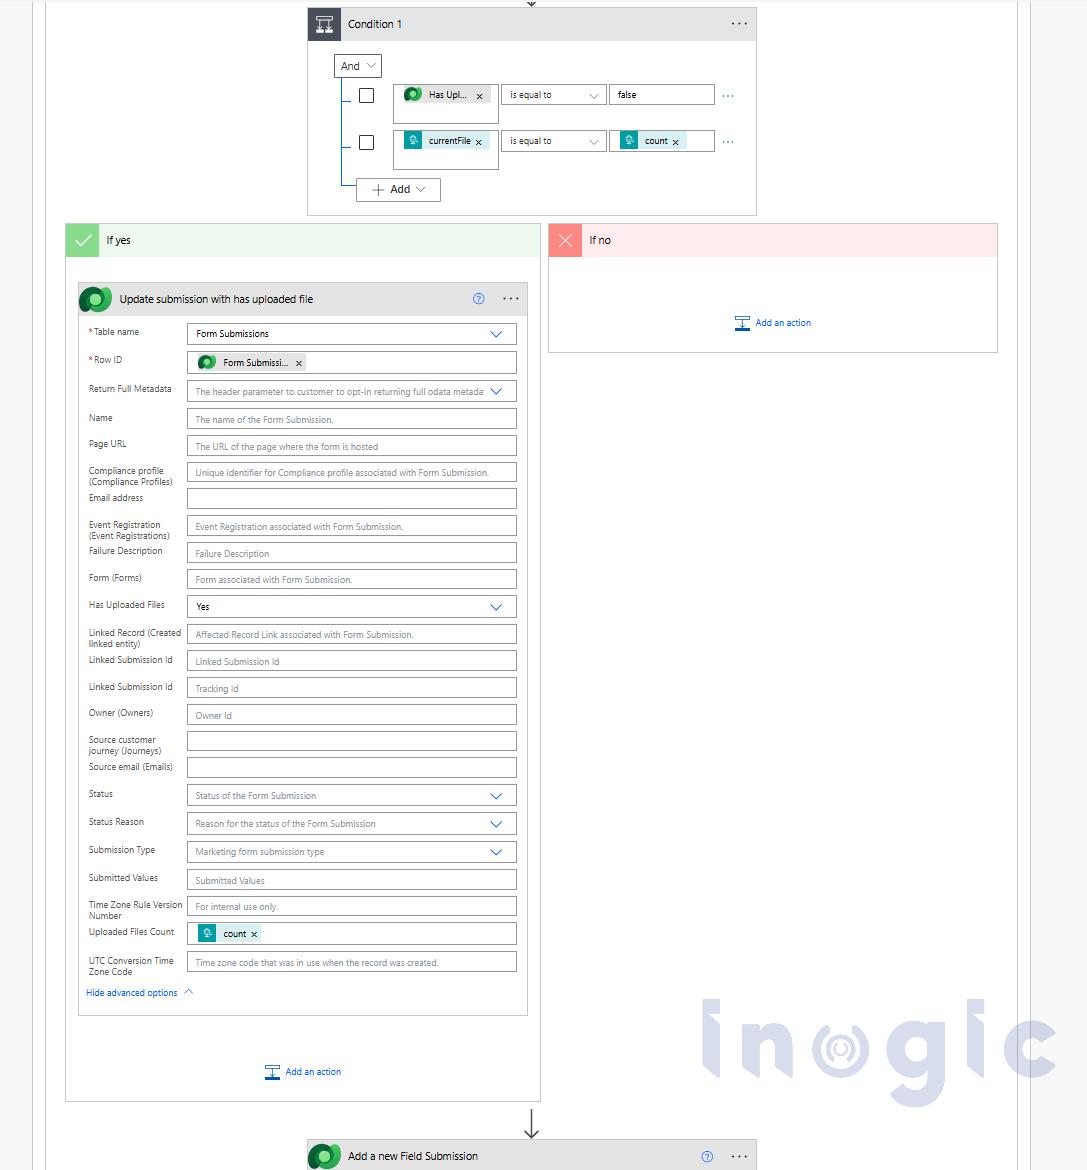
Condition and update of the submission
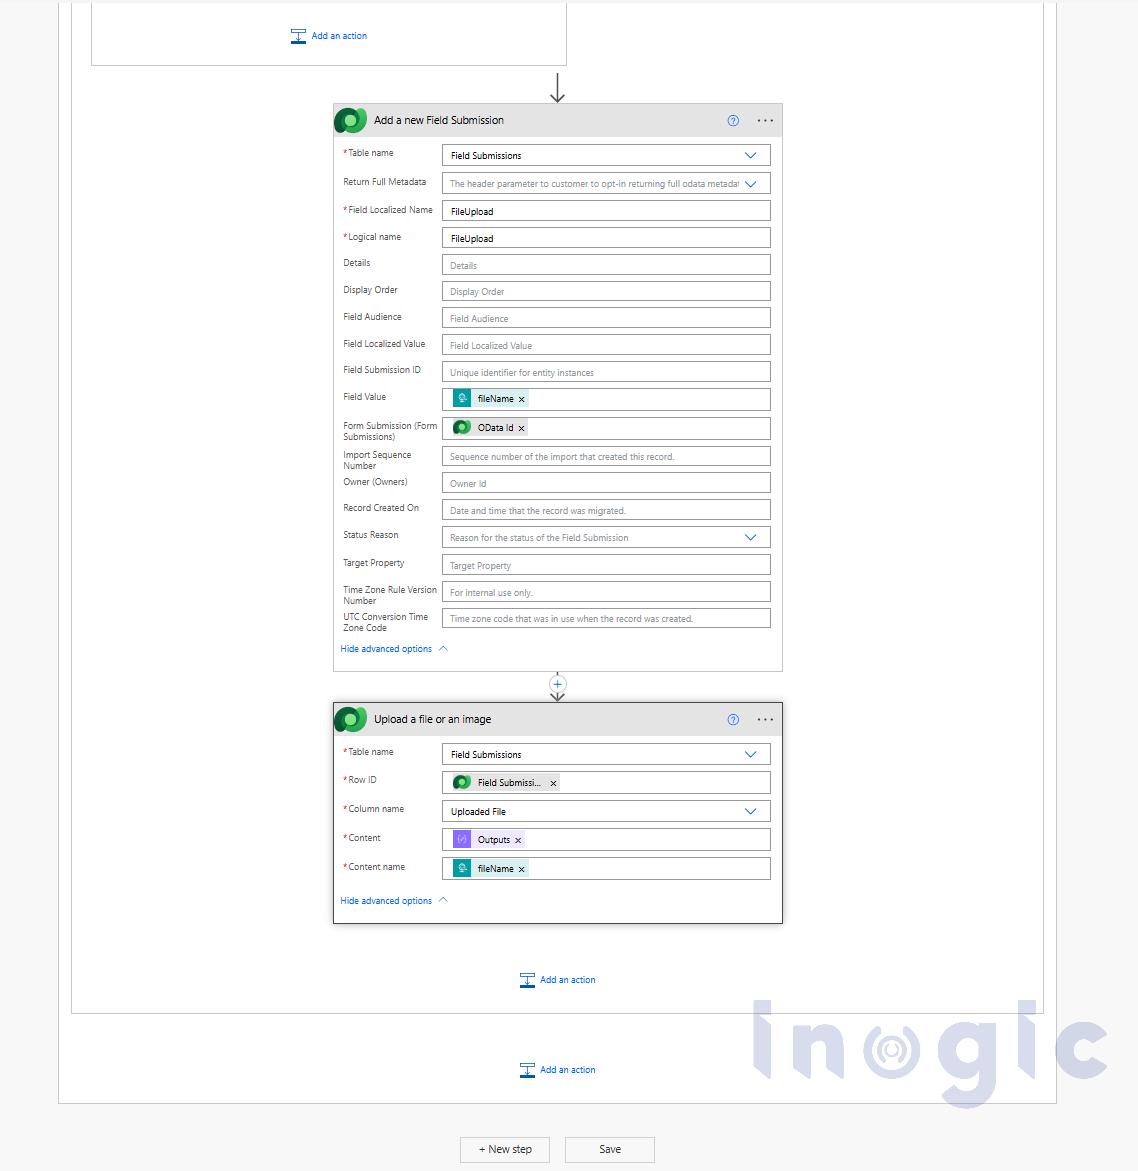
Creating the Field Submission and uploading the file
Update submission with has uploaded file
Row ID - @{items('For_each')?['msdynmkt_marketingformsubmissionid']}

Has Uploaded Files – Yes

Uploaded Files Count - @{triggerBody()?['count']}
Add a new Field Submission
Field Localized Name – FileUpload

Logical name – FileUpload

Field Value - @{triggerBody()?['fileName']}

Form Submission (Form Submissions) - @{items('For_each')?['@odata.id']}
Upload a file or an image
Row ID - @{outputs('Add_a_new_Field_Submission')?['body/msdynmkt_marketingfieldsubmissionid']}

Content - @{outputs('File_Content_octetstream')}

Content name - @{triggerBody()?['fileName']}
Once this flow runs, every uploaded file is saved as a Field Submission record linked to its form submission.
Step 4: Move the File to the Contact or Lead Timeline
The files are now in Dataverse, but your sales team lives on the Contact or Lead record. This second flow closes that gap. It triggers when a Field Submission record is created. 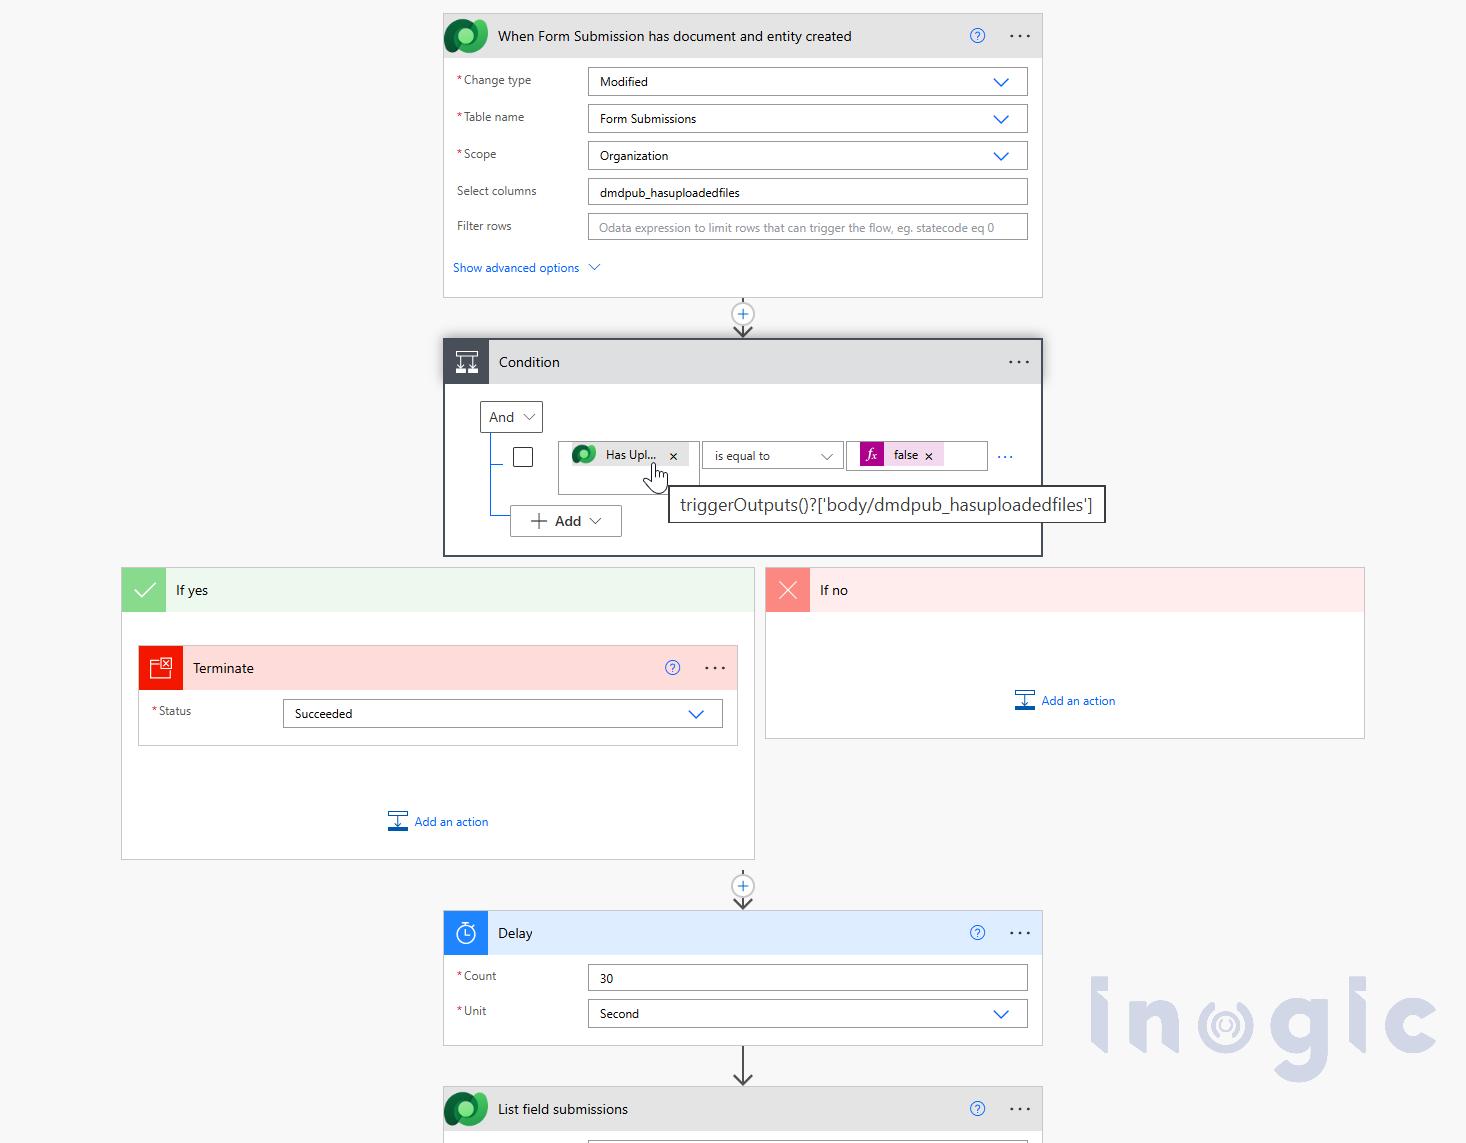
Second flow: trigger on Field Submission create
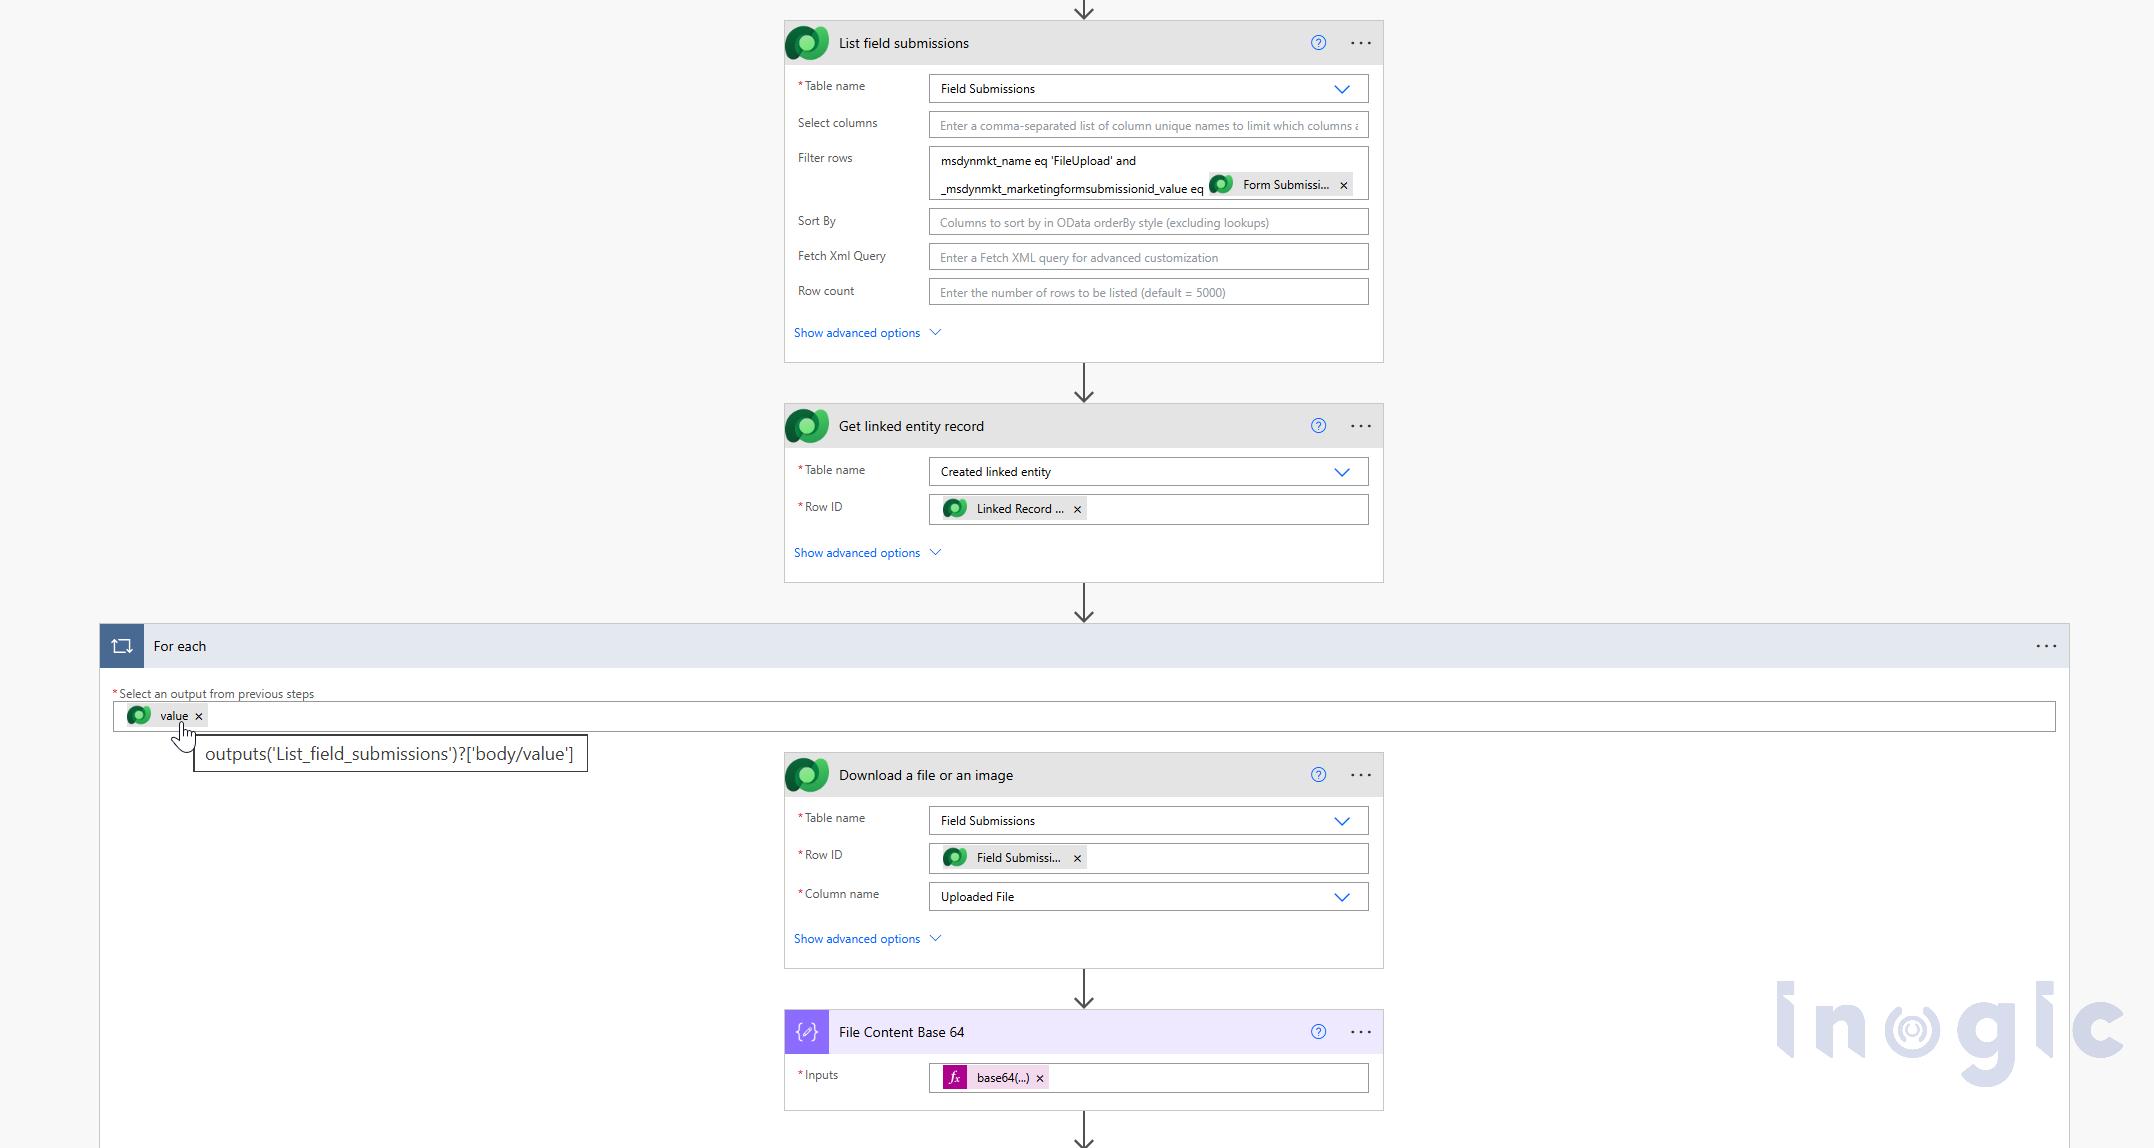
Listing field submissions of the same form submission
It then:
- Lists the field submissions where the name is FileUpload and which belong to the same form submission
- Gets the linked record using the target entity on the form submission
- Downloads the file and converts it to Base64
- Uses a Switch on the target entity, and adds a Note (title Uploaded Document, Is Document = Yes) against the Contact
List field submissions
Filter Row - msdynmkt_name eq 'FileUpload' and _msdynmkt_marketingformsubmissionid_value eq @{triggerOutputs()?['body/msdynmkt_marketingformsubmissionid']}
Get linked entity record
Row ID - @{triggerOutputs()?['body/_msdynmkt_createdentity_value']}
Download a file or an image
Row id - @{items('For_each')?['msdynmkt_marketingfieldsubmissionid']}
File Content Base 64
@{base64(body('Download_a_file_or_an_image'))}

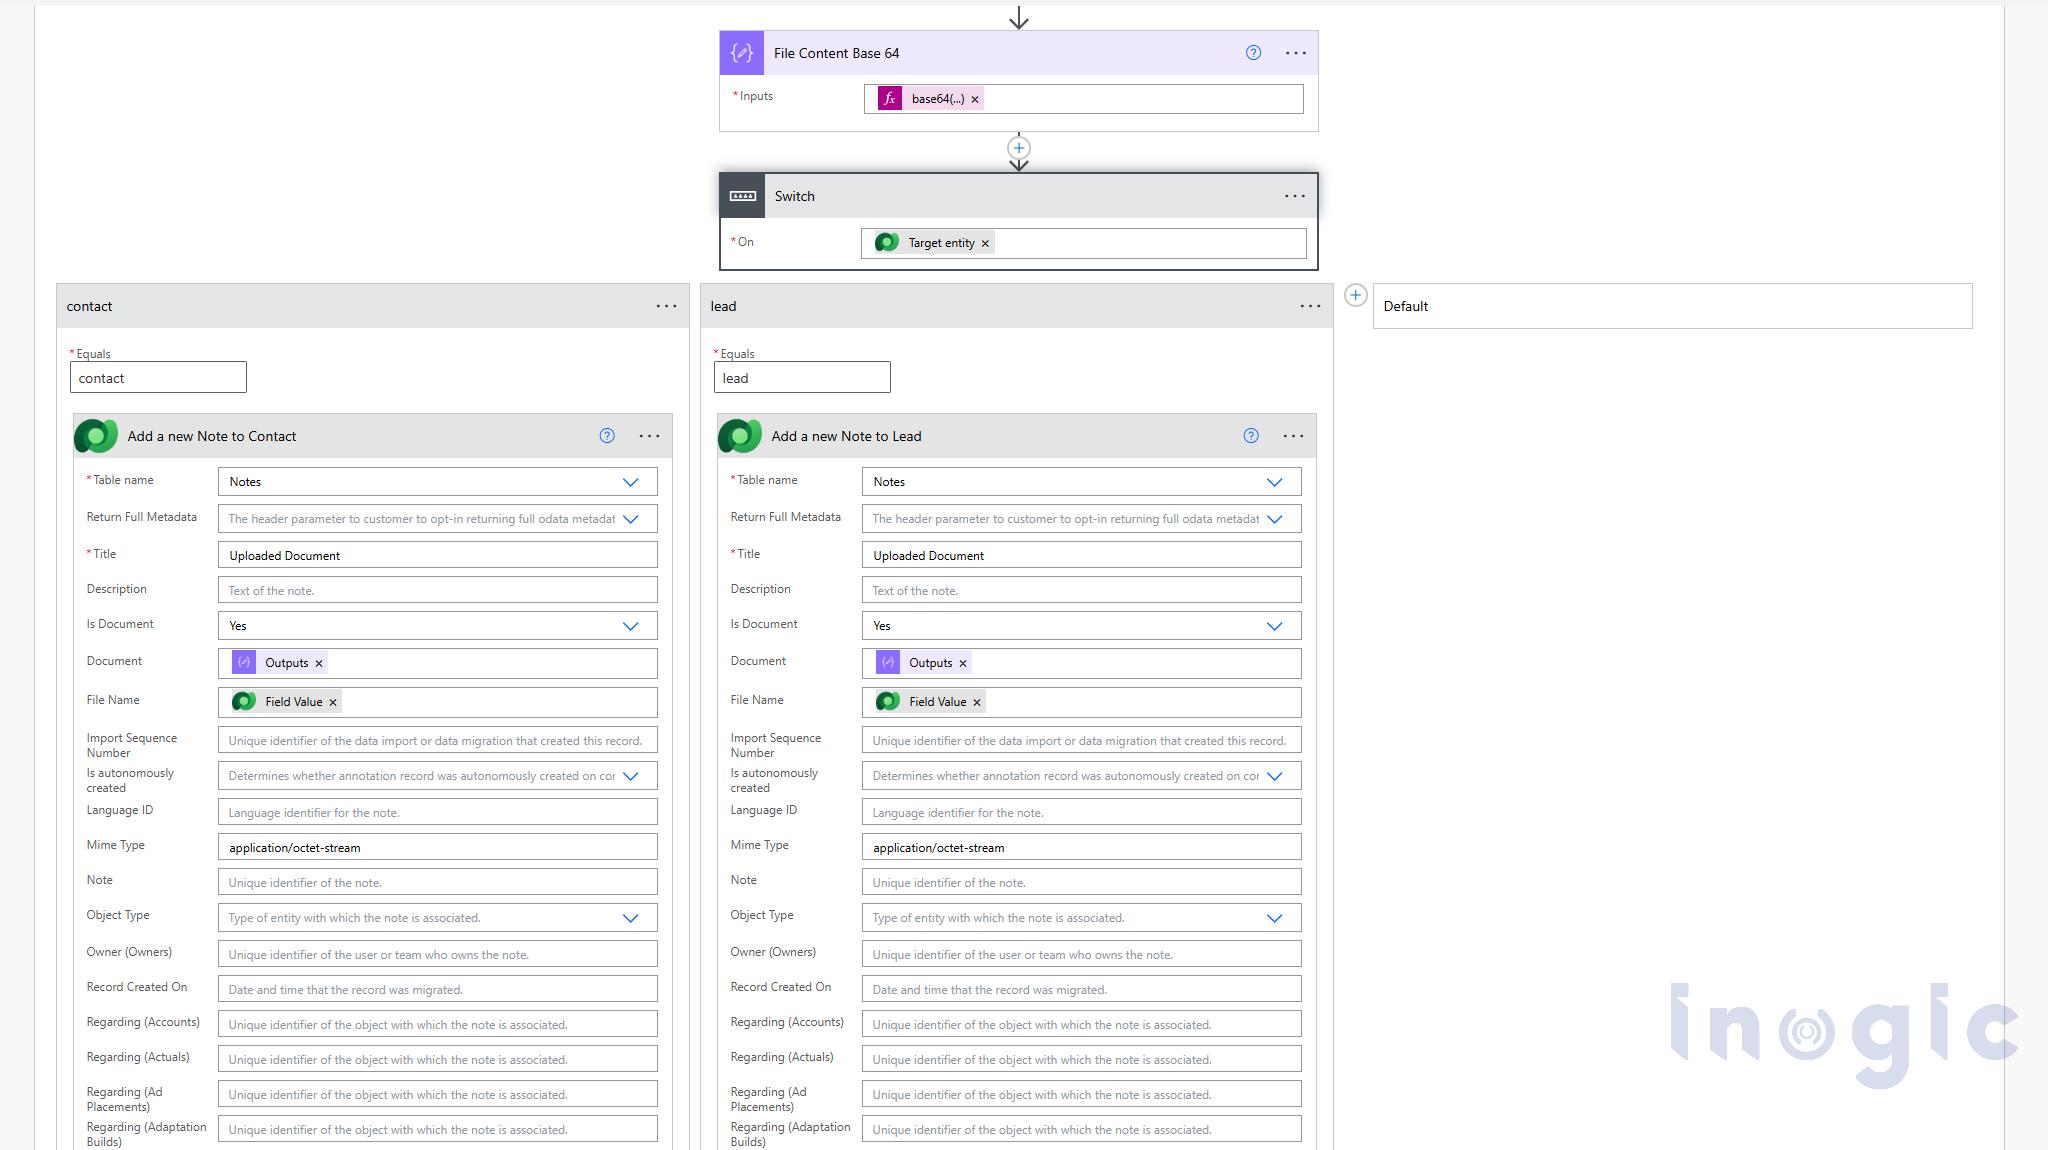
Switch on the target entity and the action that adds a Note to the Contact
Switch
@{outputs('Get_linked_entity_record')?['body/msdynmkt_targetentity']}
Add a new Note to Contact
Title - Uploaded Document

Is Document – Yes

Document - @{outputs('File_Content_Base_64')}

File Name - @{items('For_each')?['msdynmkt_fieldvalue']}

Mime Type - application/octet-stream

Regarding (Contacts) - /contacts(@{outputs('Get_linked_entity_record')?['body/_msdynmkt_targetcontact_value']})
Need it for Leads too? Add another case in the Switch and create the note against the Lead in the same way.
Step 5: Submit the Form and See It Working
Time for the real test. Publish the form and submit it with a couple of files. In our test, we uploaded Quote.pdf and Settlement Details.xlsx. Open the newly created Contact or Lead and look at the timeline. Each file is there as a note, and the form submission shows the file names and the count.
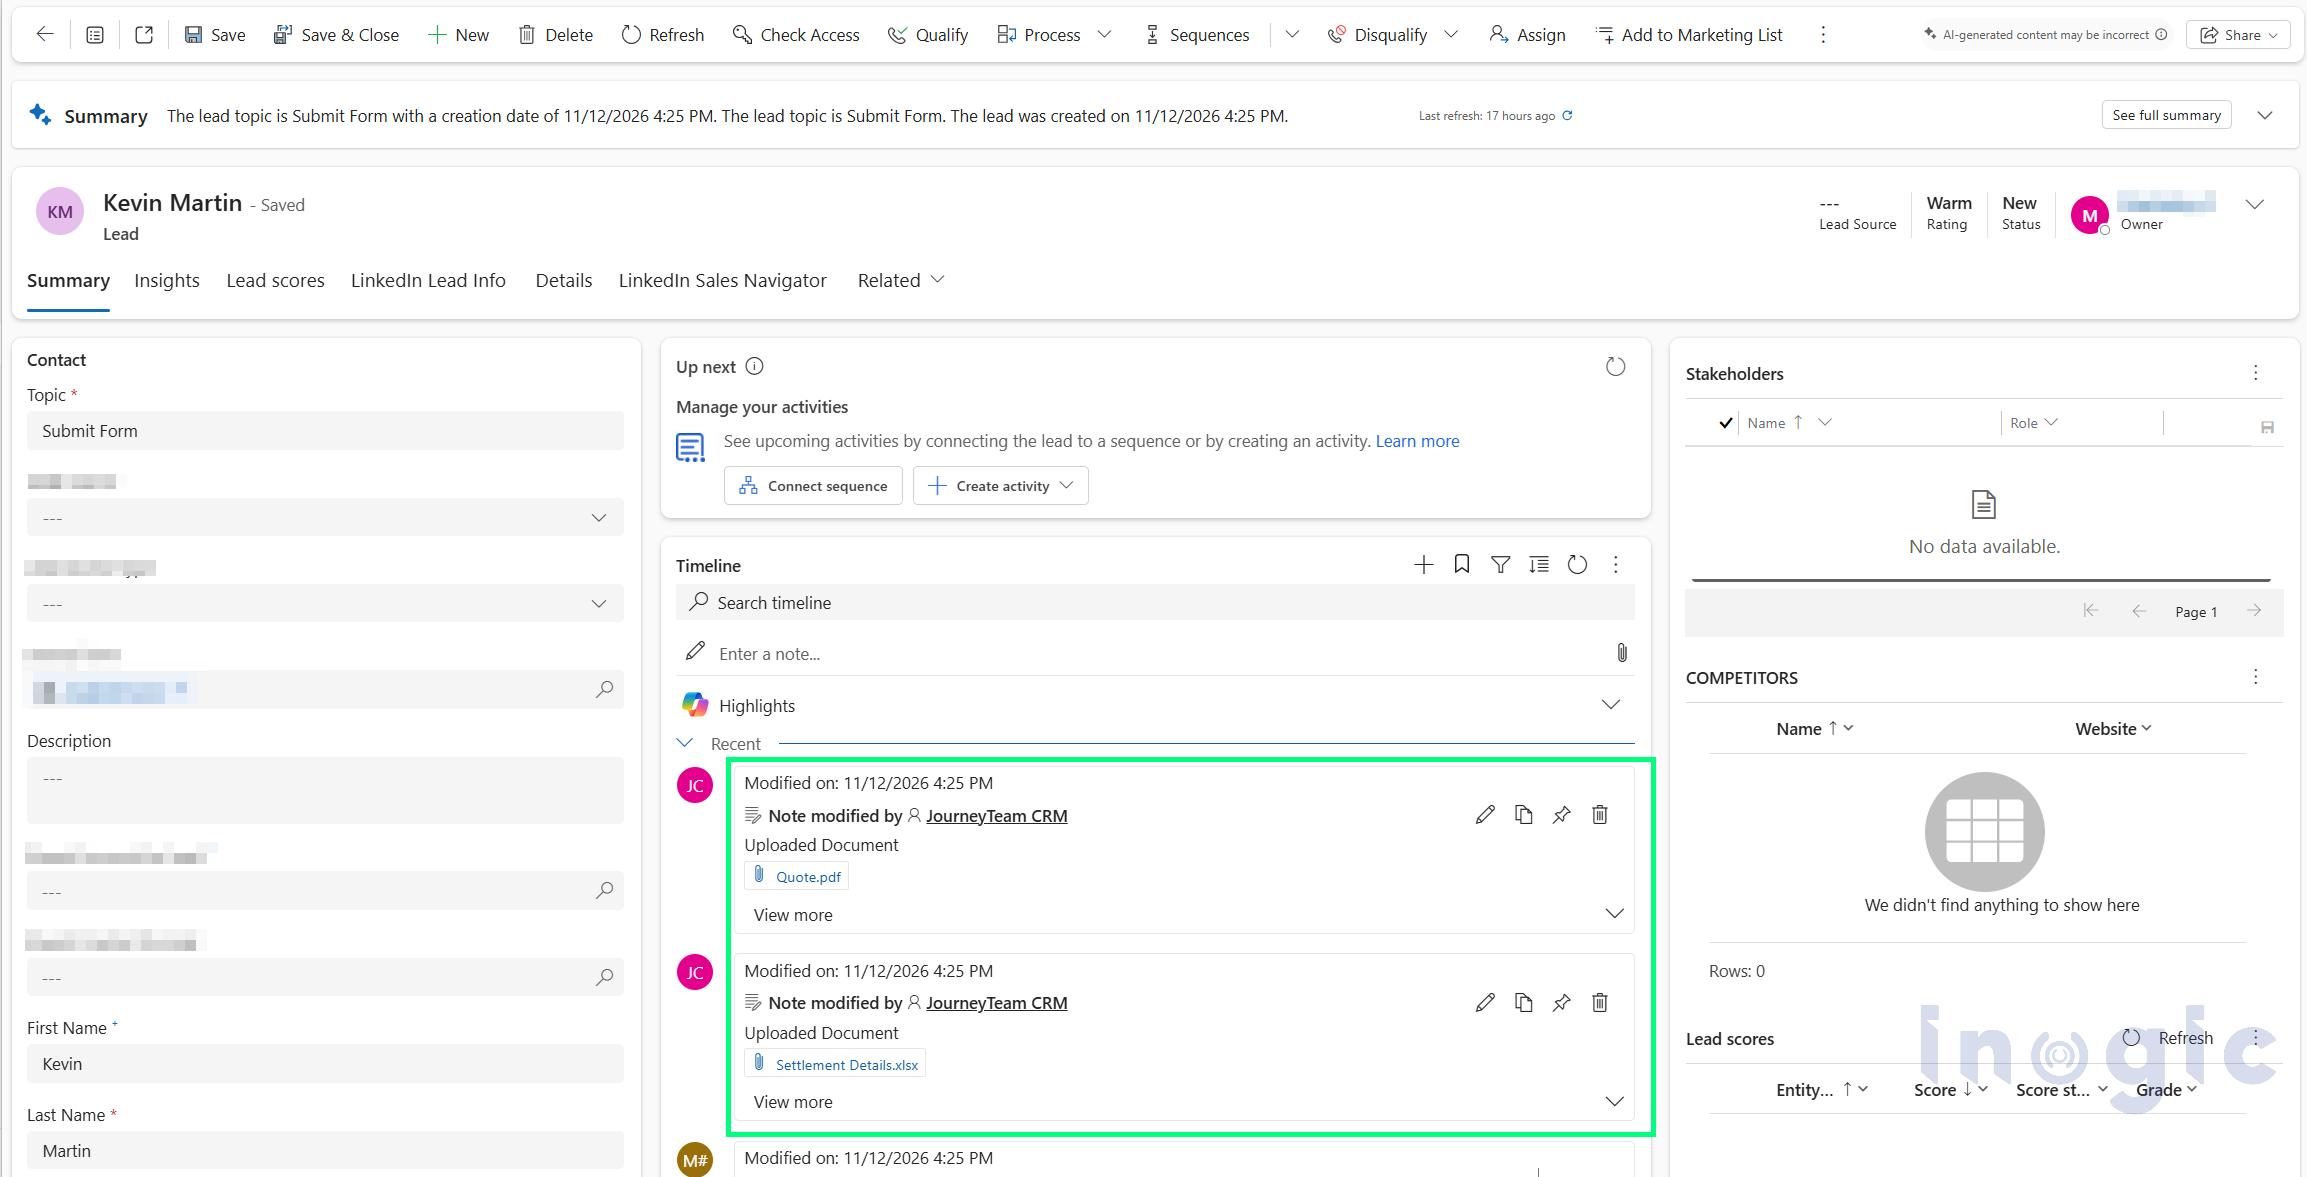
Lead timeline showing both uploaded files as notes
That is the whole setup. No custom plugin, no external storage, just a form, a script and Power Automate.
Good to Know Before You Go Live
- File size: the script reads each file in the browser and sends it as Base64, so very large files may not come through. Test with the file sizes your customers are likely to upload.
- Flow URL: the HTTP URL sits inside the form script. Consider restricting who can trigger the flow and validating the incoming request.
- Simultaneous submissions: the flow matches the latest submission for the form URL, so test how it behaves when several people submit at the same time.
Final Takeaway: Small Setup, Big Difference
By combining a custom file upload control with JavaScript and Power Automate, Customer Insights – Journeys Forms can support a file handling workflow that extends beyond the standard form experience.
The implementation keeps uploaded files connected to their original form submission while also making them available on the related Contact or Lead timeline. This gives both marketing and sales teams access to the same documents from the records they already use.
Before deploying the solution to production, test file sizes, HTTP endpoint security, and simultaneous form submissions to ensure the implementation performs reliably for your expected usage.
With those considerations in place, this approach provides a practical way to capture and surface customer documents in Dataverse without requiring a custom plugin.