Sales and business users often need quick access to CRM information such as customer names, telephone numbers, revenue, location, and account details.
we will build a real world Account Assistant that connects Microsoft 365 Copilot to an existing ASP.NET Core REST API. The REST API queries the Microsoft Dataverse Account table and exposes an account-search operation through an OpenAPI definition.
We will then use Microsoft 365 Agents Toolkit to create an API plugin for a declarative agent and make the API available to Microsoft 365 Copilot.
Suppose a sales representative asks:
“Find Contoso.”
Instead of opening Dynamics 365 and manually searching the Account table, the user can ask the same question through the custom agent in Microsoft 365 Copilot.
The agent identifies that an account-search operation is required, sends the search term to our API, and the API queries Dataverse.
Key Takeaways
- Reuse your existing REST API with Copilot, no rebuild needed.
- Write a clear OpenAPI description so the agent knows when to call it.
- Test locally first, then expose the API over HTTPS (ngrok works for demos).
- Let Agents Toolkit generate the plugin from your OpenAPI file.
- Enable custom app upload and Copilot access before testing.
Prerequisites
Before starting, make sure you have:
- Visual Studio Code
- NET SDK
- An ASP.NET Core Web API project
- Microsoft Dataverse environment
- Microsoft Entra application registration
- ngrok (we have taken this you can use your own)
- Microsoft 365 account
- Microsoft 365 Agents Toolkit
- Permission to upload custom applications in the Microsoft 365 environment
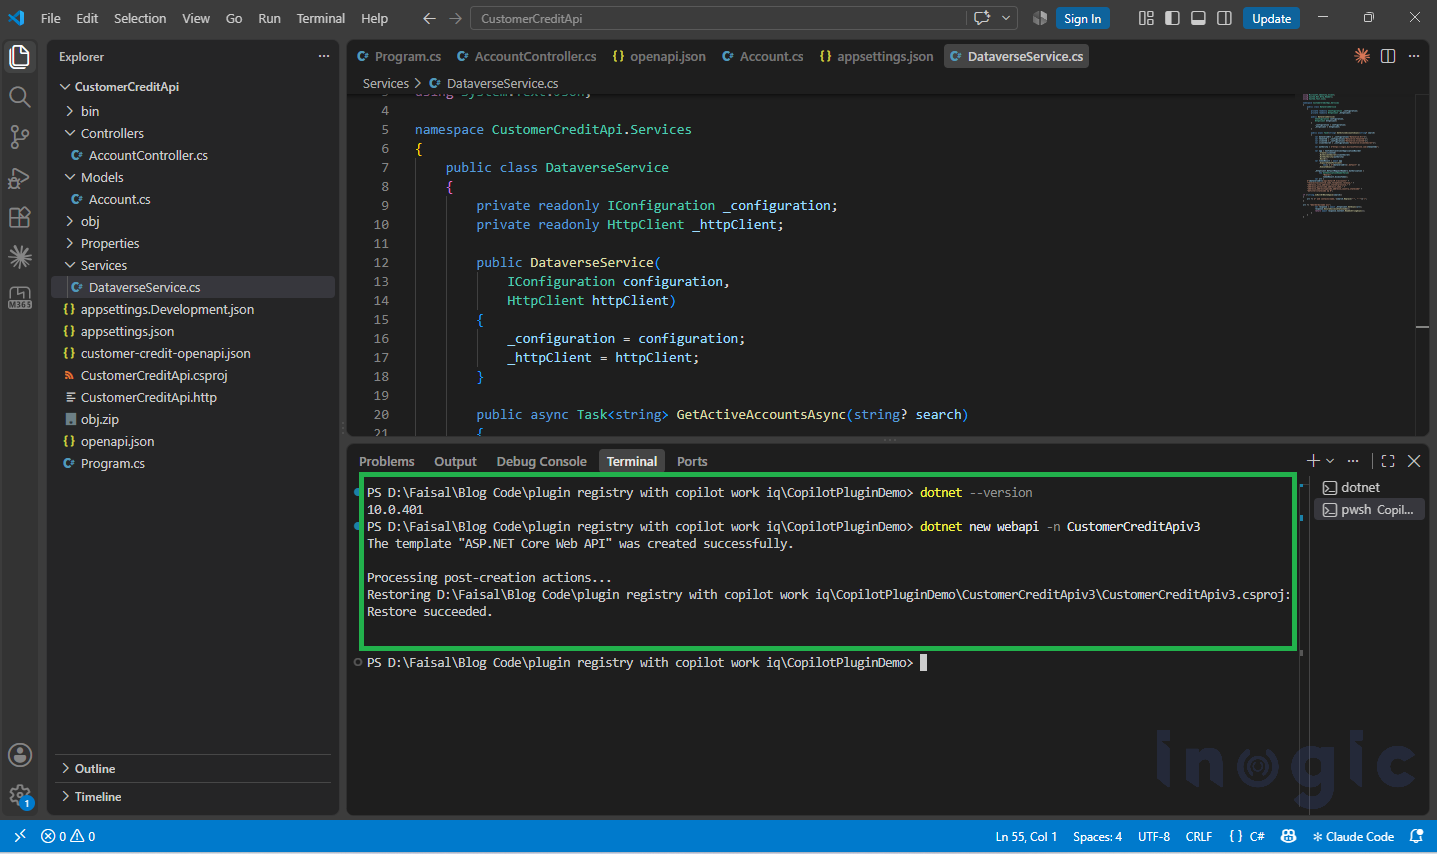
Step 1: Create the .NET Folder and API Project
Create a folder for the demonstration and create the ASP.NET Core Web API project.
dotnet new webapi -n CustomerCreditApi
Open the project in Visual Studio Code.
The project contains the API code that will eventually sit between Microsoft 365 Copilot and Dataverse.
Step 2: Build and Test the API Locally
The API was configured to connect to Dataverse using an application identity.
The Dataverse service obtains an access token and calls the Dataverse Web API.
The Account endpoint exposes:
GET /api/account/search?search=Contoso
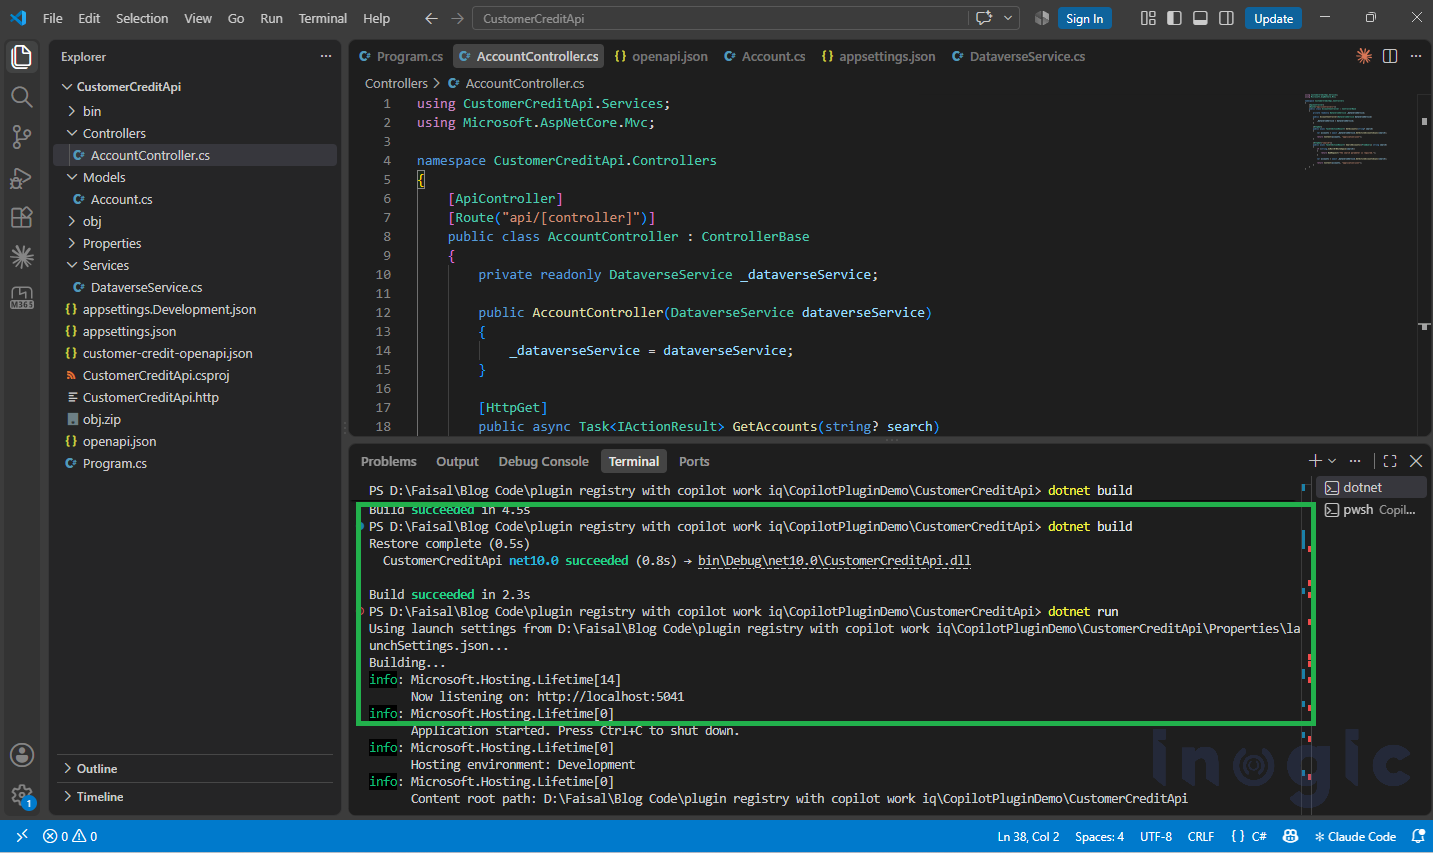
Run the project:
dotnet run
The API runs locally on:
http://localhost:5041
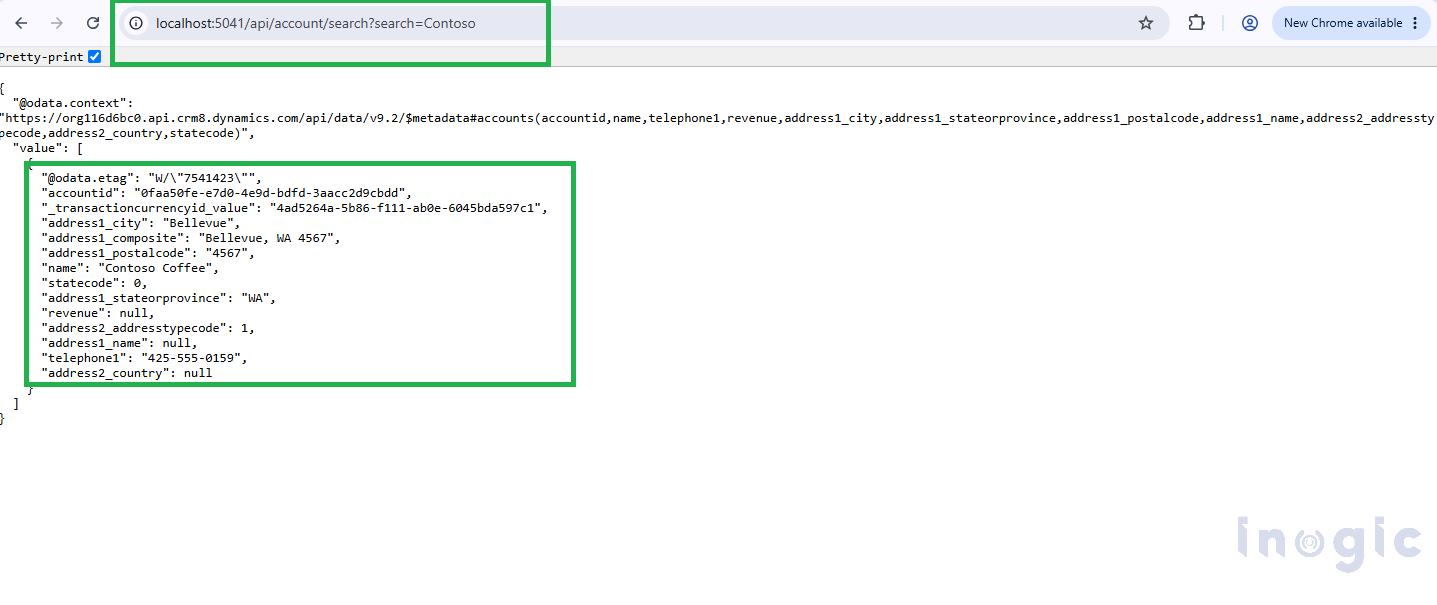
Test the endpoint:
http://localhost:5041/api/account/search?search=Contoso
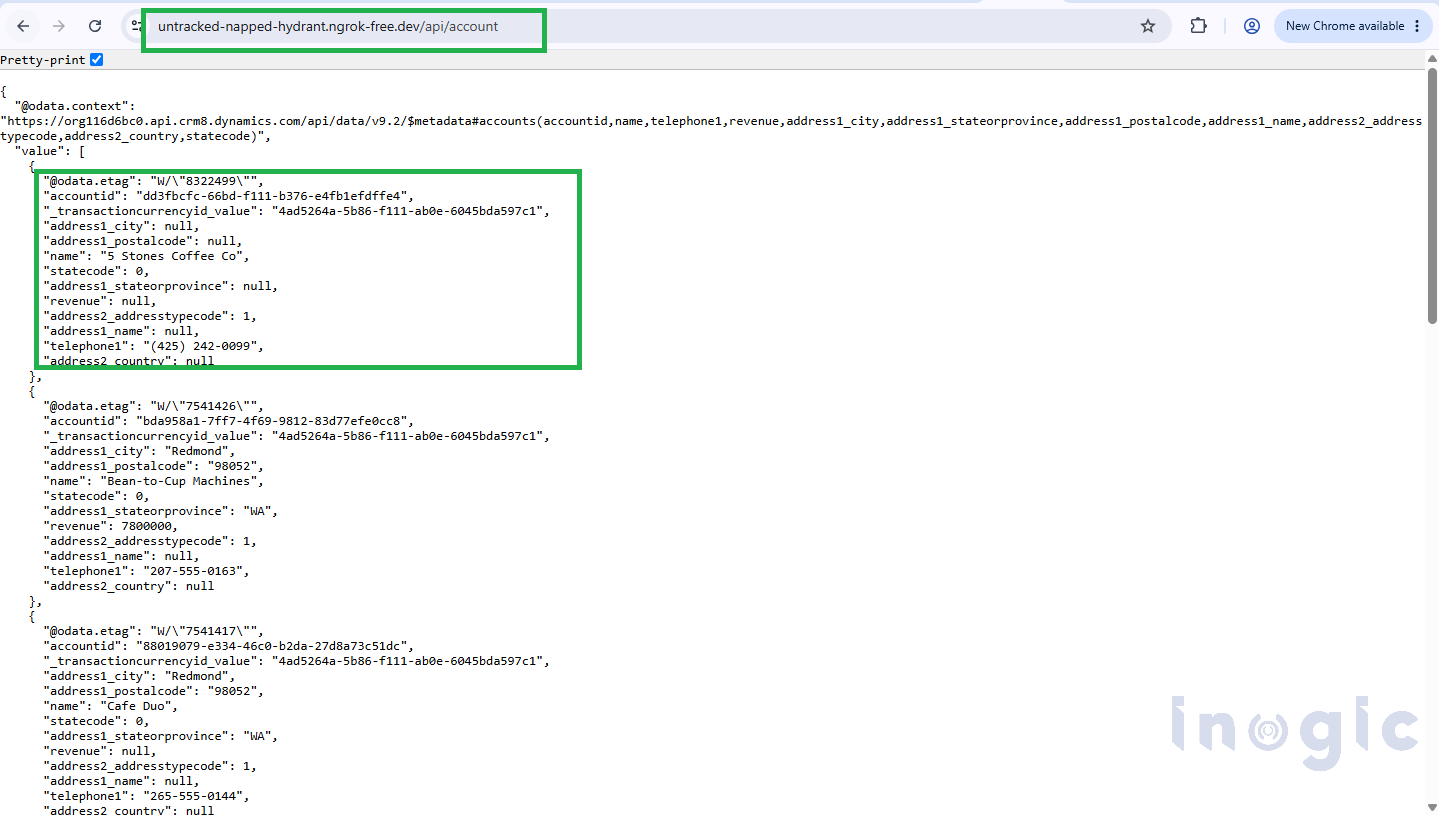
The API returns the matching Dataverse Account records.
For example:
Step 3: Test the API Locally with Azure/Entra App Registration
Before exposing the API to Microsoft 365 Copilot, verify that the complete API → Microsoft Entra ID → Dataverse connection works locally.
Create/configure an application registration in the Microsoft Entra admin center / Azure portal and use:
- Tenant ID
- Client ID
- Client Secret
- Dataverse environment URL
in the API configuration.
For example:
{
"Dataverse": {
"Url": "https://yoururl.api.crm.dynamics.com",
"TenantId": "<TENANT-ID>",
"ClientId": "<CLIENT-ID>",
"ClientSecret": "<CLIENT-SECRET>"
}
}
The API uses these credentials to obtain an access token and call the Dataverse Web API.
Run the API:
dotnet run
Then test locally:
http://localhost:5041/api/account/search?search=Contoso
If the configuration and Dataverse permissions are correct, the API should return the real Account records from Dataverse.
Step 4: Install and Configure ngrok
Now that the API has been successfully tested locally, expose it through a public HTTPS endpoint so Microsoft 365 services can reach it.
Start the API:
dotnet run
Then start ngrok:
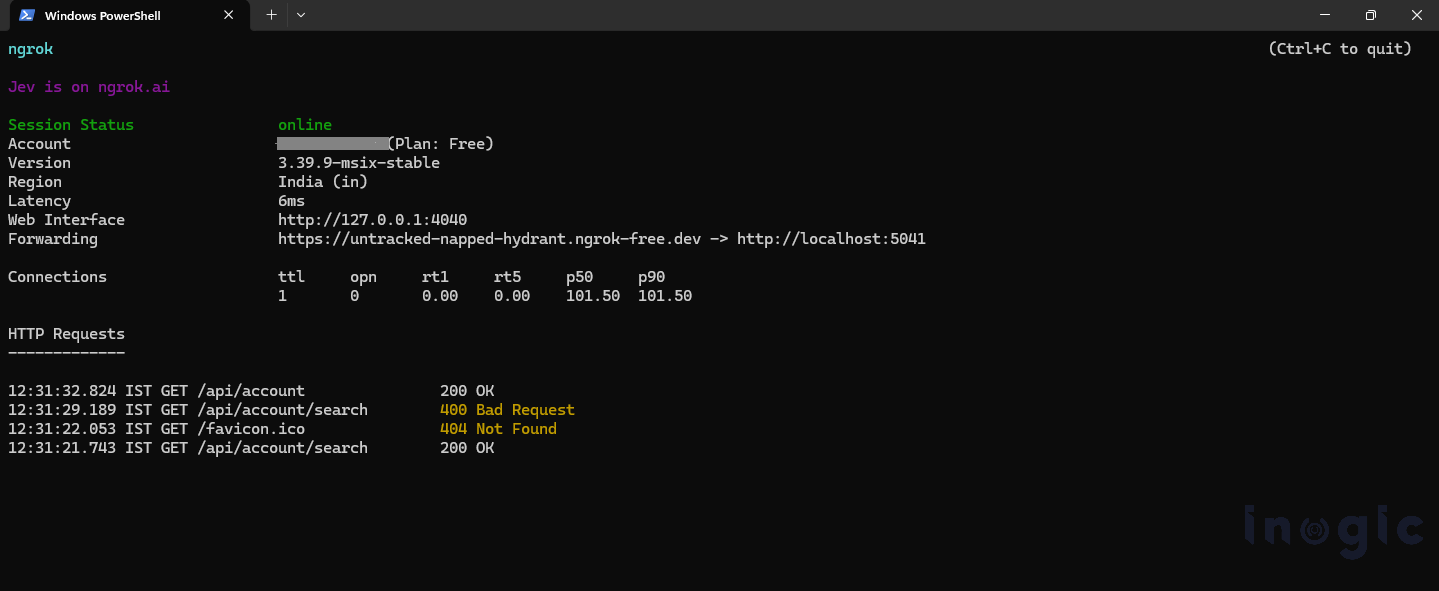
ngrok http 5041
ngrok provides a public HTTPS URL:
https://<your-ngrok-domain>.ngrok-free.dev
The Account Search endpoint can then be accessed as:
https://<your-ngrok-domain>.ngrok-free.dev/api/account/search?search=Contoso
Test this URL and confirm that it returns the same Dataverse data as the local endpoint.
Step 5: Add the OpenAPI Definition and Connect the Toolkit to the Environment
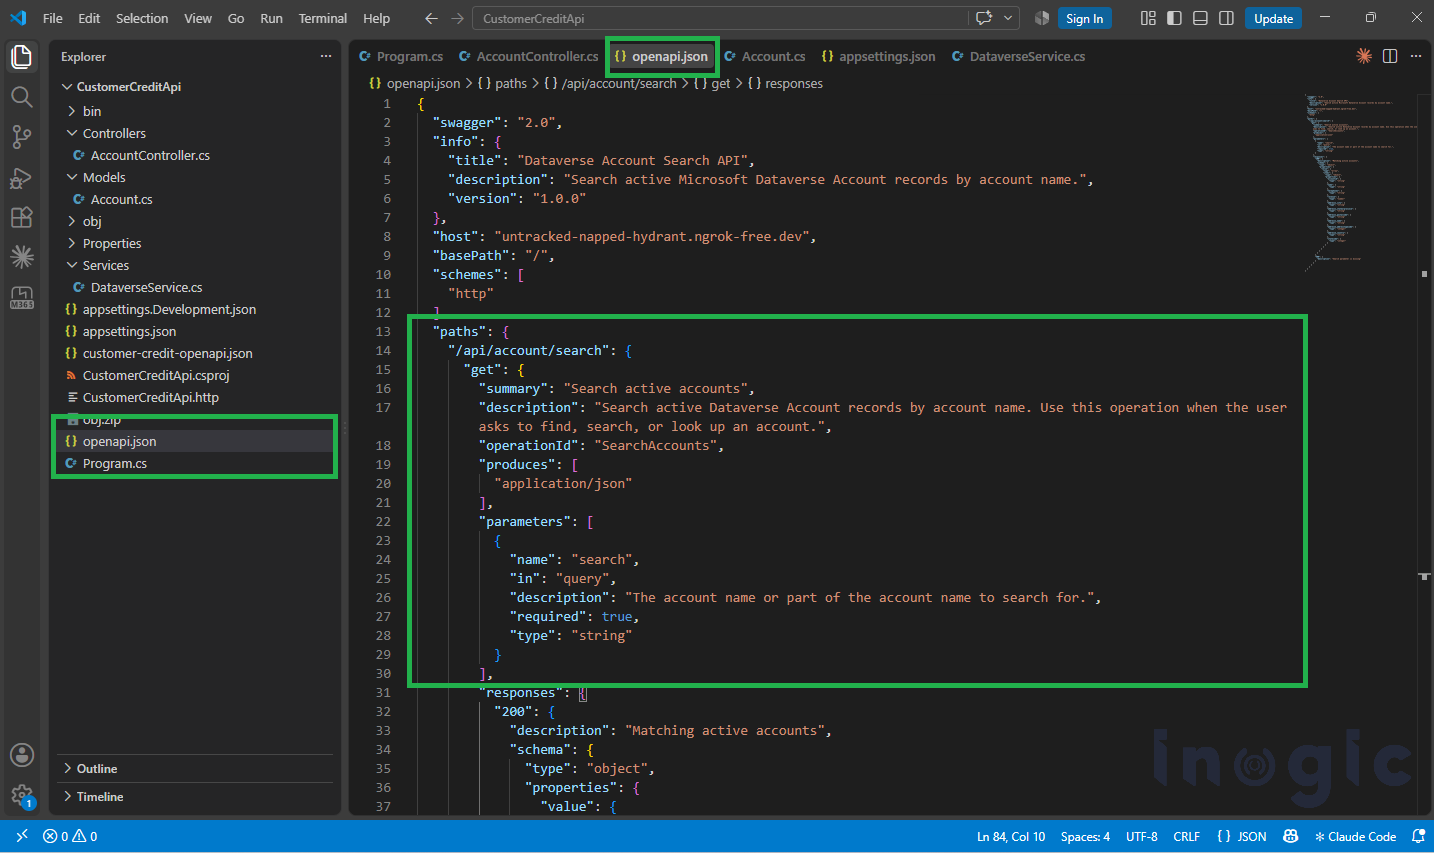
The REST API is described using an openapi.json file.
The OpenAPI definition describes the operation:
GET /api/account/search
and its parameter:
search
The operation description is important because it helps the agent understand when the API operation should be used.
For example:
Search active Dataverse Account records by account name. Use this operation when the user asks to find, search, or look up an account.
Using Microsoft 365 Agents Toolkit, create a Declarative Agent and add an action based on the existing OpenAPI description.
The toolkit generates the plugin project containing the required configuration and manifest files.
Step 6: Install Microsoft 365 Agents Toolkit
Now that the REST API is working and publicly accessible, the next component is the Microsoft 365 Agents Toolkit.
Open Visual Studio Code and install:
Microsoft 365 Agents Toolkit
The toolkit is used to create and package the API plugin for the Microsoft 365 declarative agent.
Instead of manually creating the plugin structure, the toolkit can generate the required project from an existing OpenAPI description.
Keep both windows (dotnet run and ngrok) running.
- Make sure your openapi.json is the corrected version. It should have “schemes”: [“https”], “host”: “untracked-napped-hydrant.ngrok-free.dev”, and the x-nullable fields (the file I gave you earlier).
- Create the project.
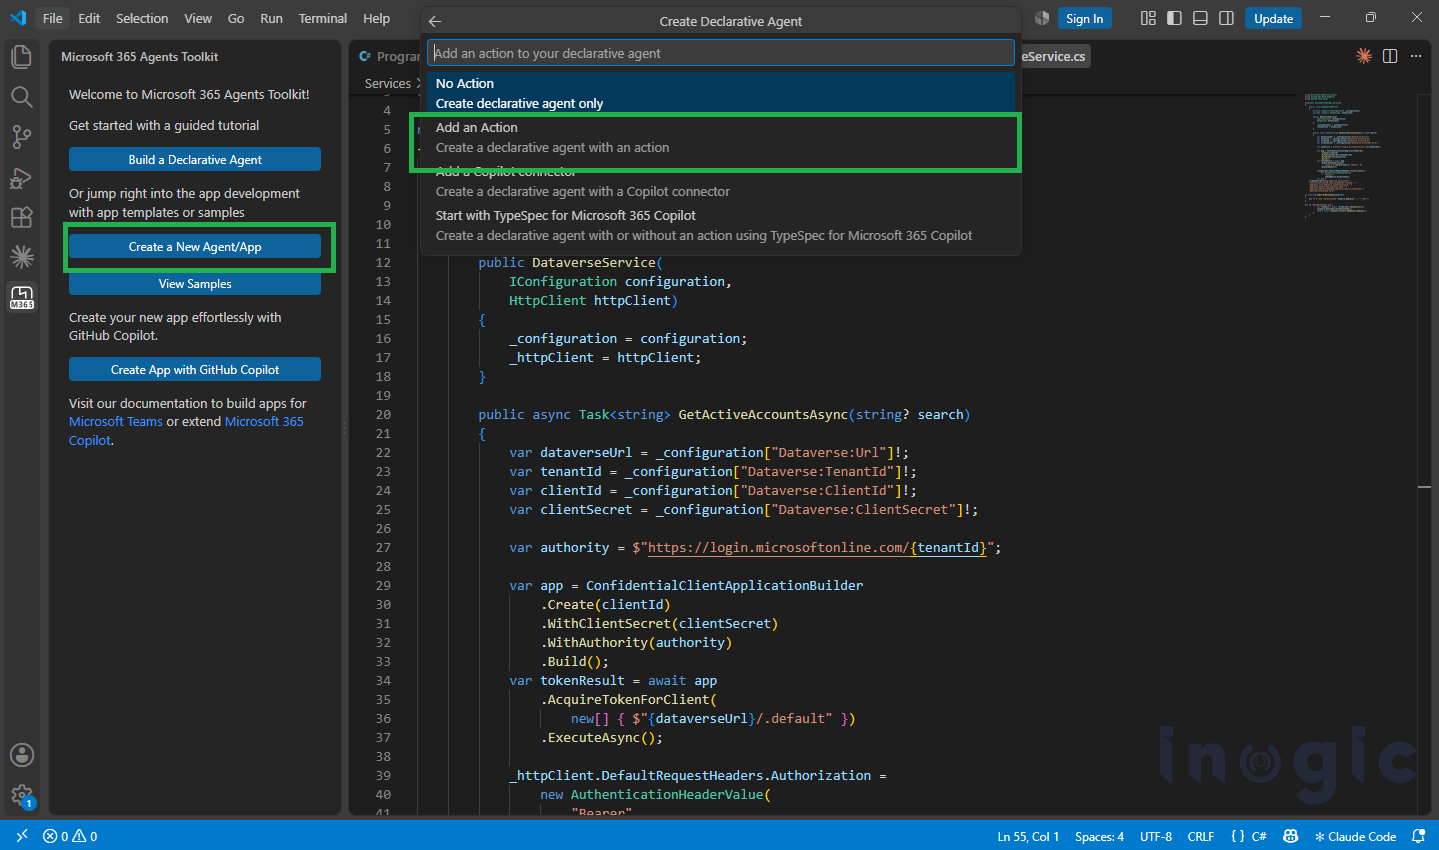
- Click the Agents Toolkit icon, then Create a New Agent/App.
- Select Declarative Agent.
- Select Add an Action.
- Select Start with an OpenAPI Description Document.
- Select Browse and pick your json.
- Tick GET /api/account/search and click OK.
- Choose a folder outside your API project
- Name it AccountAssistant.
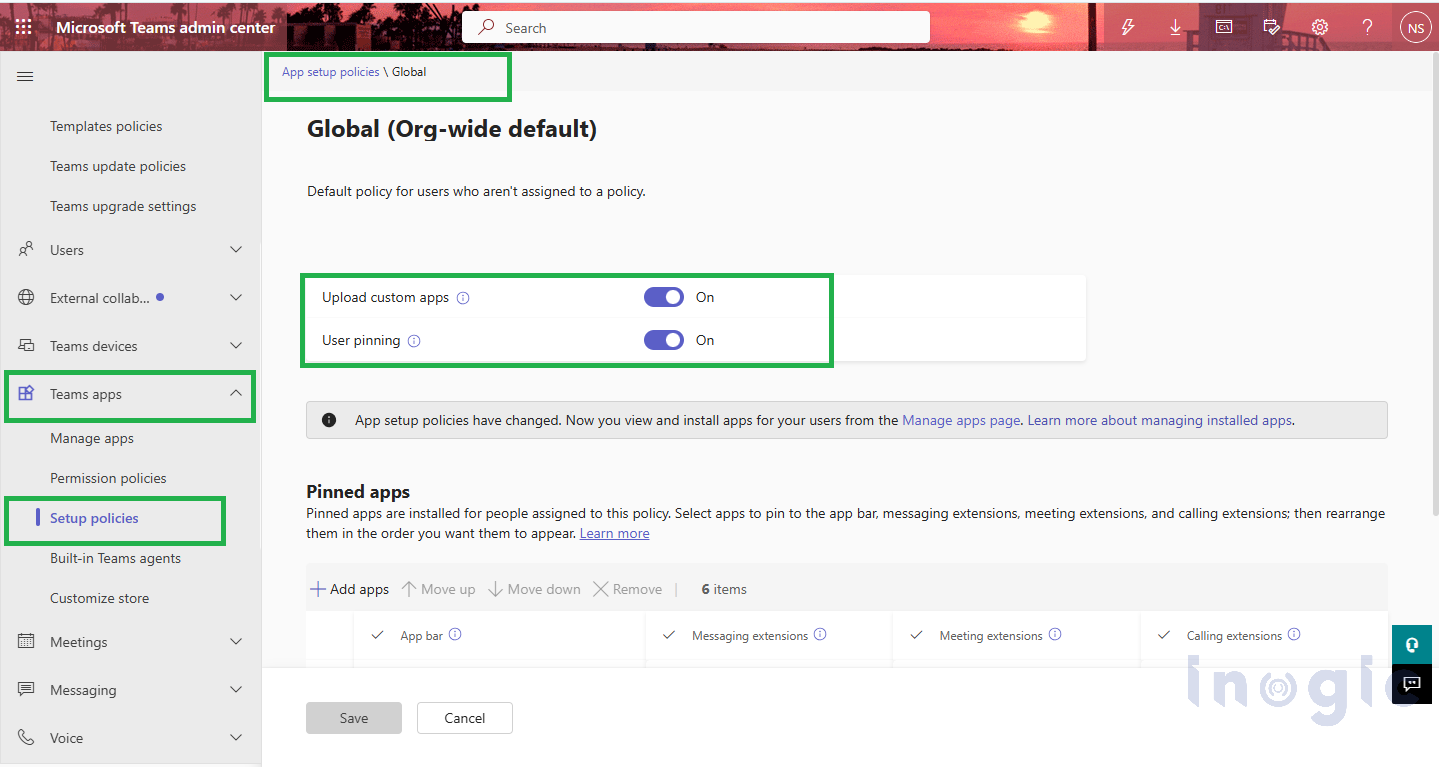
Step 7: Enable Custom App Upload in the Microsoft 365 Admin Center
Before testing the custom agent in Microsoft 365, ensure that the environment allows custom application uploads and that the required Microsoft Copilot access is enabled for the test account.
This is an administrative configuration step and does not require any changes to the API or application code.
- Open the Microsoft Teams Admin Center.
- Navigate to Teams apps → Setup policies → App setup policies.
- Select the relevant app setup policy assigned to the test users.
- Verify that Upload custom apps is enabled/allowed.
- Ensure the test account has the required Microsoft Copilot access/licensing.
- Save the changes and allow some time for the policy to propagate before testing the custom agent.
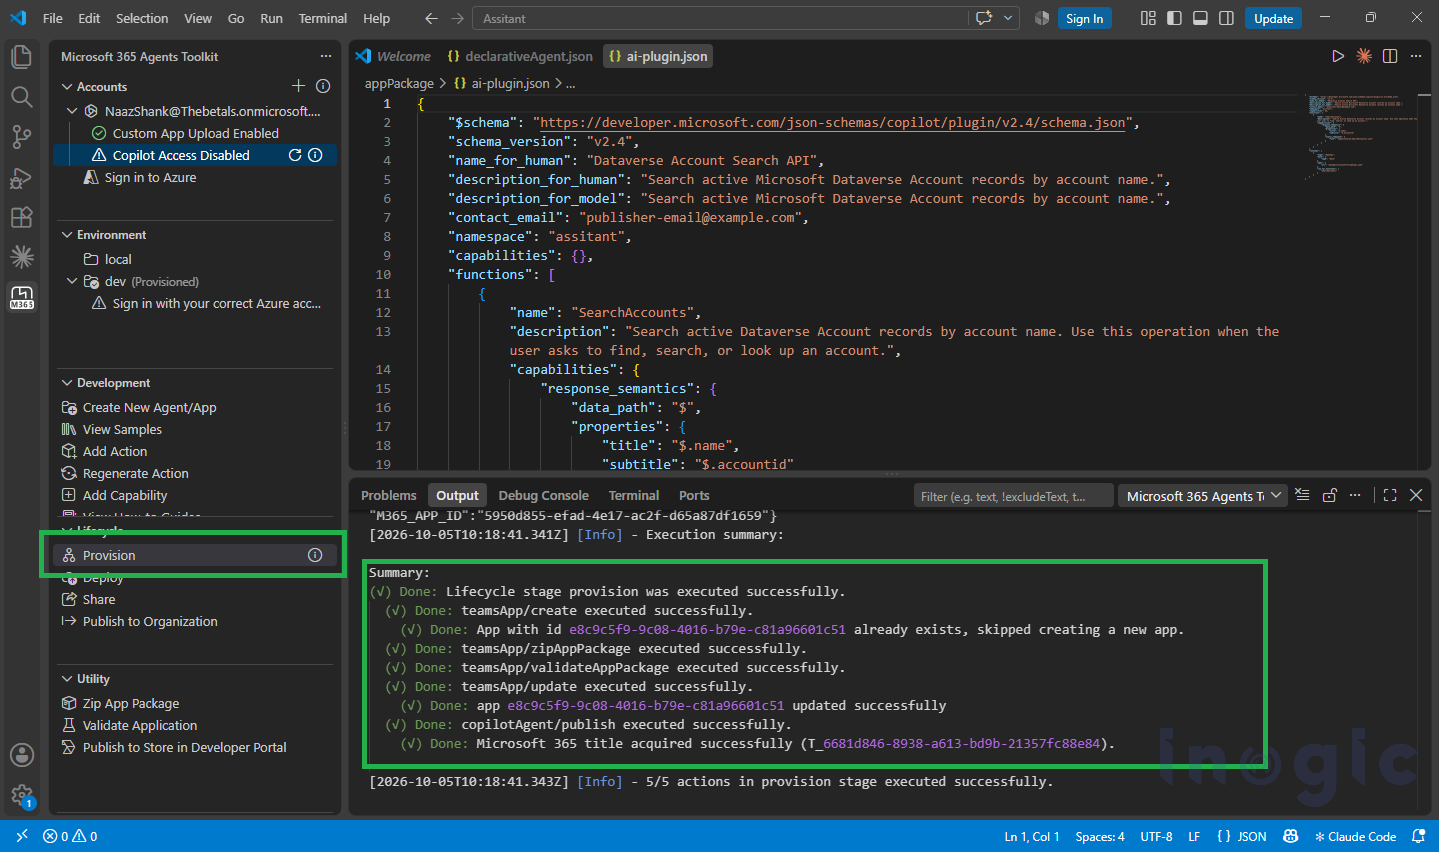
Step 8: Apply Provisioning
Once the plugin project is configured, use the Provision action from Microsoft 365 Agents Toolkit.
The provisioning process deploys the required application/plugin configuration to the Microsoft 365 environment.
The toolkit may request authentication or application information depending on the plugin configuration.
After successful provisioning, the API plugin is ready to be tested with the declarative agent.
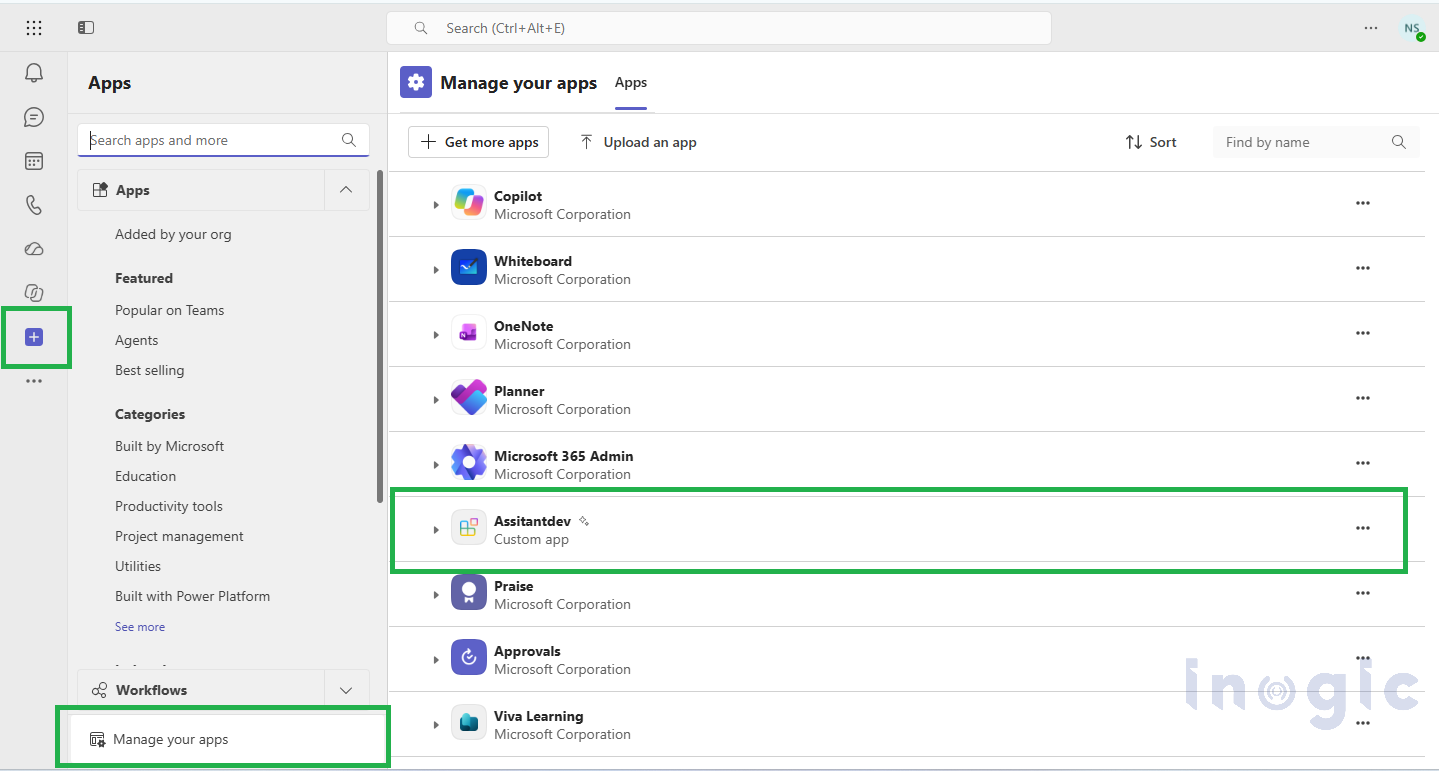
Step 9: Check the Custom Agent
After provisioning, open Microsoft 365 Copilot and verify that the custom Account Assistant agent is available.
The important thing to verify at this stage is that the agent appears and can be selected.
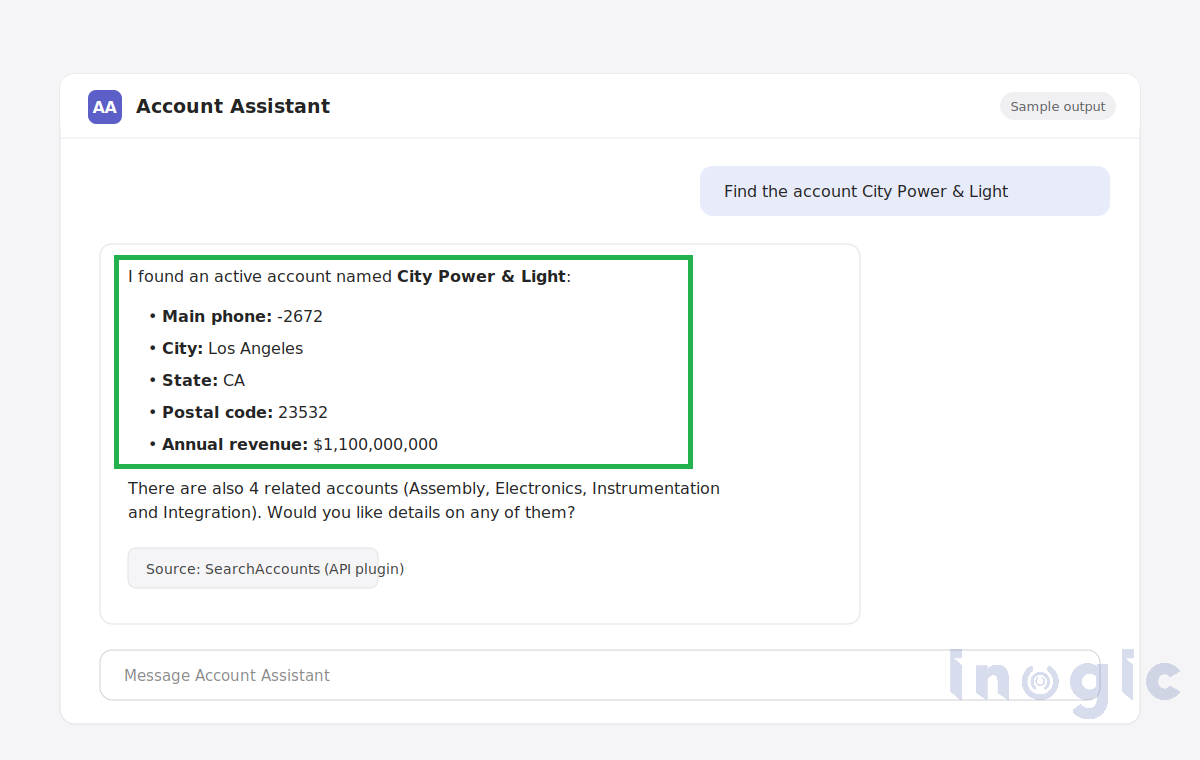
Step 10: Test the Account Assistant with Real Dataverse Data
Now comes the most important part of the demonstration.
Instead of using mocked data, ask the agent a real question against the Dataverse Account table.
Conclusion:
This walkthrough showed how to connect a real Dataverse Account API to Microsoft 365 Copilot using an API plugin and declarative agent. The same approach can be extended to expose additional CRM operations and business data through Copilot.
FAQs
What is an API plugin for a declarative agent in Microsoft 365 Copilot?
It lets a custom agent in Copilot call your existing REST API, described by an OpenAPI file, to fetch or act on business data.
How do I connect a REST API to Microsoft 365 Copilot?
Describe the API in an OpenAPI file, then use Microsoft 365 Agents Toolkit to generate a declarative agent with an API plugin. Provision it and test it in Copilot.
Can Microsoft 365 Copilot query Dataverse data?
Yes, through your API. The API authenticates to Dataverse and returns the matching records, such as accounts, to the agent.