 Managing a full-capacity event can get tricky when cancellations leave seats open and new registrants have nowhere to go. Dynamics 365 Customer Insights – Journeys simplifies this with its native event waitlist capability, allowing marketers to manage capacity, queue new registrants, and automatically fill available seats. This blog walks through how to set up and manage a waitlist for a single-session webinar.
Why It Matters
Marketing events are judged on turnout, and turnout is judged against capacity. A webinar platform license, a guest speaker’s time, or a virtual room’s bandwidth all have a ceiling — and every empty seat at that ceiling is wasted spend. Before this feature, closing a full registration list meant either turning latecomers away entirely or manually chasing down replacements every time someone cancelled, usually in a spreadsheet parked outside the CRM. Which is a real pain for the Marketing Team.
Waitlisting solves this in two ways. First, it keeps demand visible instead of discarding it — everyone who wanted in after capacity was reached becomes a tracked, Waitlist record created rather than a bounce. Second, it automates the backfill, so a cancellation on Tuesday can be replaced with a confirmed registrant by Wednesday without an event coordinator manually working the list.
What the Feature Does
At its core, the feature lets you attach a maximum capacity to an event (and, separately, to individual sessions within an event). Once the capacity reached, further registrations are waitlisted. Which can be managed and maintained in any of 2 ways:
- Automatic backfill: when a spot opens up, the system finds the longest-waiting waitlisted contact and registers them immediately.
- Manual backfill: when a spot opens up, the contact is flagged as eligible, and you decide when and how to invite them to claim the seat.
How to Set It Up: A Single-Session Webinar
For a webinar, there’s no session-level agenda to worry about — capacity and waitlisting are configured once, directly on the event.
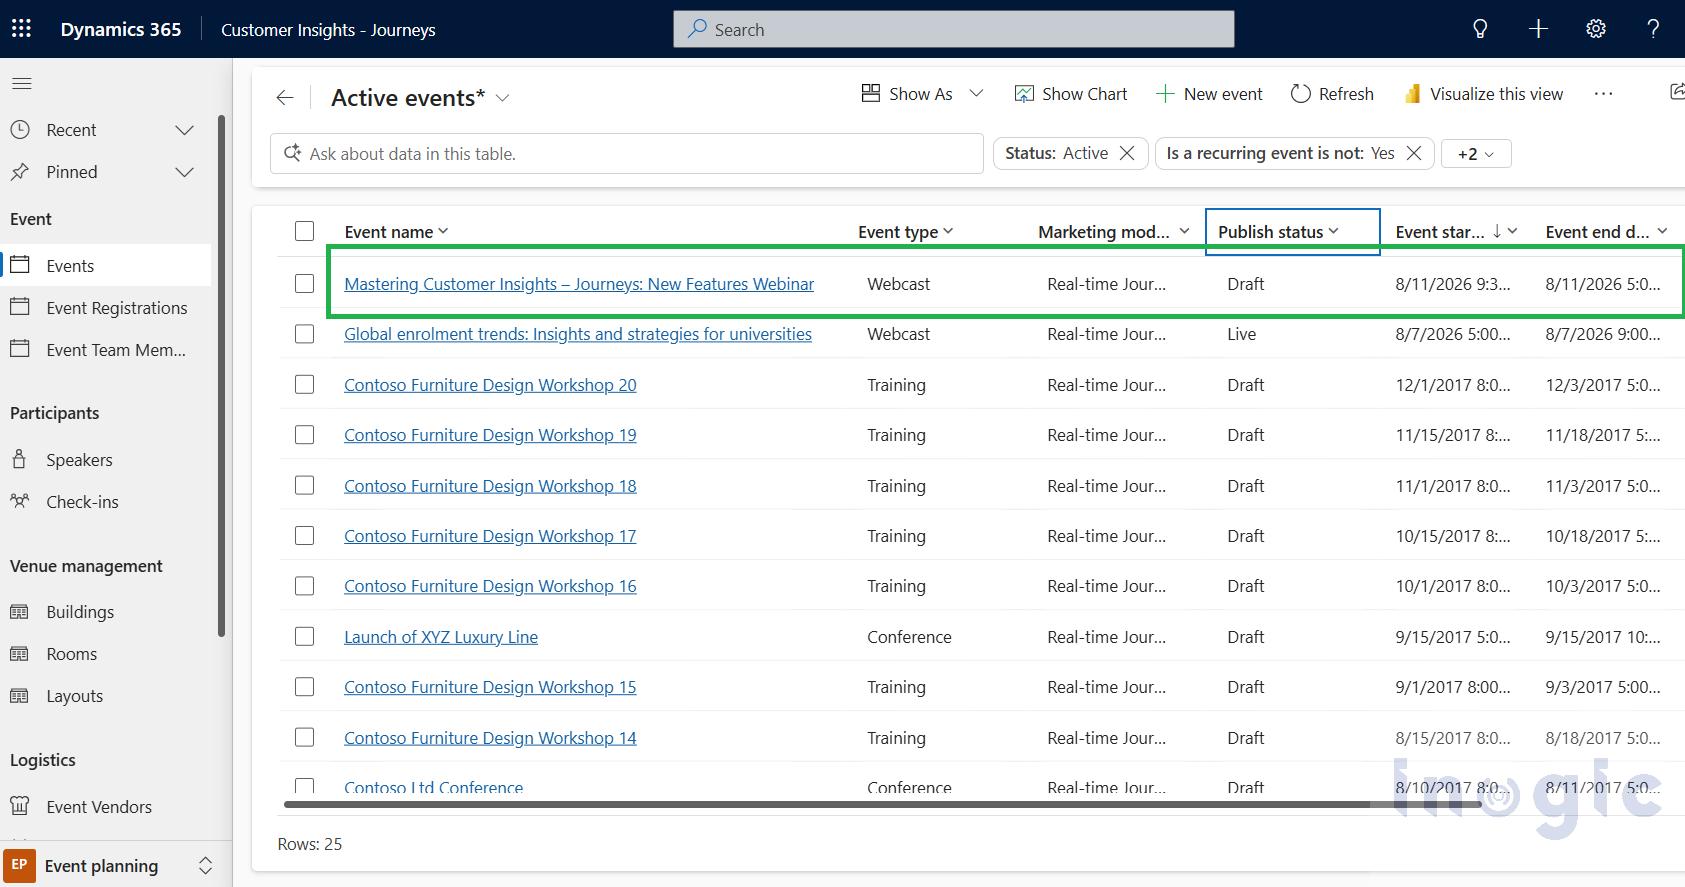
- In the Customer Insights Journeys app > under Event Planning > Open the Event work area and go to Events > Open your webinar event (As I am setting it up, its publish status = Draft initially, and when done with set up, we can make it Live).

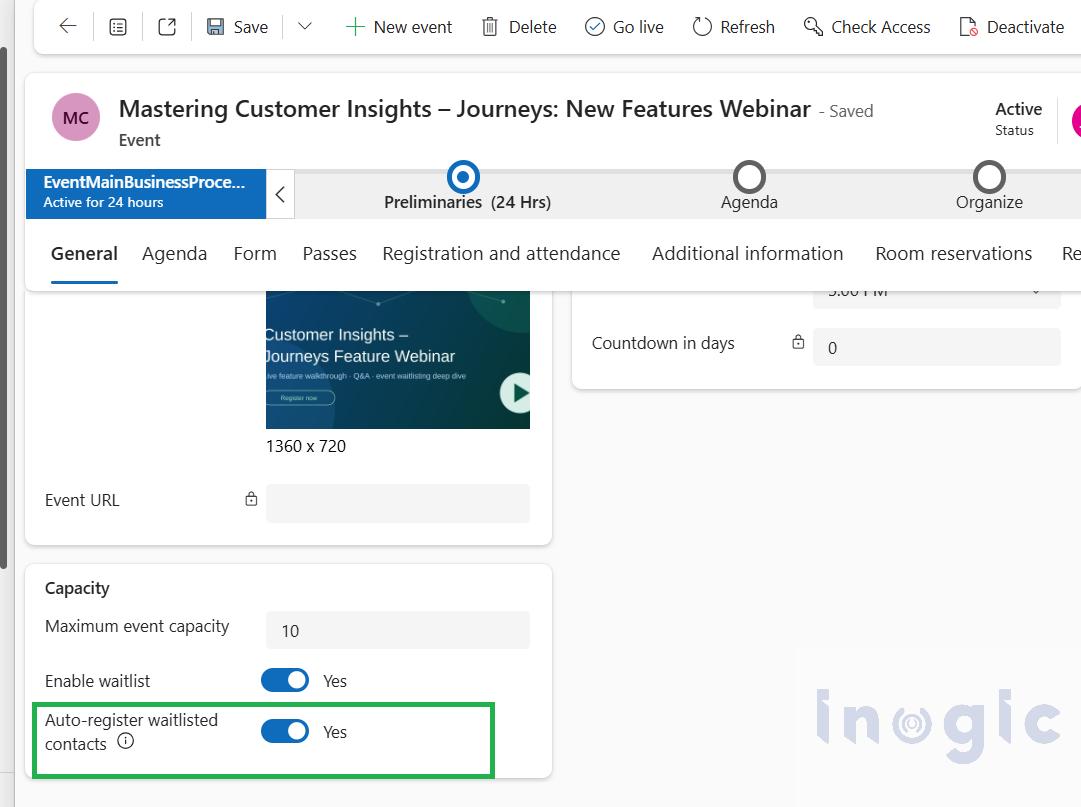
- On the General tab, under the Capacity area. Set the maximum event capacity to the number of attendees your webinar platform can support.
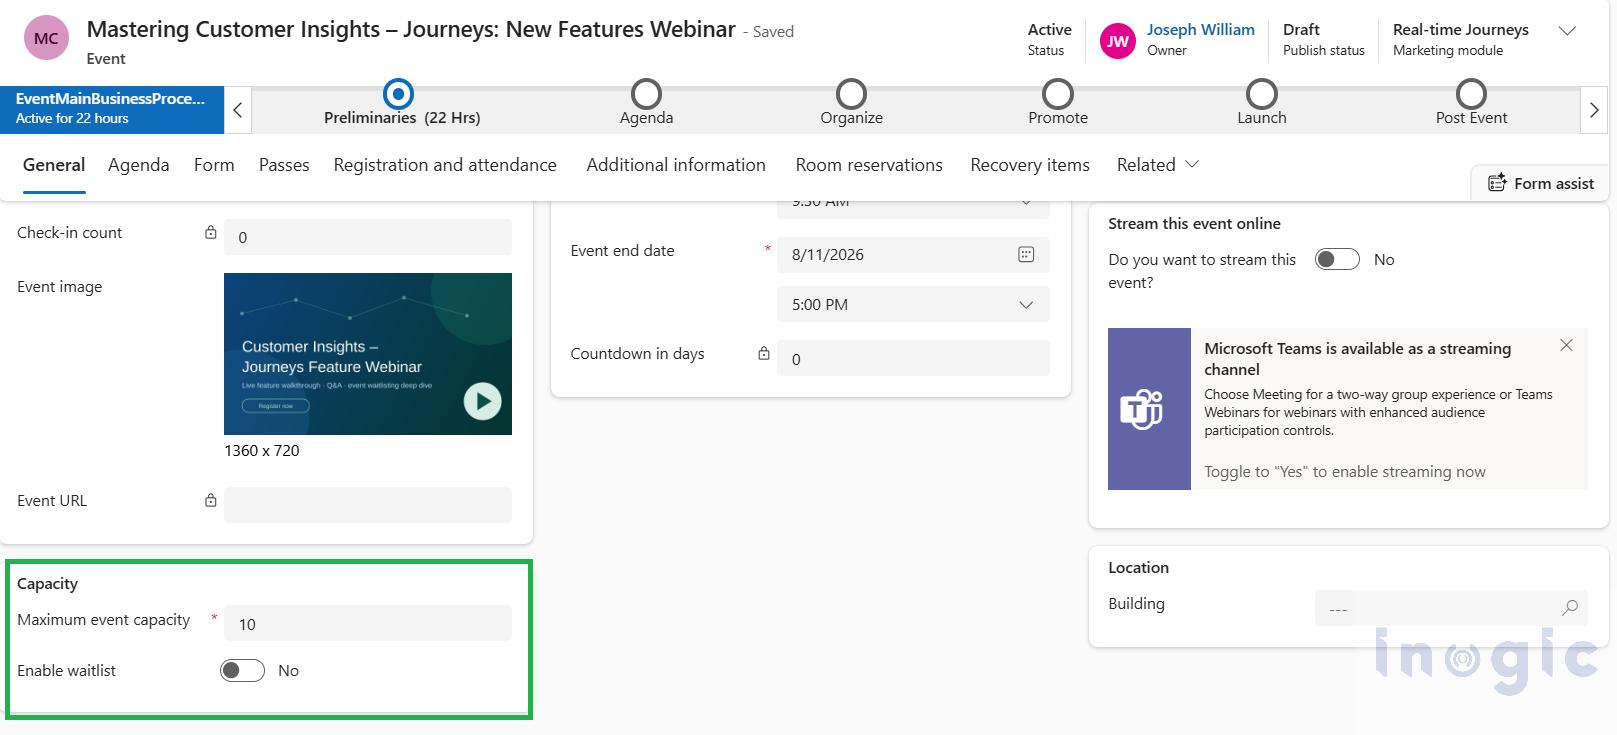
- Set the Waitlist for this event to Yes by changing the toggle “Enable waitlist” = yes
- Once toggle is set to Yes, the “Auto-register waitlisted contacts” field gets visible, which is set to No by default.
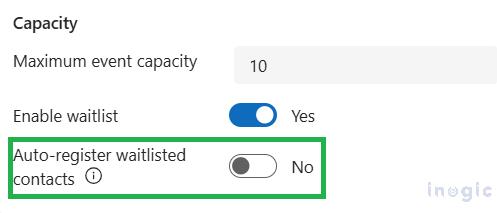
Depending on the “Auto-register waitlisted contacts” setting on the event, the Auto-register waitlisted contacts behave as follows:
- If it’s set to Yes, the system generates a registration for that contact automatically and flips their status reason to Registered.
With auto-register turned on, there’s no manual step at all — the system changes the status reason from Waitlisted to Registered on its own the moment a seat frees up.
- If it’s set to No, the contact isn’t registered automatically. Instead, they need to be invited to confirm they still want the seat, typically via a segment and journey that targets people whose registration is waitlisted and flagged as invited.
Unlike the above option, someone must manually change their status reason from ‘Waitlisted’ to ‘Registered’ using the segment or journey automation.
Let’s keep the “Auto-register waitlisted contacts” toggle to yes as below:
 Once setup is finished, clicking on the Go Live button publishes the event and makes it available to registrants.
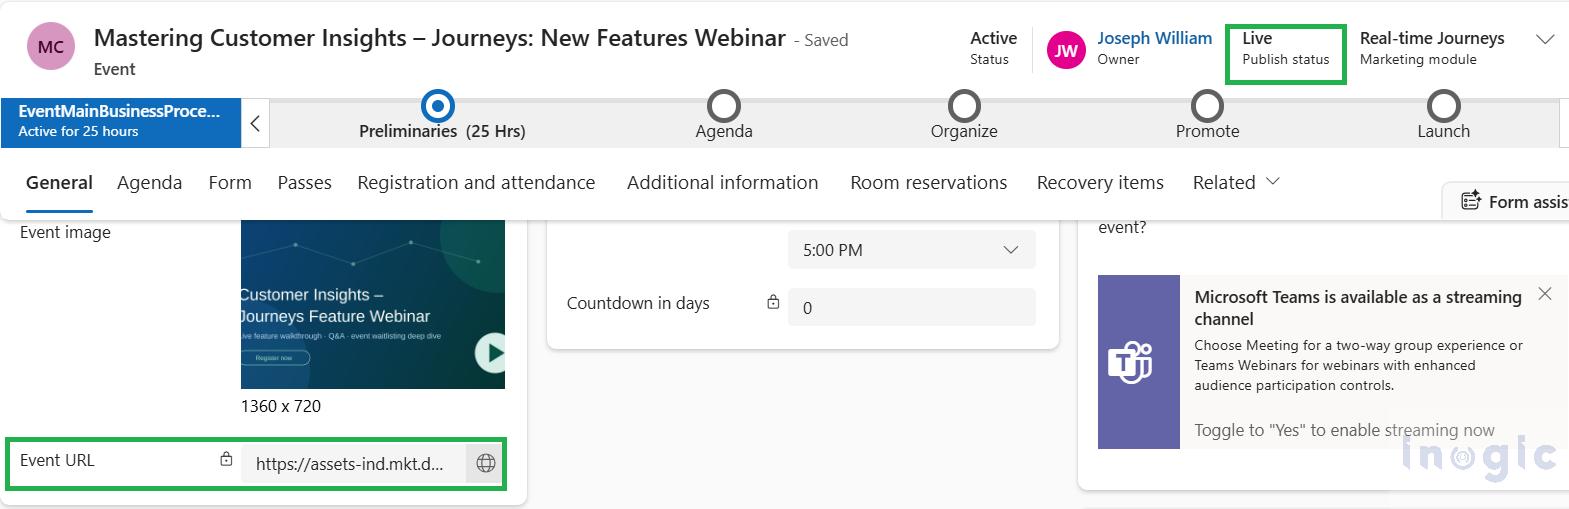
Once the event is live, the auto-generated Event URL can be dropped into an email and distributed through a customer journey to a targeted segment for registration.
The event registration form that I have created and sent for registration is as follows:
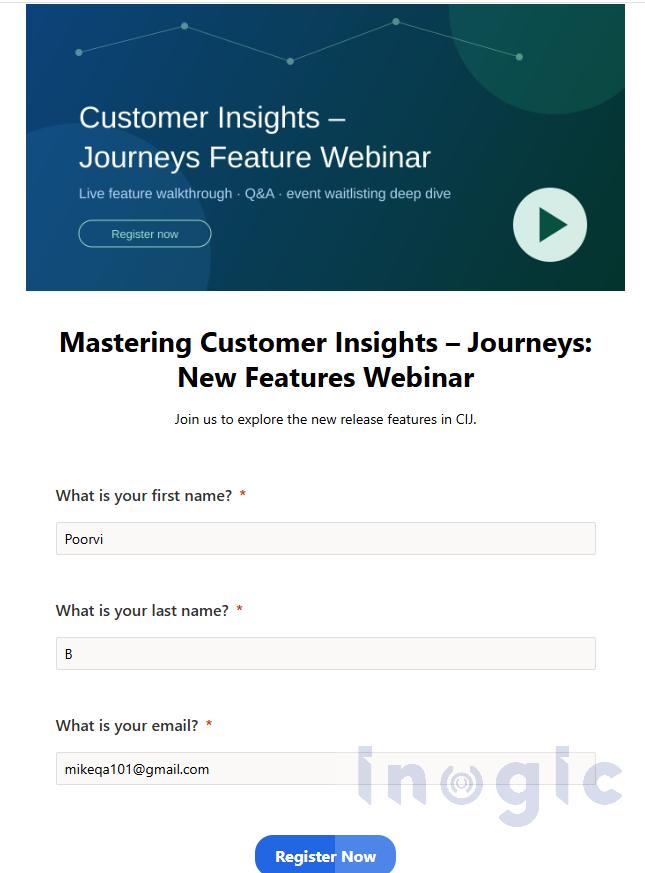
When the user clicks on the “Register Now” button, the “Event Registration” record will be created automatically.
You can refer to the MS doc for more details about Marketing forms. Let’s now look at the Journey side, which triggers are available.
In Customer Insights – Journey app > under Real-time journeys > Journeys> create a new Journey record:
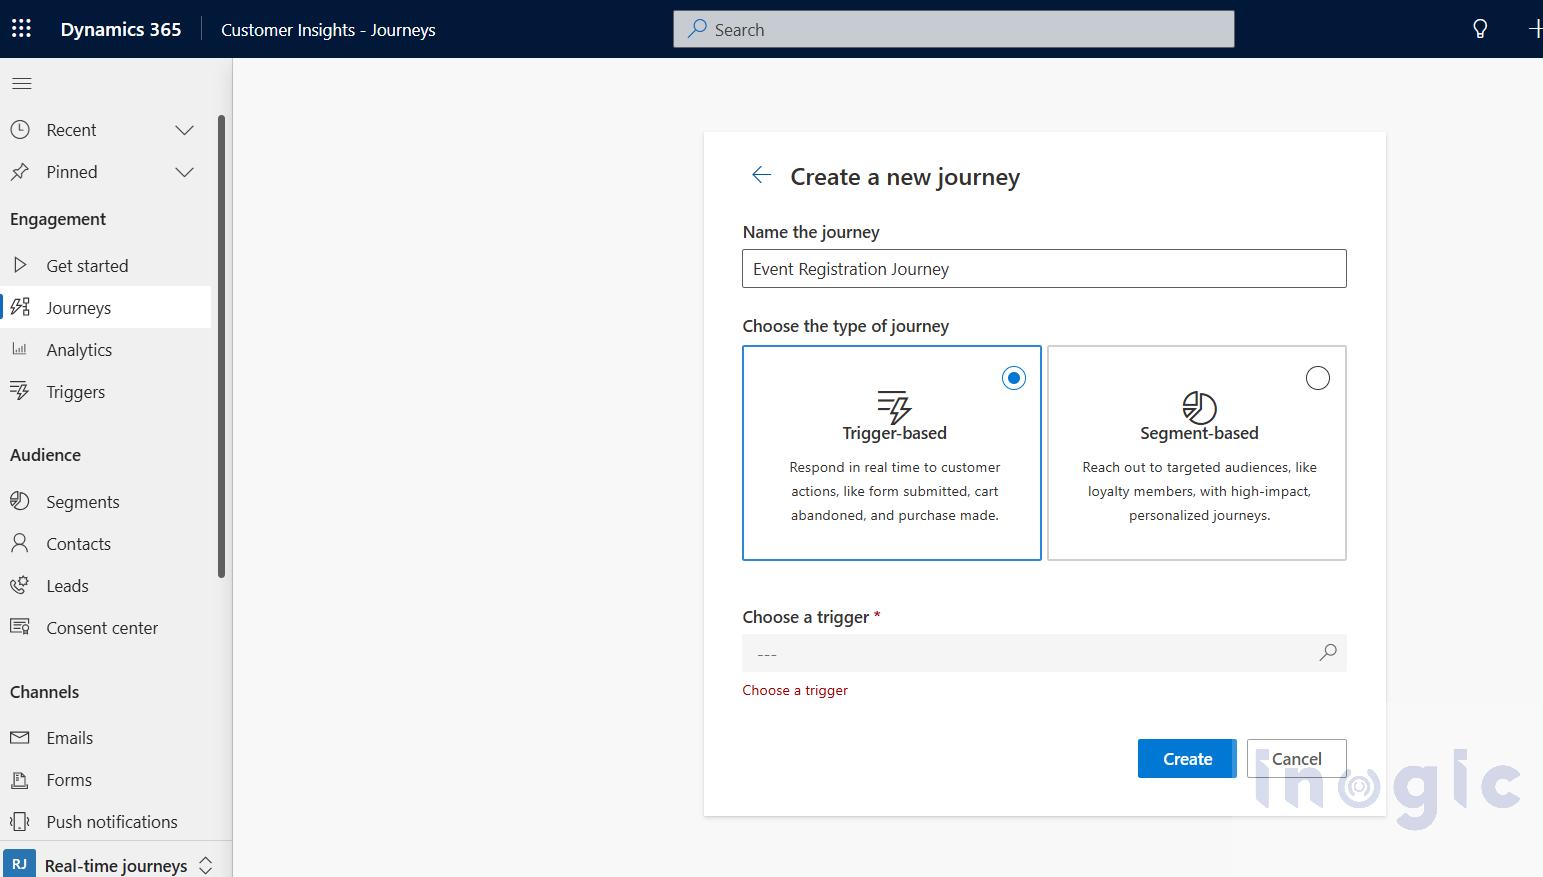
The available triggers are as follows:
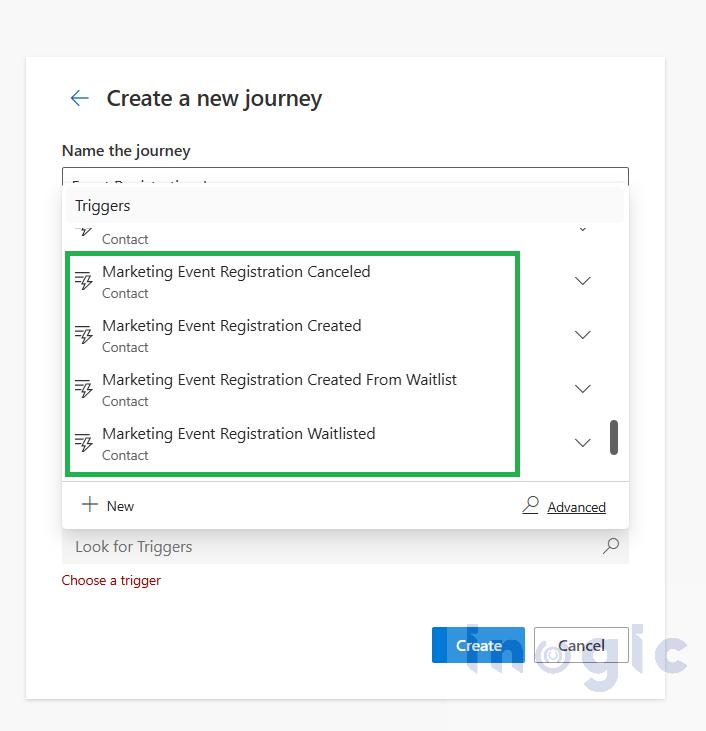
The two waitlist triggers
Two journey triggers ship with the feature, and they cover the two moments in the waitlist lifecycle you’re most likely to want to message around:
- Marketing event registration created — fires when a new waitlist registration is created, useful for an immediate “you’re on the list” confirmation.
- Marketing registration created from waitlist — fires when a registration’s status reason flips from Waitlisted to Registered, useful for the “a seat opened up — you’re confirmed” moment
Select the appropriate trigger and choose your event record as below:
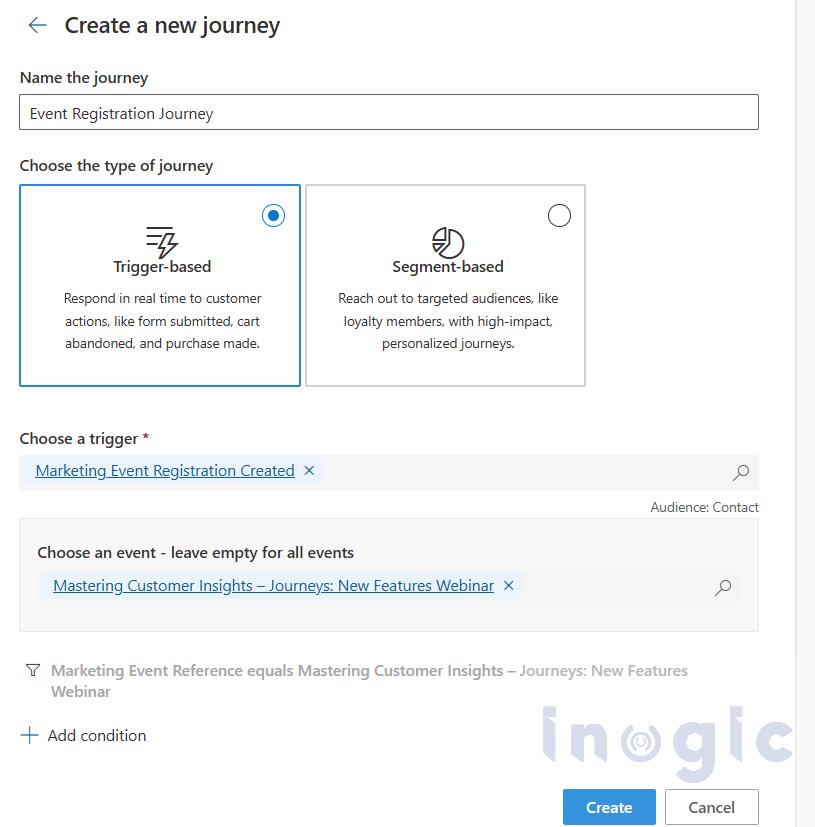
For this blog, let’s keep the Journey very simple. When the Event Registration record is created, the Registration confirmation email should be sent. In reality, it can be complex with follow-up steps, and you can use the custom trigger when the status reason of the event registration record is updated. You can refer to the MS doc for more details about the custom trigger.
How It Works
The mechanics are simpler than they might sound, and they hinge entirely on the status reason attached to each event registration record.
Every registration that comes in after capacity is reached is saved with a status reason of Waitlisted, rather than Registered.
In our example, when the 11th attendee (as the capacity is set as 10) tries to register for the webinar, they will experience the waitlist form instead of the simple registration. Now they will click on the “Join a waitlist” button as displayed below:
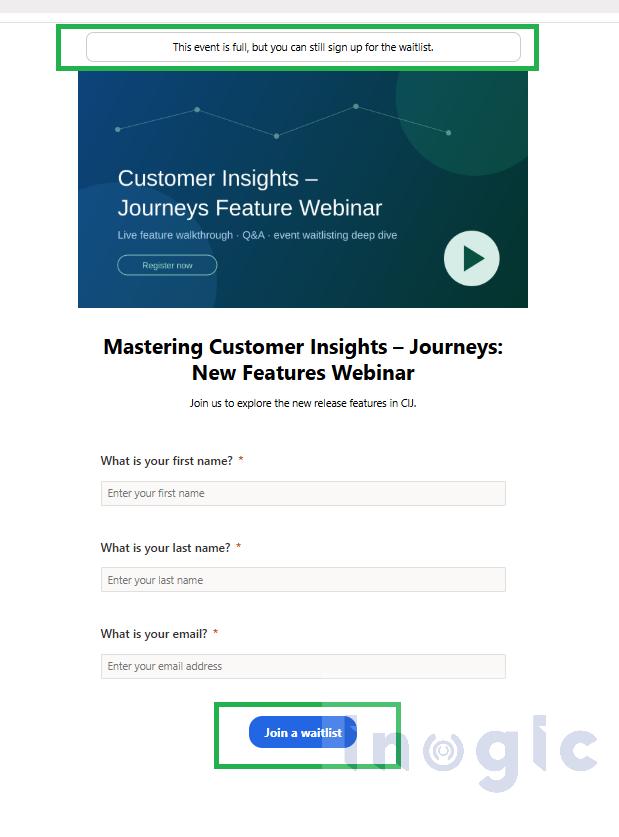
Event registration record still created with status reason as Waitlisted, shown below:
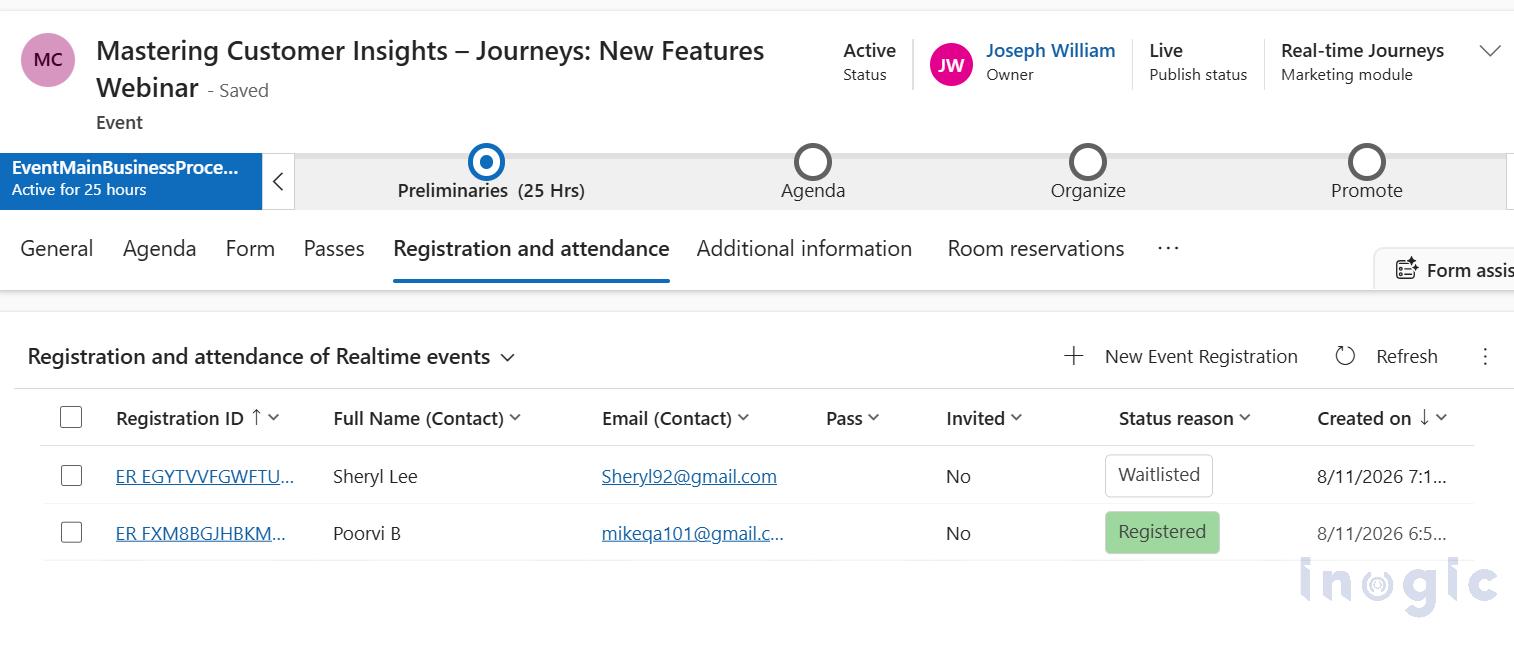
When an existing registrant cancels (freeing up a seat), the system revisits the waitlist and identifies the oldest record — the contact who has been waiting longest, based on registration date and time.
As the “Auto-register waitlisted contacts” setting is set to Yes in our scenario, the system will auto-change the “Waitlisted” status reason to “Registered” — no manual step is required.
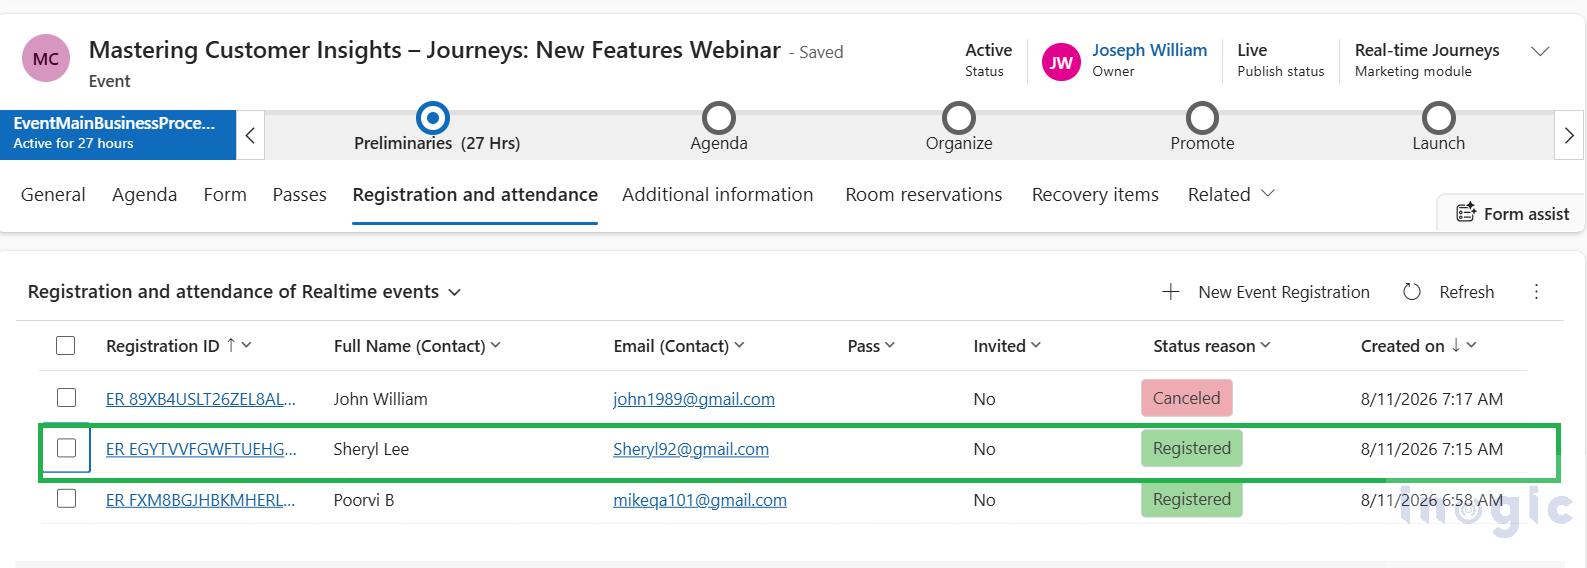
The status reason field is really the backbone of the whole feature — it’s what a segment or a journey trigger reads to know whether someone is holding a confirmed seat or still in the queue.
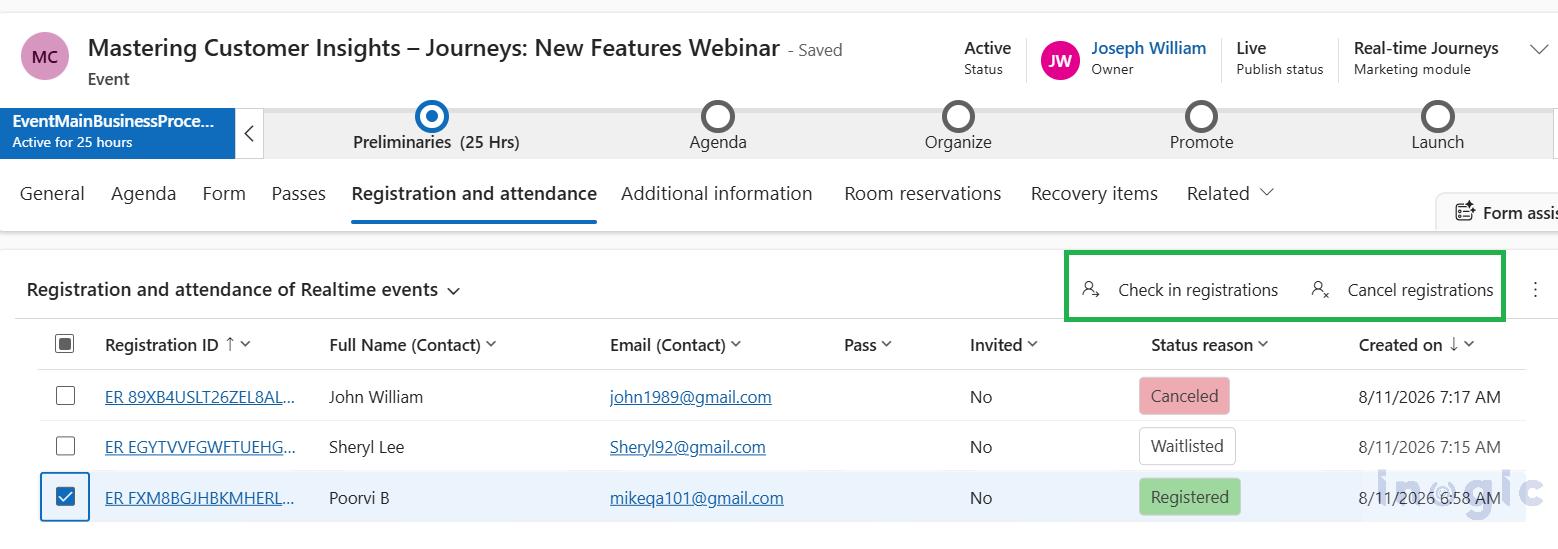
You can select a particular “Event Registration” record and can cancel the registration manually if needed, the 2 buttons available on selection of the record are Check in and Cancel Registration as shown below:
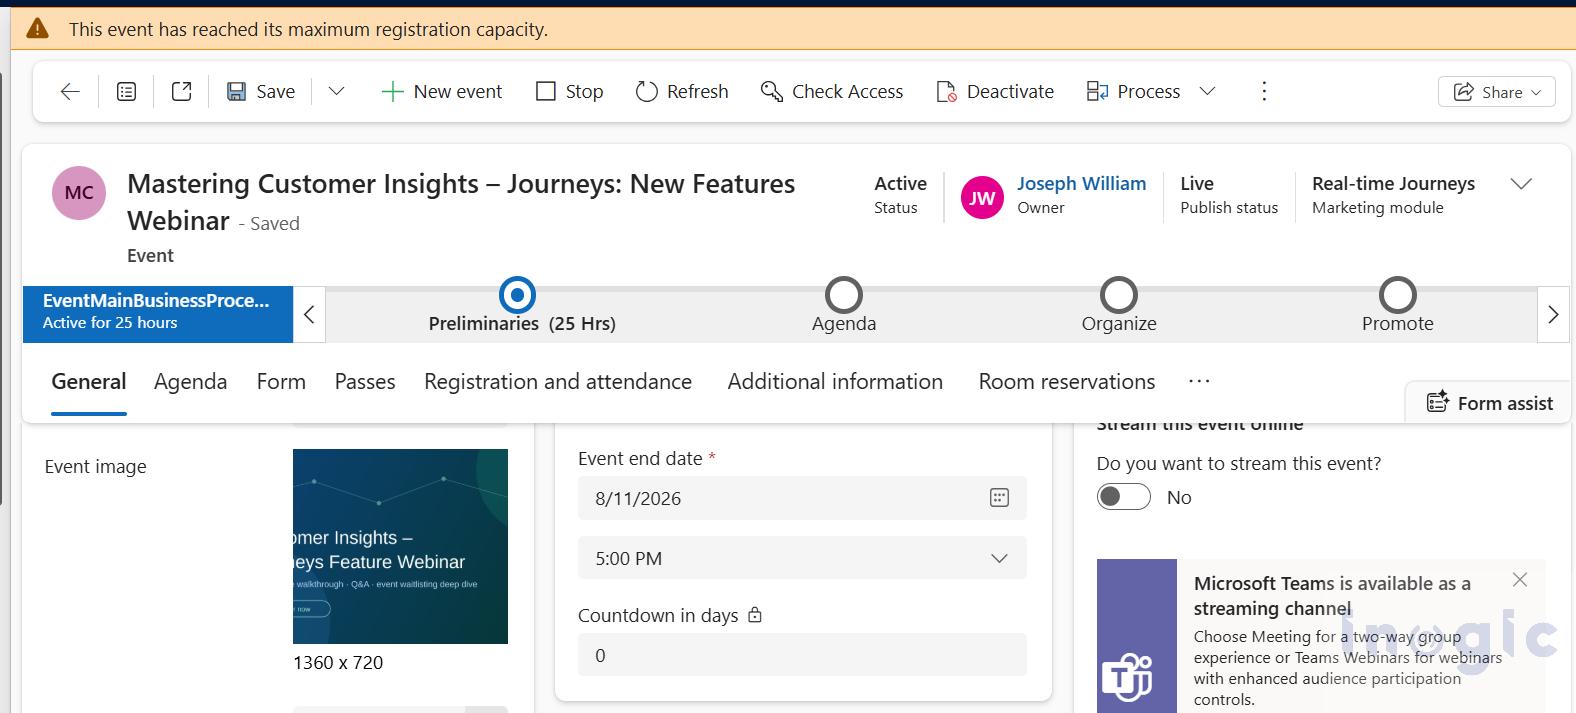
You will observe the warning on the event record itself that the event has reached its maximum registration capacity. For more details, refer to the MS doc.
With waitlisting configured for this webinar, here’s what happens end-to-end:
- Maximum event capacity is set to 10, Waitlist this event is set to Yes, and Auto-register waitlisted contacts is set to Yes.
- The Marketing event registration created trigger fires the moment someone lands on the waitlist, so they can immediately receive a “you’re on the waitlist, we’ll notify you if a slot opens” email rather than being left wondering through Journey.
- The Marketing registration created from the waitlist trigger fires the moment they’re promoted, sending a follow-up confirmation with the standard join link and calendar invite through Journey.
Conclusion
With event waitlisting, Customer Insights Journeys can automatically manage registrations as seats become available, while journey triggers keep registrants informed at each stage.
Looking to extend your Dynamics 365 capabilities? Explore Inogic for more Dynamics 365 solutions.
Have questions? Email us at crm@inogic.com
FAQs
1. How do I enable a waitlist in Dynamics 365 Customer Insights Journeys?
Open the event, go to the Capacity area, set the maximum event capacity, and enable the Waitlist option. You can then choose whether waitlisted contacts should be automatically registered when a seat becomes available.
2. What happens when a Dynamics 365 event reaches its maximum capacity?
New registrants are added to the waitlist instead of being registered directly. Their event registration record is created with the Waitlisted status reason.
3. Can Dynamics 365 automatically register contacts from an event waitlist?
Yes. Enable Auto-register waitlisted contacts on the event. When a registered attendee cancels and a seat becomes available, the longest-waiting contact can be automatically moved from Waitlisted to Registered.
4. What journey triggers are available for event waitlists?
Customer Insights Journeys provides two relevant triggers: Marketing event registration created, which can be used when a waitlist registration is created, and Marketing registration created from waitlist, which can be used when a waitlisted contact is moved to a confirmed registration.
5. Can I manually manage waitlisted registrations in Dynamics 365?
Yes. Waitlisted registrations can be reviewed and managed from the Event Registration records. You can also manually cancel registrations when required and use journeys or other automation to manage communication with waitlisted contacts.