Introduction
In this blog you will learn how to configure and synchronize data from QuickBooks to Dynamics 365 CRM and vice versa at specified intervals.
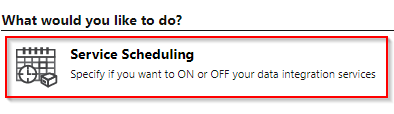
If you want to sync your data i.e. Customer, Product, and Transaction History records from QuickBooks to Dynamics 365 CRM, or if you want to bulk promote your data i.e. Account, Contact, Product, Quote, Order or Invoice records from Dynamics 365 CRM to QuickBooks, then you need to switch on the services and schedule it according to your business needs. In order to schedule your services, you need to click on Service Scheduling as highlighted in the below screenshot.
On clicking Service Scheduling, a user interface will open where you can switch on the different types of services provided as per your business needs.
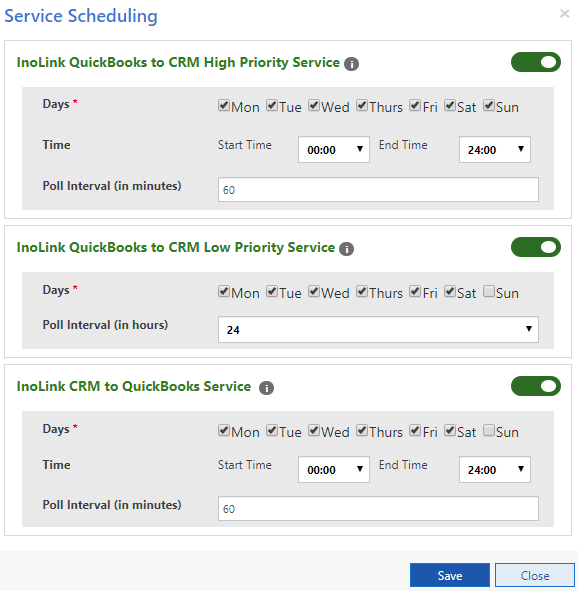
InoLink provides 3 different services for data synchronization from QuickBooks to Dynamics 365 CRM and vice versa, namely:
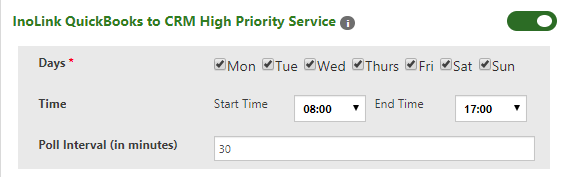
1. InoLink QuickBooks to CRM High Priority Service
This will sync Customers, Products, Transaction Histories and Balances from QuickBooks to Dynamics 365 CRM. To sync the aforementioned entity records, user needs to follow the below steps to setup the service:
- Toggle: Click on the toggle button to switch on/off the service.
- Days: Indicates on which days your service will run. The service will trigger only on the selected days.
- Time: Indicates the time when your service will run. The service will trigger from the specified time. If you want your service to run in your business hours i.e. 8 AM to 5 PM, then select the Start Time, and End Time accordingly and the service will trigger in your business hours only.
- Poll Interval (In minutes): Indicates the triggering interval of the service in the specified time. Meaning; if the poll interval has been set as 30 minutes, then your service will trigger after every 30 minutes, starting from 8 AM, till 5 PM.
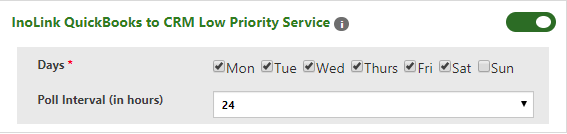
2. InoLink QuickBooks to CRM Low Priority Service
This will sync Ageing details (30, 60, 90) from QuickBooks to Dynamics 365 CRM. To sync ageing details, user needs to follow the below steps to setup the service:
- Toggle: Click on the toggle button to switch on/off the service.
- Days: Indicates on which days your service will run. The service will trigger only on the selected days.
- Poll Interval (In hours): Indicates the triggering interval of the service in the specified time. Here the poll interval is set in hours, and the options to choose are 6 hours, 12 hours, and 24 hours. If you select 6 hours, then your service will trigger after every 6 hours starting from midnight on the given day.
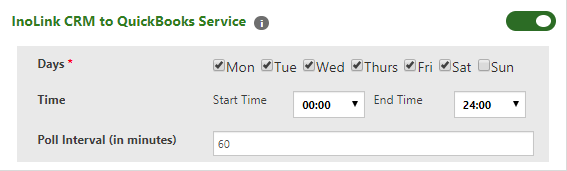
3. InoLink CRM to QuickBooks Service
Apart from real time synching of records from Dynamics 365 CRM to QuickBooks, we also support bulk synchronization of records from Dynamics 365 CRM to QuickBooks. If a user wants to promote records in bulk, she/he can go on the home grid, select records and click on promote button. Any records promoted from home grid would be considered as bulk promote. In order to sync your bulk promoted records, user needs to do the following to setup the service:
- Toggle: Click on the toggle button to switch on/off the service.
- Days: Indicates on which days your service will run. The service will trigger only on the selected days.
- Poll Interval (In minutes): Indicates the triggering interval of the service in the specified time. Meaning; if the poll interval has been set as 60 minutes, then your service will trigger after every 60 minutes (1 hour), starting from 12 midnight, till 23:59 PM.
Once the services have been switched on and setup accordingly, then click on Save button to save the details of your services.
Service dependency:
If you have switched on the services, but your features are off, then no data would be synced from either of the systems. So make sure you always turn on the features before starting the services.
Examples:
1. QuickBooks to Dynamics 365 CRM
Let’s say you have been using QuickBooks for a while and you are new to Dynamics 365 CRM, but you want your customer data of QuickBooks to be present in CRM. Creating tons of customer records manually in CRM would be time consuming, but you need not worry. Simply turn on the InoLink QuickBooks to CRM High Priority Service and InoLink QuickBooks to CRM Low Priority Service, and it will do the job for you. It will bring over all the Customers and Ageing details from QuickBooks, and create appropriate Accounts, and Contacts in CRM.
2. Dynamics 365 CRM to QuickBooks
Let’s say you have imported hundreds of Accounts and Contacts in your CRM, and you need the same to be present in QuickBooks, and you don’t have an excel ready with you to import in QuickBooks. This can be handled by InoLink CRM to QuickBooks Service. Simply select all the records you want to integrate in your QuickBooks, and click on Promote button on the home grid of Account, and Contact entity. As per your setup, the service will trigger, and start processing all the promoted records in Dynamics 365 CRM.
Conclusion
As illustrated above, you can easily synchronize data from QuickBooks to Dynamics 365 CRM and vice versa at specified intervals.