It’s always a great pleasure for us to innovate and discover something which is very new but can be used at a large extent.
This article is also based on a very interesting topic which can be used in SSRS reports to enhance the quality and overview of the reports and i.e. “Indicators”.
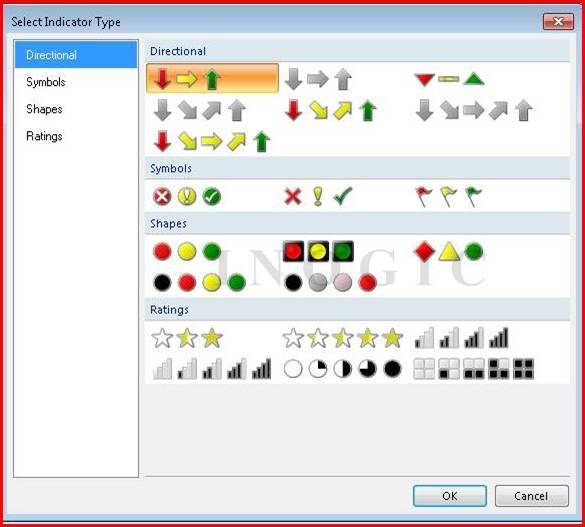
Indicators are the icons that can be used to provide special effects like directions, symbols, ratings etc. on the reports.
The below figure shows the indicators provided in the SQL Server Business Intelligence Development Studio:
Scenario:
Suppose we have a report which shows the star indicators based on the value of a column of a dataset and we want to show the output as:
![]()
To achieve the desired output we have to follow the below steps:
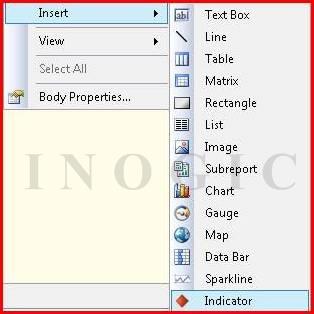
1. Open an existing project or create a new project and on the report area right click and from the Insert tab select Indicator.
2. Select any of the indicators as per your requirement, for example here we are considering the 3 Stars –Rating Indicator.
3. Once added, we can set the dataset for the indicator from where the data would be shown.
4. In case of Rating Indicators, we have to insert the same no. of indicators as shown in the options.
For example– If we have to show a five star rating indicator then we have to insert the 5 Star- Rating Indicator five times and for a three star rating indicator we have to insert the 3 Star Rating Indicator three times.
5. Each indicator has two parts
- Gauge Panel
- Indicator
6. We have to modify the Indicator part to show the data and to set its appearance.
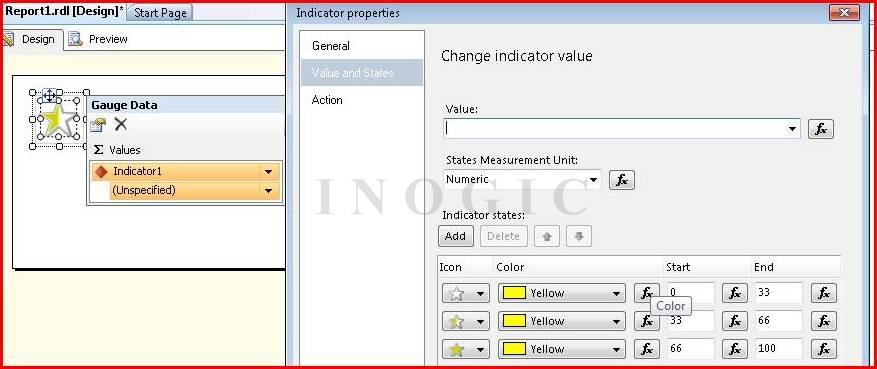
In the above fig.,
Value: The column of the dataset whose data is to be shown or any expression based on the scenario.
States Measurement Unit: It has two options, Numeric and Percentage. The default value is Percentage.
Indicator States: In case of 3 Star Rating Indicator, we have to define 3 states for all the three indicators inserted on the report,
- 1st state is for the blank star i.e. we have to provide the (Interval) Start and End values for which the Star would be shown as blank. In our case it would be 0-0 as we would like to show the blank star only when the value is 0.
- 2nd state is for the half-filled star i.e. We have to provide the (Interval) Start and End values for which the Star would be shown as half-filled. Here we would set it as 0-0.5 to show a half-filled star if the value is between 0 and 0.5.
- 3rd state is for the full star i.e. We have to provide the (Interval) Start and End values for which the Star would be shown as full. We will set it as 0.5-1 to show a filled star if the value is 0.5-1.
We have to repeat the above steps a, b and c for the remaining two indicators and also we have to change the intervals too.
7. Additionally we can change the colors of the indicators to be shown based on different conditions.
Note: Indicators are supported for the SQL SERVER 2008 R2 or later versions.
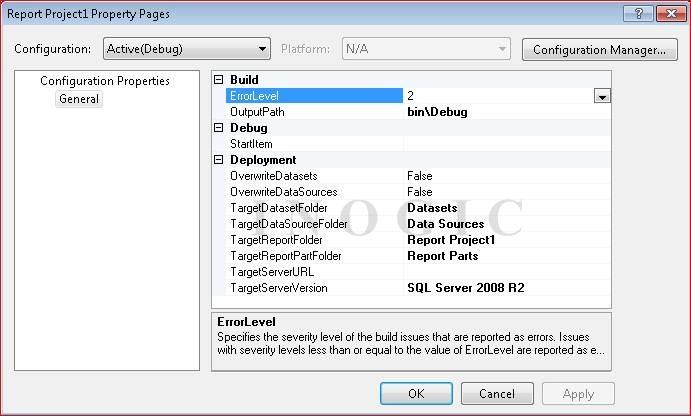
To use indicators in your report you have to use the SQL SERVER 2008 R2 as TargetServerVersion. If your project is not configured to use the SQL SERVER 2008 R2 as TargetServerVersion then you will get an error: “The state indicator, Indicator Name, was detected in the report. SQL Server 2008 Reporting Services does not support state indicators. Either reduce the error level to a value less than 2 or change the ReportServerTargetVersion to a version that supports state indicators.”
Please follow the below steps to set the TargetServerVersion in case of SQL SERVER 2008:
Go to Project >> Project Properties >> set TargetServerVersion= SQL Server 2008 R2.
Advanced Features:
If we want to show the different colors of the stars based on the values retrieved like:
- If the value is 1, then show 1 star in Red Color,
- If the value is 2, then show 2 stars in Orange Color, and
- If the value is 3, then show 3 stars in Green
In order to achieve this output we will have to modify the Indicator Properties as:
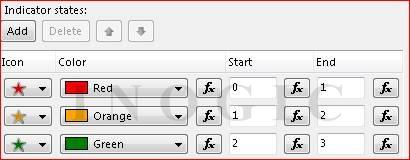
- Go to the first star and modify its states as shown in the following figure:
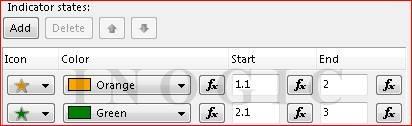
- Similarly so to the second star and change its properties as:
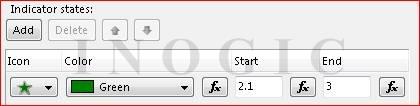
- Finally change the properties of the third star and you are done.
The output would be something like:

Hope this helps.