 Marketing teams generate valuable customer engagement through emails, events, forms, and digital campaigns, but converting that engagement into sales opportunities often involves manual effort and delayed follow-ups. Record Creation (Preview) in Dynamics 365 Customer Insights – Journeys helps automate this process by creating Microsoft Dataverse records when customers perform predefined actions within a journey. In this blog, we’ll show you how to use this feature to automatically create Lead records in Dynamics 365 Sales and streamline the handoff between marketing and sales.
To enable this feature:
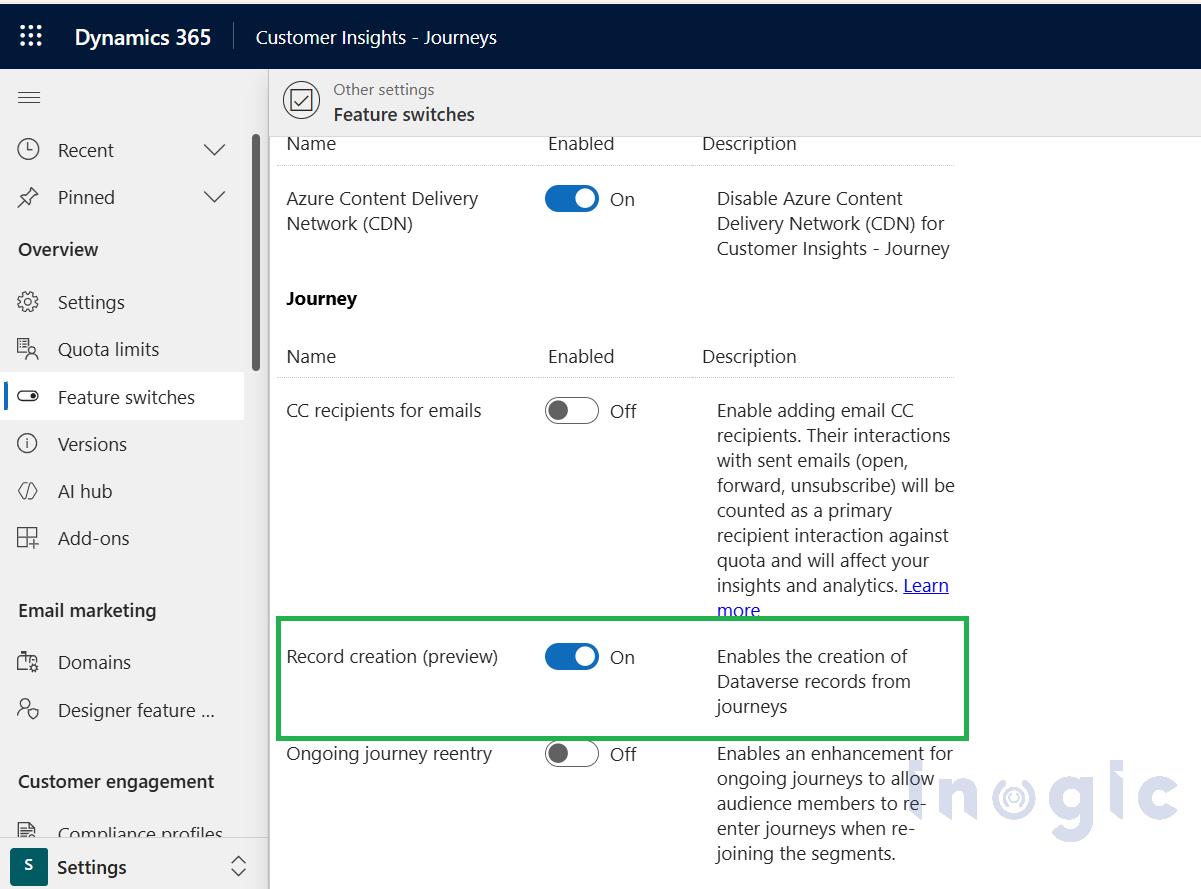
- Under Dynamics 365 Customer Insights – Journeys app > Go to Settings> Overview > Feature switches.
- Turn on Record creation (preview)as shown below:
 Before implementing Record Creation (Preview), keep the following points in mind:
- Ensure users have the required permissions to create records in the selected Dataverse table.
- Validate all field mappings before publishing the journey.
- Review any feature limitations associated with Preview functionality.
- Monitor record creation activity after deployment to ensure expected behavior.
Let’s consider a business scenario to understand how this feature works.
Business Scenario:
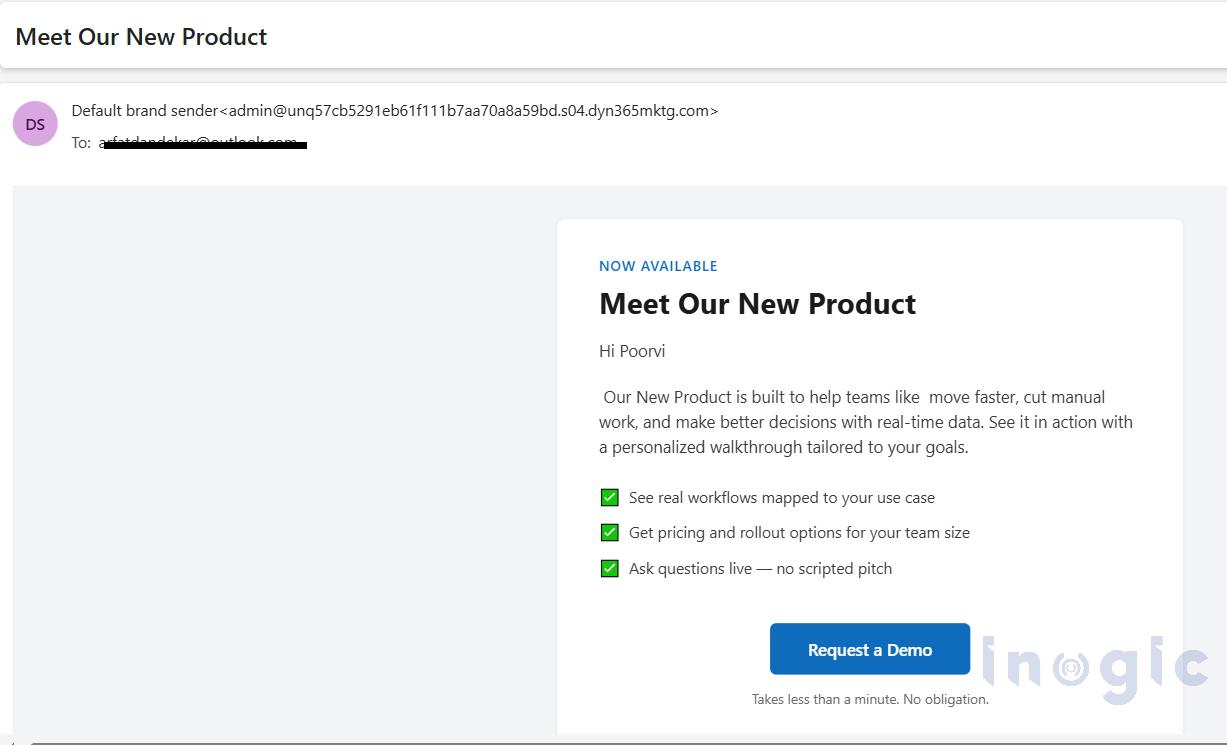
Imagine a company launching a marketing campaign to promote a new product through email. Existing contacts receive a marketing email containing a Request a Demo button.
When they click the “Request a Demo” button, they are expressing interest in learning more about the product. Traditionally, marketing teams might need to review submissions and manually create lead records for the sales team. This process can introduce delays and ultimately increase the risk of missing potential opportunities.
With Record Creation (Preview), the journey can automatically create a Lead record as soon as the contact clicks the “Request a Demo” link. The lead is populated with relevant customer information, enabling the sales team to initiate the qualification process promptly.
What is Record Creation (Preview)?
Record Creation (Preview) is a journey action that enables Customer Insights – Journeys to automatically create records in Microsoft Dataverse when customers meet predefined conditions or perform specific actions within a journey.
The feature supports both standard and custom Dataverse tables, enabling organizations to automate a wide range of business processes without requiring additional automation tools.
Some common use cases include:
- Creating leads from demo requests.
- Creating cases from support requests.
- Generating follow-up tasks for sales representatives.
- Creating custom business records.
- Automating internal business processes triggered by customer interactions.
Let us continue our business scenario.
- A contact receives a marketing email.
- The contact clicks the “Request a Demo” button.
- The contact enters a journey.
- The Create a Record (Preview) action is triggered.
- A Lead record is automatically created in Dynamics 365 Sales. Along with a Phone Call activity.
This automation ensures that interested prospects are immediately captured and routed to the sales team for timely engagement.
Step 1: Create a Journey
Navigate to Customer Insights – Journeys and create a new journey.
Configure the journey entry point based on the customer interaction you want to track. Once the trigger is configured, define the customer path within the journey designer.
Step 2: Add the Record Creation (Preview) Action
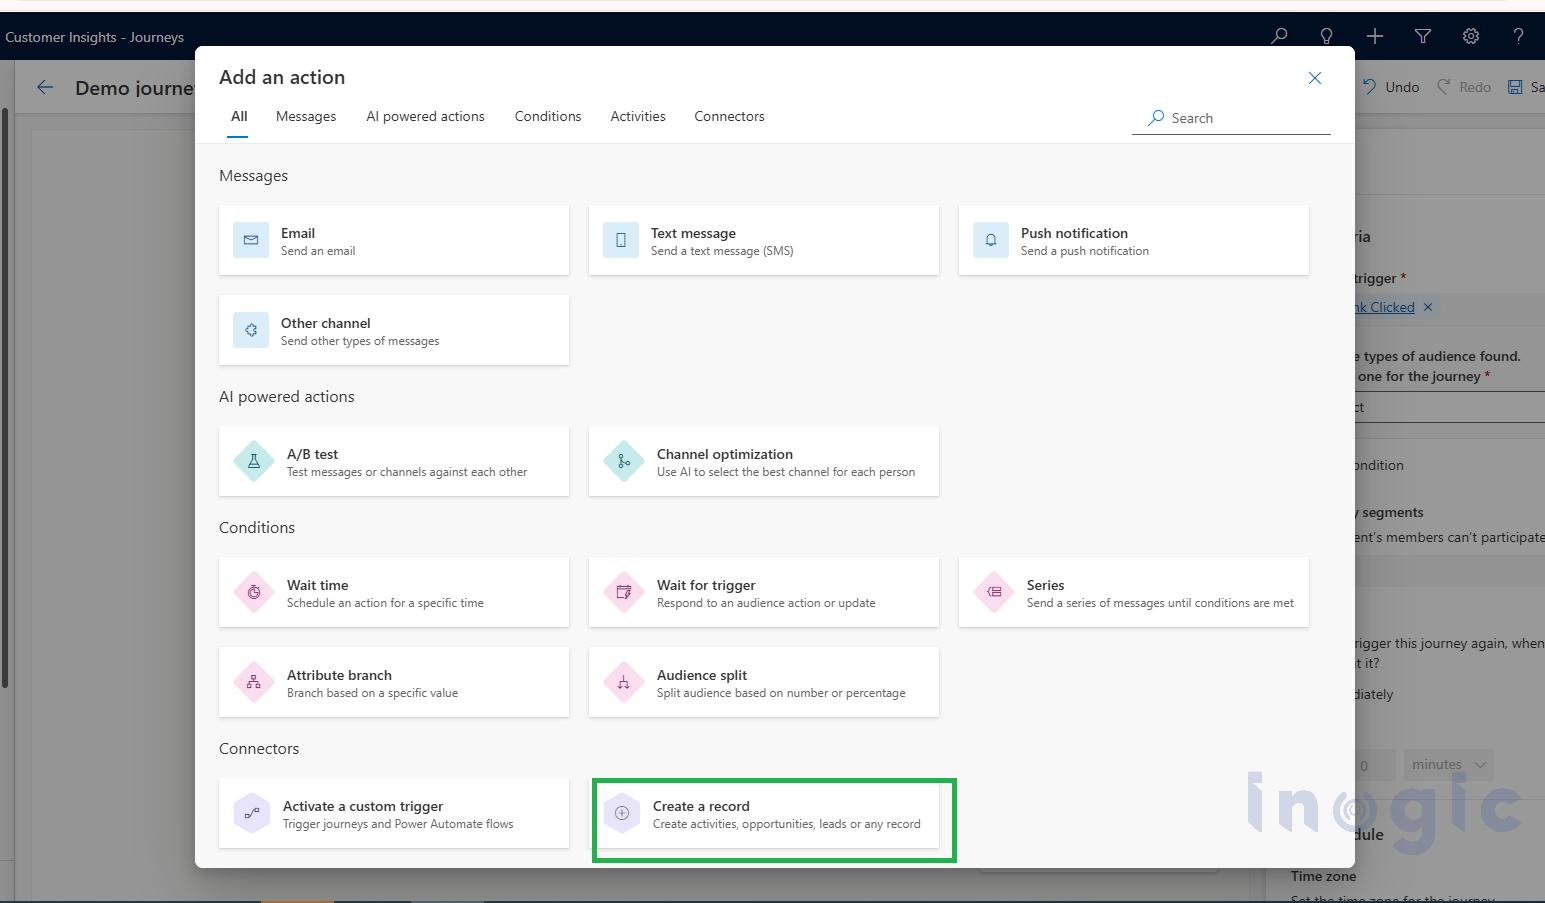
After configuring the trigger, select the “+” icon within the journey canvas and add the Create a Record (Preview) action.
This action will automatically create a Dataverse record when the customer reaches this stage of the journey.
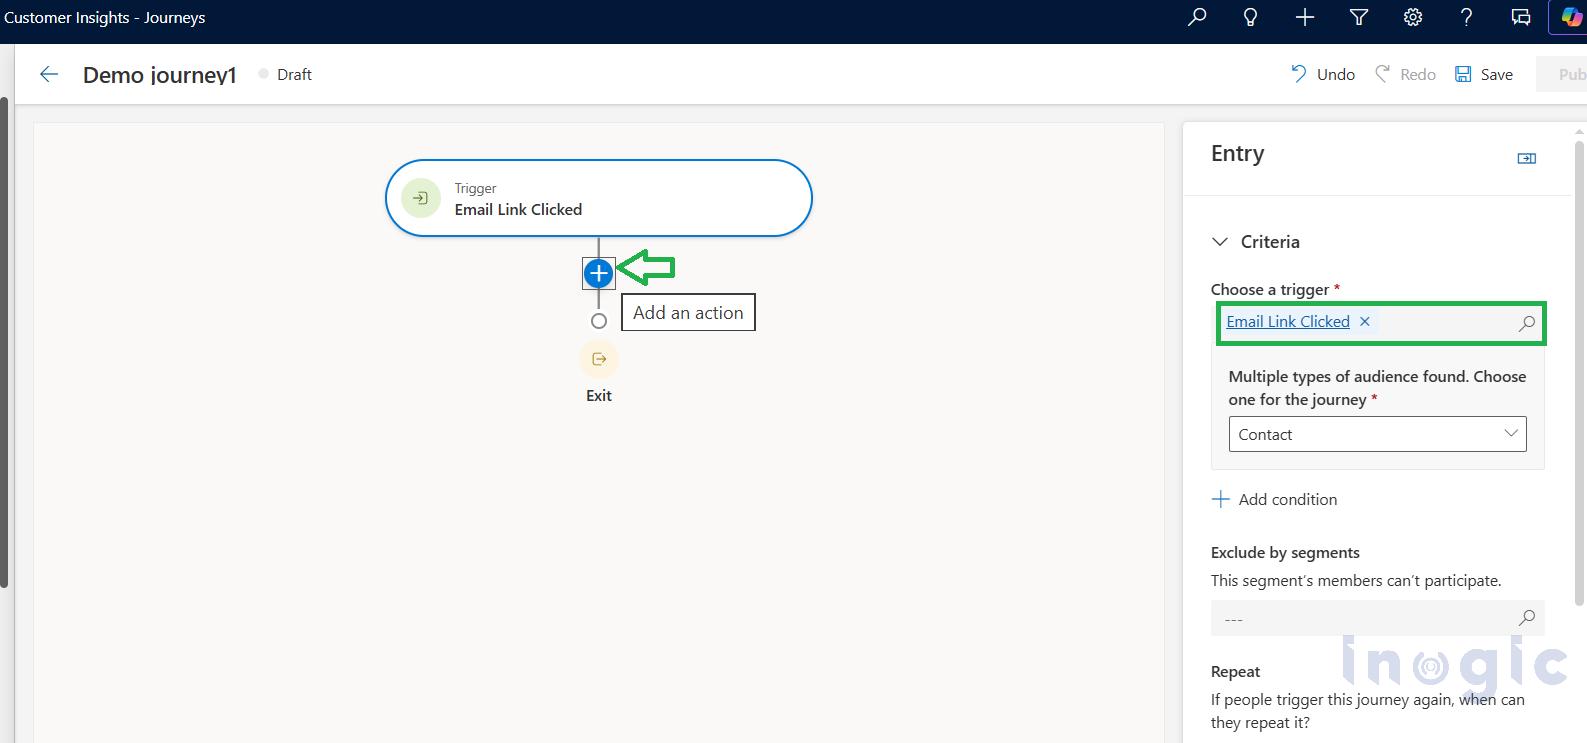
Journey Designer with Record Creation (Preview) Action
The Journey Designer provides a visual representation of the customer experience. By adding the Create a Record (Preview) action directly into the journey flow, organizations can automate business processes without requiring custom development or separate workflows.
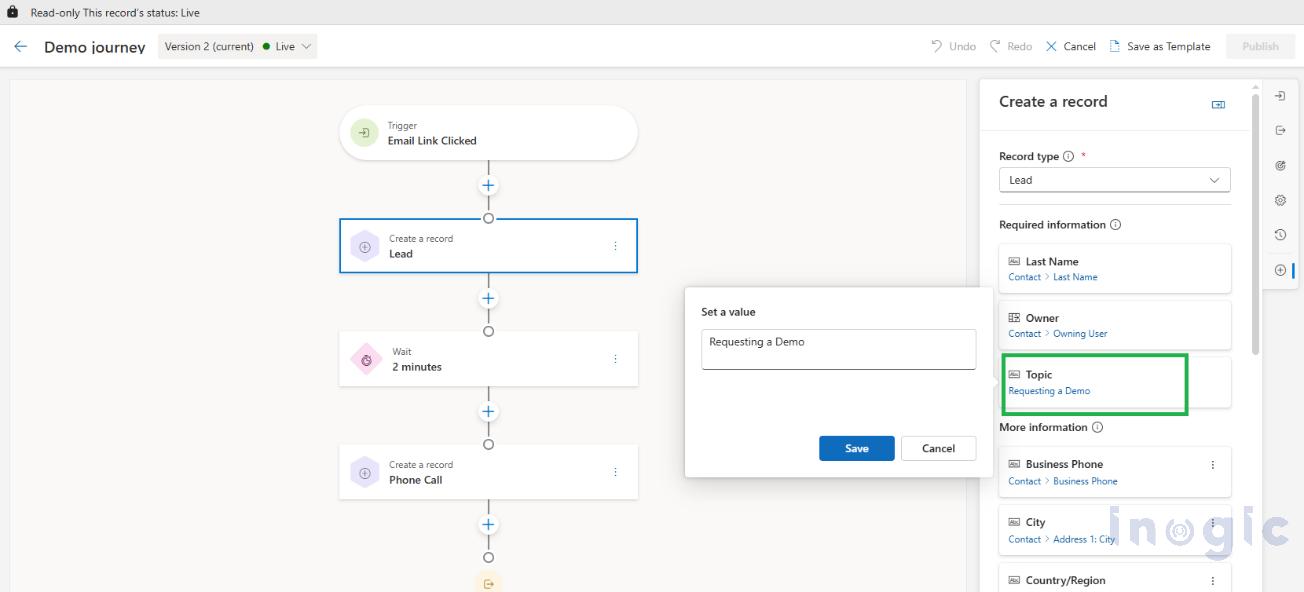
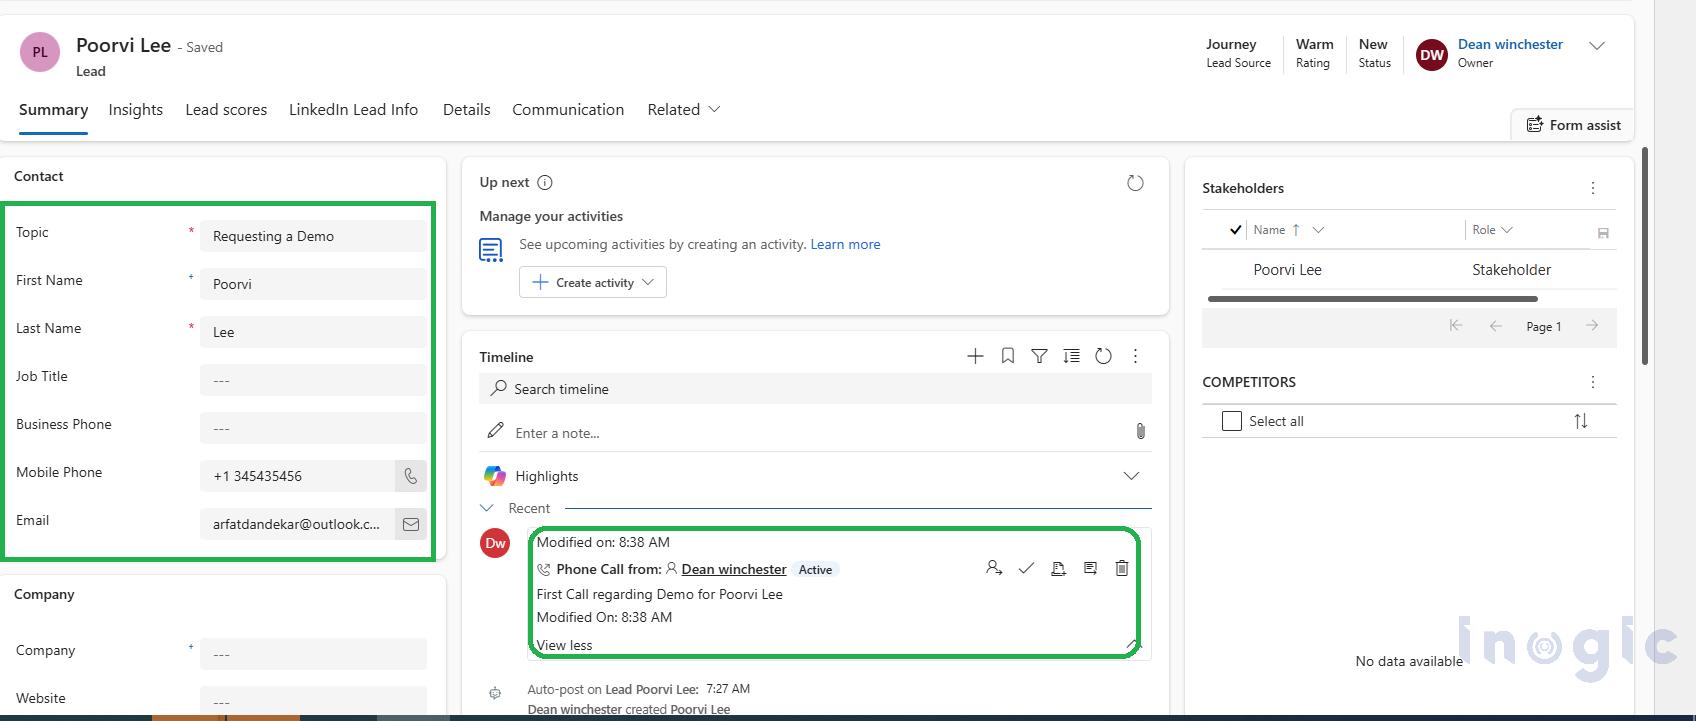
In this scenario, when the contact clicks the Request a Demo link, the journey executes the Record Creation (Preview) action, automatically creating both a Lead record and a Phone Call activity record in Dynamics 365. This enables the sales team to follow up with the prospect promptly.
Step 3: Select the Target Table
The next step is to choose the Dataverse table where the record should be created.
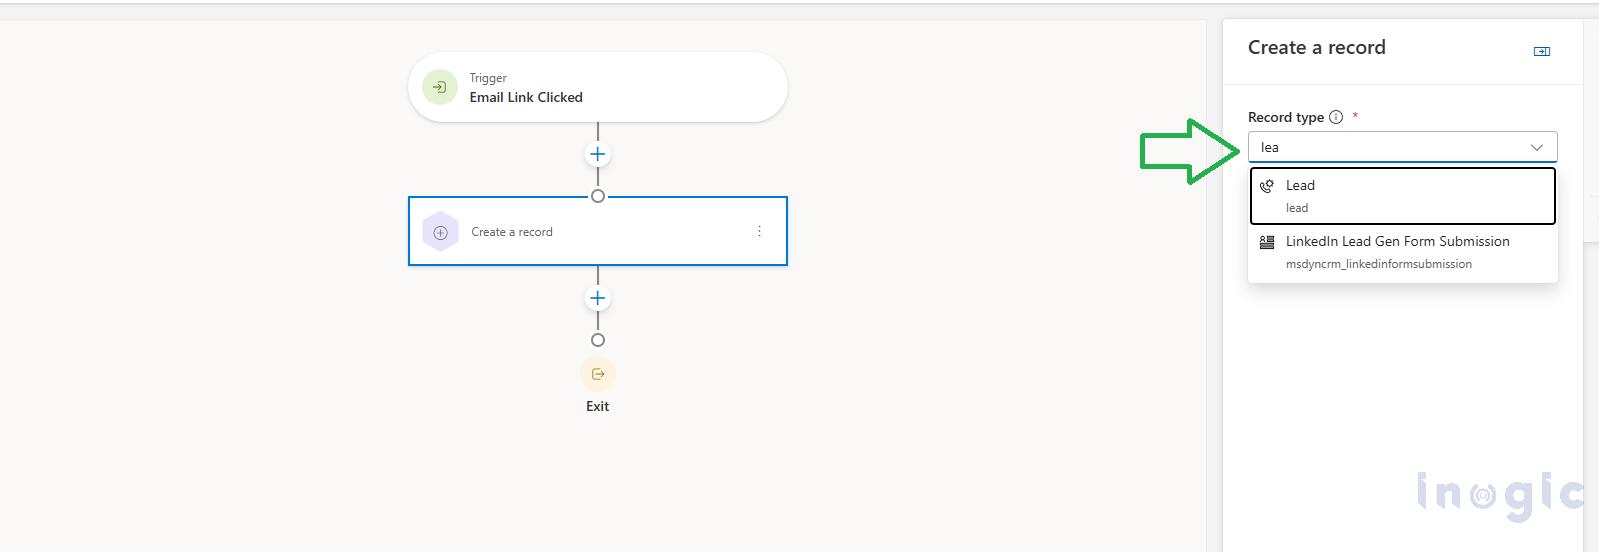
On the right pane, select the Record Type field and choose the desired Dataverse table. You can choose from standard Dataverse tables, such as Lead, Opportunity, Case, and Phone Call, or select custom tables if needed. The selected record type determines which fields will be available for mapping during the record creation process. Select the Lead table.
The Lead record serves as the handoff point between marketing and sales, ensuring the prospect’s interest is captured immediately.
Step 4: Configure Field Mapping
Field mapping determines how customer information is transferred into the Lead record.
By mapping the appropriate fields, the sales team receives all necessary information to begin engaging with the contact.
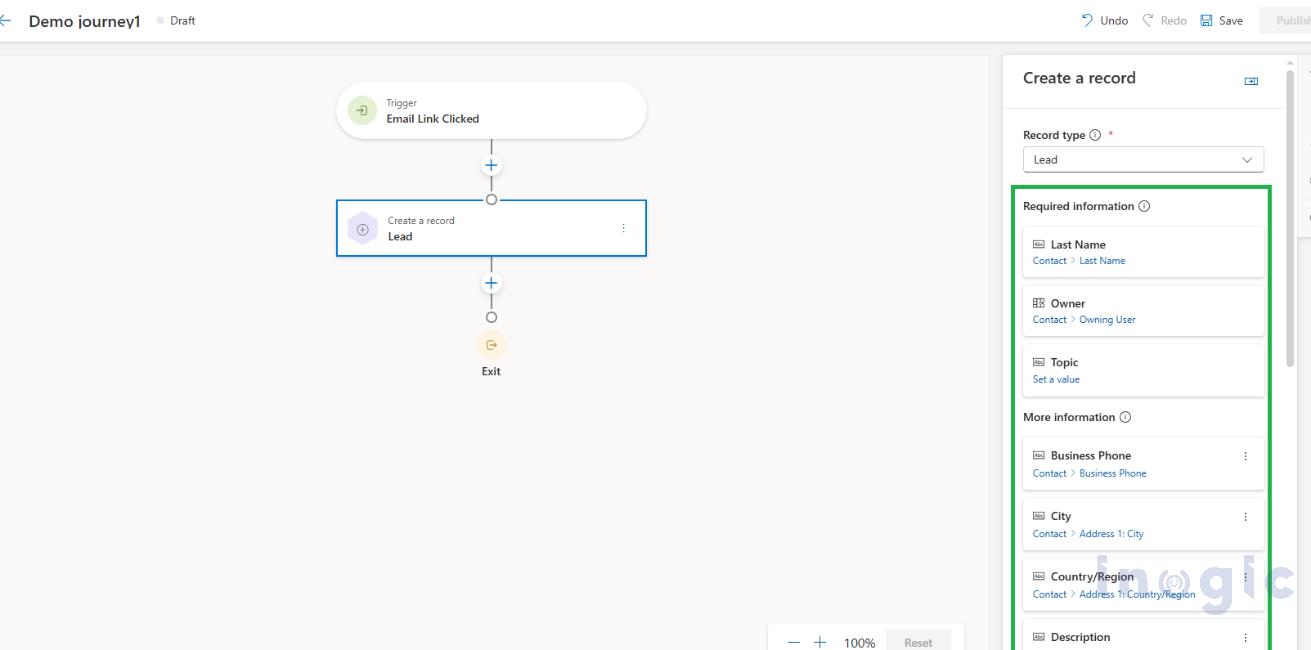
After selecting the Lead table from the Record Type dropdown, the Required Information and More Information sections become visible. These sections display the default field mappings between the Contact and Lead tables. The required fields must be populated for successful record creation, while the additional fields can be mapped as needed to capture more information about the contact.
Note: Required fields are displayed by default from the Journey Audience selected (In our scenario its Contact).
Static vs Dynamic Content configuration:
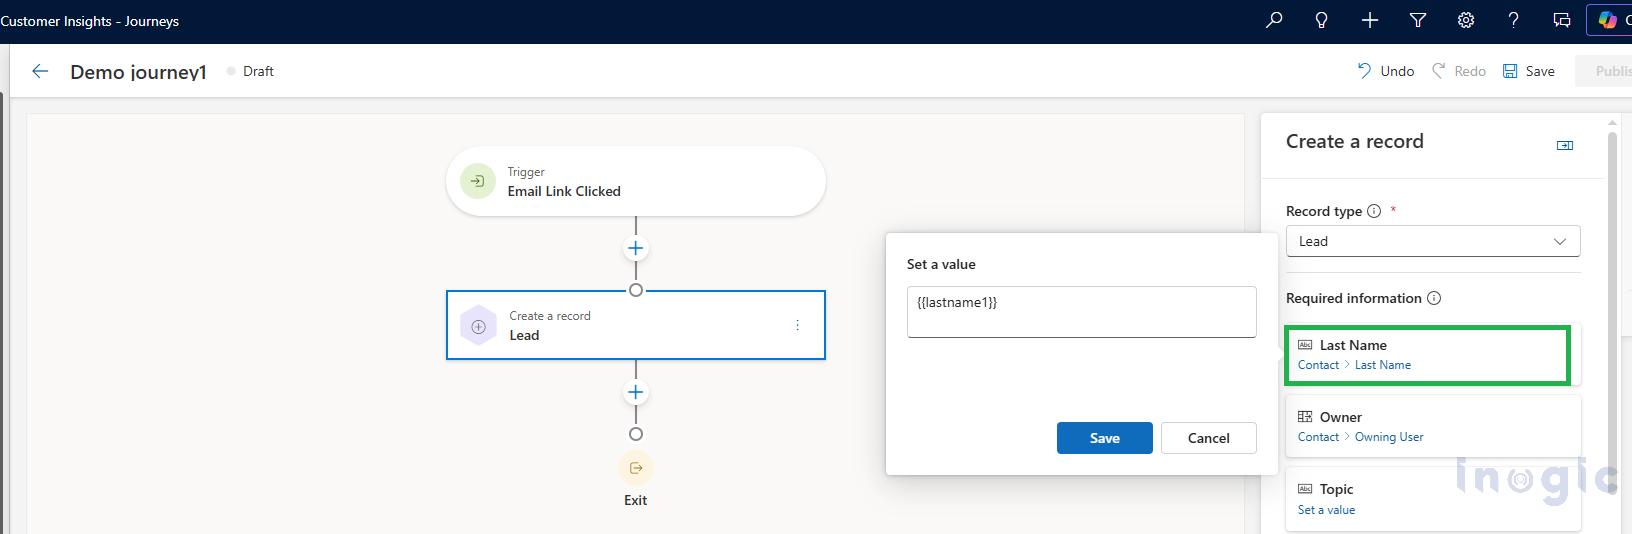
You can either set the static value or dynamically can use Dataverse table fields to personalize each record based on the contact, lead, trigger, or related data.
In our business use case, we have used the Contact table mapping while creating a Lead record. Below are examples of dynamic content and static values:
Last Name field of Lead record mapped dynamically from Last Name of Contact record:
The Topic field on the Lead record was assigned a static value because there was no corresponding field available in the Contact table. Since Topic is a required field, a static value must be provided.
If you don’t populate a required field, you’ll receive the following validation error when publishing the journey.
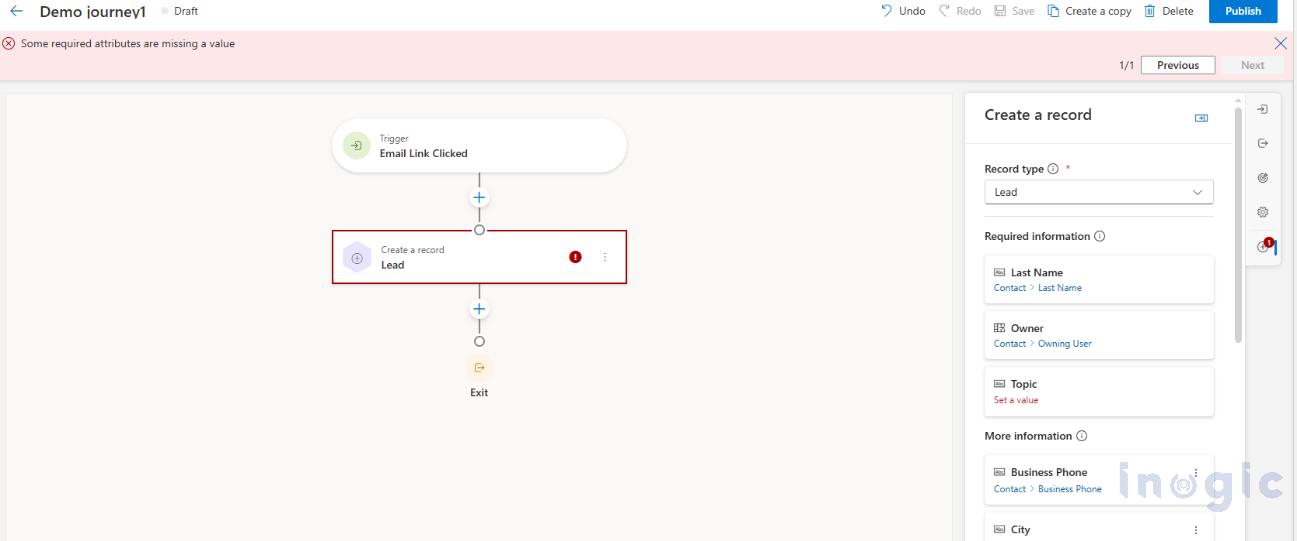
After providing a value for the Topic field, you can publish the journey.
Step 5: Save, Validate, and Publish
After completing the configuration, publish the journey. Verify that the Lead record has been successfully created in Dynamics 365 Sales along with the associated Phone Call activity.
The following image shows the final published journey:
Execution:
When a contact receives an email announcing a new product launch and clicks the “Request a Demo” link, the journey automatically creates a Lead record in Dynamics 365. Additionally, a Phone Call activity record can be created to facilitate timely follow-up by the sales team.
Depending on the value configured in the Regarding field for the Phone Call activity, the record can be associated either with the newly created Lead or with the existing Contact record.
Marketing email received by the contact:
Lead record creation with defined mapping:
For more details, you can refer to this Microsoft doc.
Benefits of Record Creation (Preview)
Implementing Record Creation within customer journeys offers several advantages:
- Faster Lead Capture – Prospects are automatically converted into leads as soon as they express interest, reducing delays in follow-up.
- Improved Sales Productivity – Sales representatives spend less time on administrative tasks and more time engaging with potential customers.
- Better Marketing and Sales Alignment – The automated handoff ensures that marketing-generated interest is immediately visible to the sales team.
- Reduced Manual Effort – Lead records are created automatically, eliminating repetitive data entry.
- Enhanced Customer Experience – Timely engagement helps organizations respond to customer interest while it is still fresh, increasing the likelihood of conversion.
Conclusion
Record Creation (Preview) in Dynamics 365 Customer Insights – Journeys helps organizations automate lead creation and other business processes, enabling faster follow-ups and reducing manual effort.
By incorporating this feature into your customer journeys, you can improve operational efficiency and strengthen collaboration between marketing and sales.
Looking to get more from Dynamics 365 Customer Insights – Journeys? The experts at Inogic can help you implement, customize, and optimize your marketing automation strategy. Reach out to us at crm@inogic.com to discuss your business requirements.
FAQ
What is Record Creation (Preview) in Dynamics 365 Customer Insights – Journeys?
Record Creation (Preview) in Dynamics 365 Customer Insights – Journeys is a journey action that automatically creates Microsoft Dataverse records when customers meet predefined conditions or perform specific actions during a customer journey. It supports both standard and custom Dataverse tables, enabling organizations to automate lead creation, case management, task creation, and other business processes without manual intervention.
How do I use Record Creation (Preview) in Dynamics 365 Customer Insights – Journeys to create Leads?
To create Leads using Record Creation (Preview) in Dynamics 365 Customer Insights – Journeys, add the Create a Record (Preview) action to your journey, select the Lead table as the record type, configure the required field mappings, and publish the journey. When a customer meets the defined trigger – such as clicking a Request a Demo button – a Lead record is automatically created in Microsoft Dataverse and becomes available in Dynamics 365 Sales for follow-up.
What are the benefits of using Record Creation (Preview) in Dynamics 365 Customer Insights – Journeys?
Using Record Creation (Preview) in Dynamics 365 Customer Insights – Journeys helps organizations automate business processes by creating records in real time based on customer interactions. It reduces manual data entry, improves lead response times, enhances collaboration between marketing and sales teams, increases data accuracy, and ensures customer engagement is converted into actionable business records without delays.