Modern Dynamics 365 applications often require intelligent automation to reduce manual effort and improve customer experience. Agent Nodes in Copilot Studio Agent Flows allow an existing AI agent to be invoked as part of a workflow. The flow can pass information to the agent, receive a structured response, and use that response in subsequent actions. In this example, a customer support email is analyzed by an agent, and the result is used to create a Dynamics 365 Case.
Key Takeaways
- Add an AI agent to Copilot Studio Agent Flows using the Run an agent
- Pass dynamic email subject and body to the agent at runtime.
- Use Text + JSON to return structured AI outputs.
- Automatically classify customer emails by category and priority.
- Use AI-generated results to create Dynamics 365 Cases.
- Replace manual triggers with automated email or business-event triggers in production.
Business Scenario
A customer support team receives requests that need to be classified before a Case is created. The requirement is to automatically analyze the incoming request and determine the appropriate routing information.
- Identify the case category, such as Billing, Technical, Sales, or General.
- Determine the priority: Low, Medium, High, or Critical.
- Generate a short summary of the customer’s issue.
- Use the AI-generated information while creating a Dynamics 365 Case.
Step 1: Create an Agent Flow
Navigate to: Copilot Studio → Flows → New Flow
Choose the Manually trigger a flow trigger.
Create the following trigger inputs:
Input Type (Text) – Email Subject (emailSubject), Email Body (emailBody)
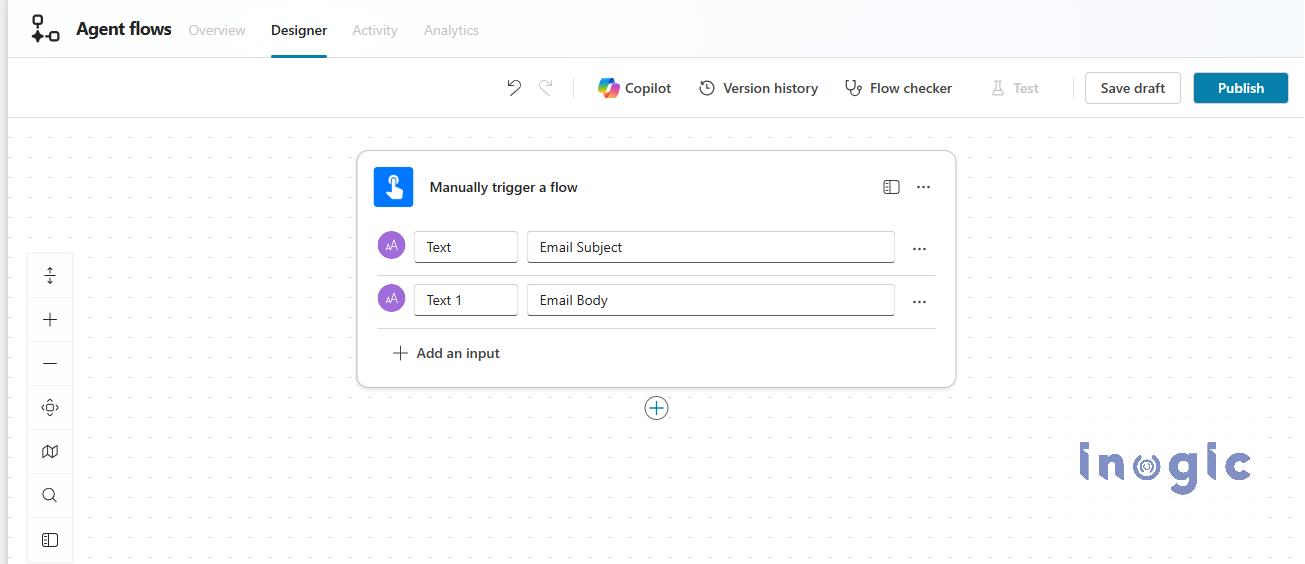
This trigger is used only for demonstration purposes. In production, these values can come directly from Outlook, Dynamics 365, or another connector.
Step 2: Add the Agent Node
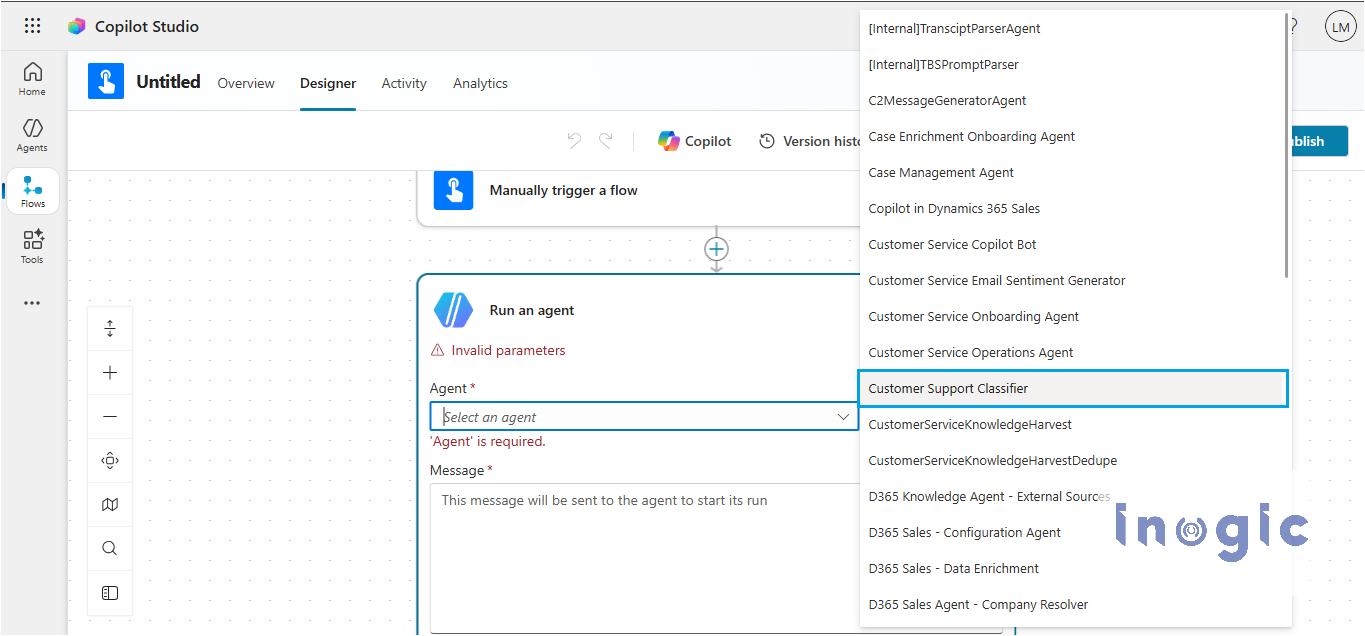
Click the + icon below the trigger and select: Run an agent
If prompted, sign in using your Microsoft account.
Select your published agent from the Agent dropdown.
Note: If the agent is not visible, verify that it has been published. Unpublished agents are not listed in the dropdown.
Step 3: Configure the Runtime Message
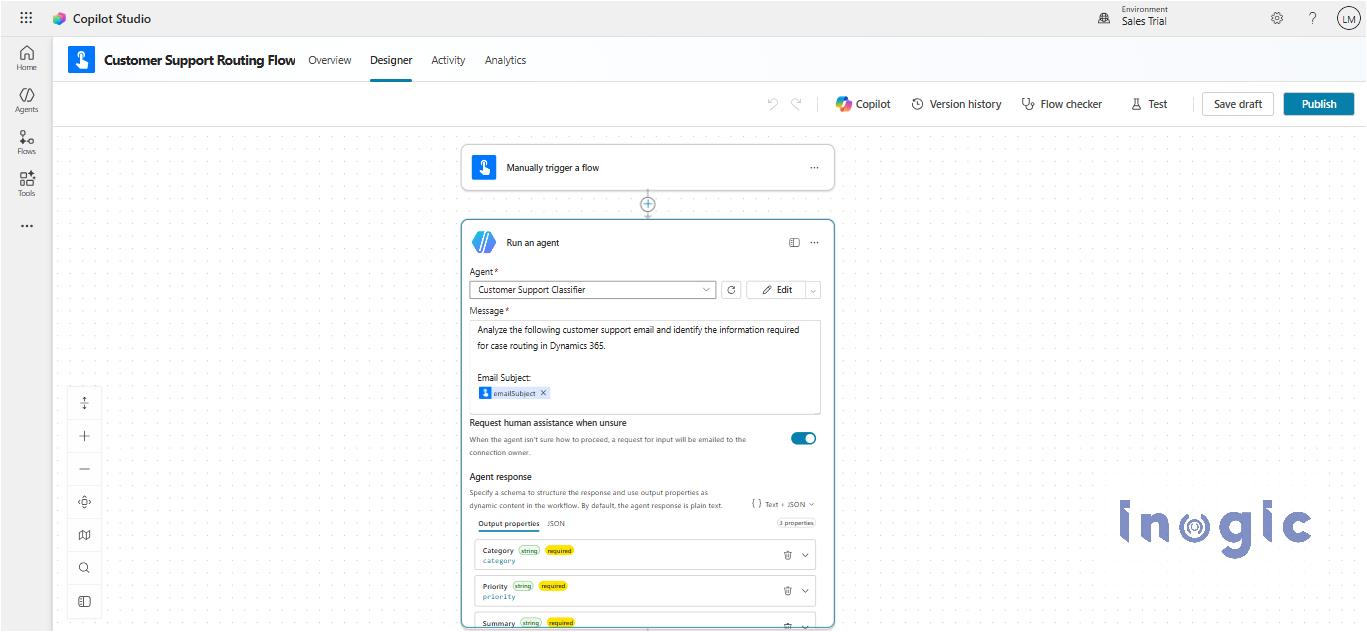
The Message field is the runtime input sent to the agent. Insert the trigger’s emailSubject and emailBody using dynamic content; do not hardcode the values in the flow.
Example message:
Analyze the following customer support email and identify the information required for case routing in Dynamics 365.
Email Subject:
[dynamic emailSubject]
Email Body:
[dynamic emailBody]
Based on the email, determine:
– Category (Billing, Technical, Sales, or General)
– Priority (Low, Medium, High, or Critical)
– A concise one-line summary of the issue.
Return the response using the JSON schema provided. Do not include any additional text, explanations, or markdown.
Step 4: Configure the Agent Response
Under Agent response as shown in the above screenshot, select Text + JSON. In the JSON section, define the expected structure so the flow can use each result as a separate output.
{
“type”: “object”,
“properties”: {
“category”: { “type”: “string” },
“priority”: { “type”: “string” },
“summary”: { “type”: “string” }
},
“required”: [“category”, “priority”, “summary”],
“additionalProperties”: false
}
This produces structured outputs such as category, priority, and summary that can be selected as dynamic content in later actions.
Step 5: Test the Agent
To test the Agent Flow, use a real customer email as the input for the manual trigger.
- Run the flow using the Test
- In the Email Subject field, enter the subject of a received customer email.
- In the Email Body field, copy and paste the corresponding content of the email.
- Execute the flow.
The email subject and body are passed dynamically to the Run an agent node. The agent analyzes the provided content according to its configured instructions and JSON schema.
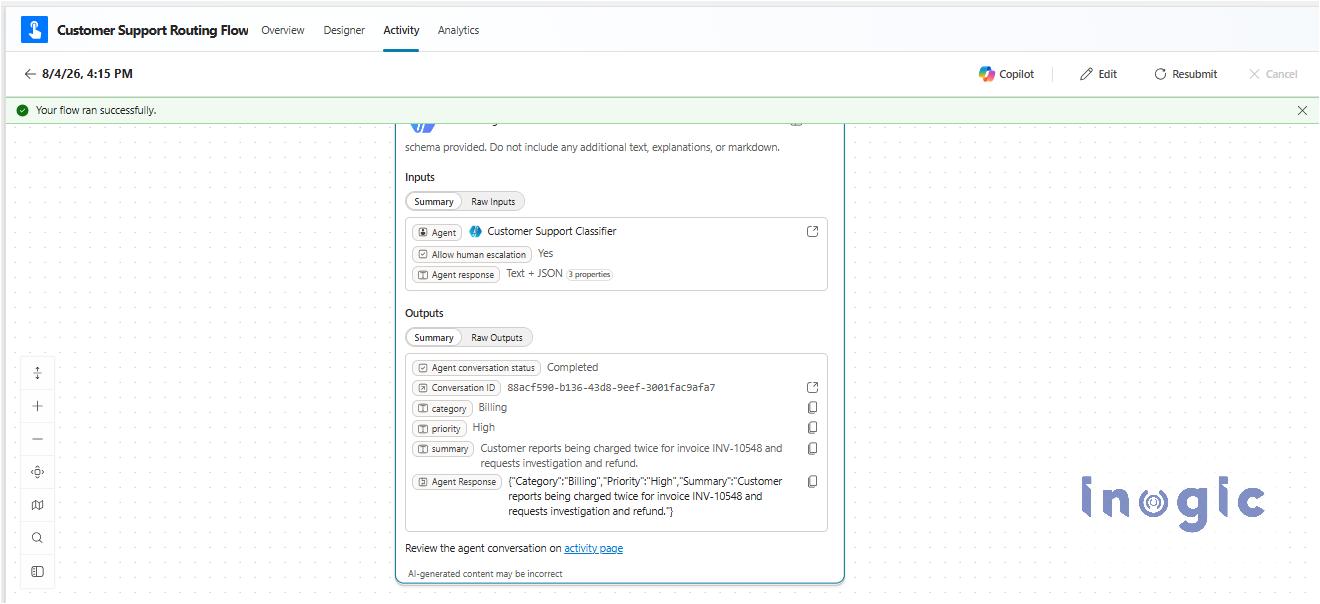
After the flow completes, review the Run history to see the Agent Node’s response. The structured output will contain the properties configured in the response schema, such as:
{
“category”: “Billing”,
“priority”: “High”,
“summary”: “Customer reports being charged twice for an invoice and requests investigation and refund.”
}
The actual values will vary depending on the email used for testing. These structured outputs can then be used by subsequent actions in the flow, such as creating or updating a Dynamics 365 Case.
Note: The manual trigger is used here only to simulate the receipt of a customer email. In a production implementation, the trigger can be replaced with an appropriate automated trigger so that the email content is passed to the Agent Node without requiring manual input.
Step 6: Use the Agent Output in Dynamics 365
The structured output from the Agent Node can now be used in a Dataverse action such as Add a new row to create a Case.
In this implementation:
- Title was mapped to the AI-generated Summary.
- Description was mapped to the Email Body.
- Customer was mapped by binding an existing Account through its OData ID.
Note: The Customer field on the Case table is a lookup field. It requires a valid Account or Contact reference (OData ID). Providing only the account name will result in an error.
Result
After running the flow successfully:
- The customer email was analyzed by the AI agent.
- The issue was classified automatically.
- Priority and summary were generated.
- A Dynamics 365 Case was created using the structured output returned by the agent.
This demonstrates how an Agent Node can intelligently process business data before it is consumed by Dynamics 365.
Conclusion
The Run an agent node makes it easy to integrate AI into Dynamics 365 workflows. By passing real-time data to an agent and using its structured output, tasks such as email analysis, case classification, and case creation can be automated efficiently.
FAQs
1. What is an Agent Node in Microsoft Copilot Studio?
An Agent Node, available through the Run an agent action in Copilot Studio Agent Flows, allows a workflow to invoke a published AI agent. The flow can pass dynamic information to the agent, receive a structured response, and use that output in subsequent actions such as creating a Dynamics 365 Case.
2. How do I add an Agent Node to an Agent Flow in Copilot Studio?
Create an Agent Flow in Copilot Studio, add a trigger, and select Run an agent from the available actions. Choose the required published agent, configure the runtime message, and define the expected response format. The agent can then process information passed from the flow.