
Power Pages is a strong tool that helps you create and run websites.
One key feature of the Advanced Settings helps improve the security of your site. In this blog, we’ll break down what Advanced Settings are, why they matter, and how to use them effectively.
Please note this is a preview feature as per Microsoft documents.
What Are Advanced Settings?
- Advanced Settings in Power Pages are the featuresthat allow you to set up a variety of security options for your site.
- Thesesettings secure your data and content from security attacks.
- They can be foundin the Security workspace of the Power Pages design studio.
How to Access Advanced Settings
- To useAdvanced Settings in Power Pages:
- Sign in to Power Pages.
- Open your pagefor editing.
- ChooseSecurity Workspace from the left-hand navigation menu.
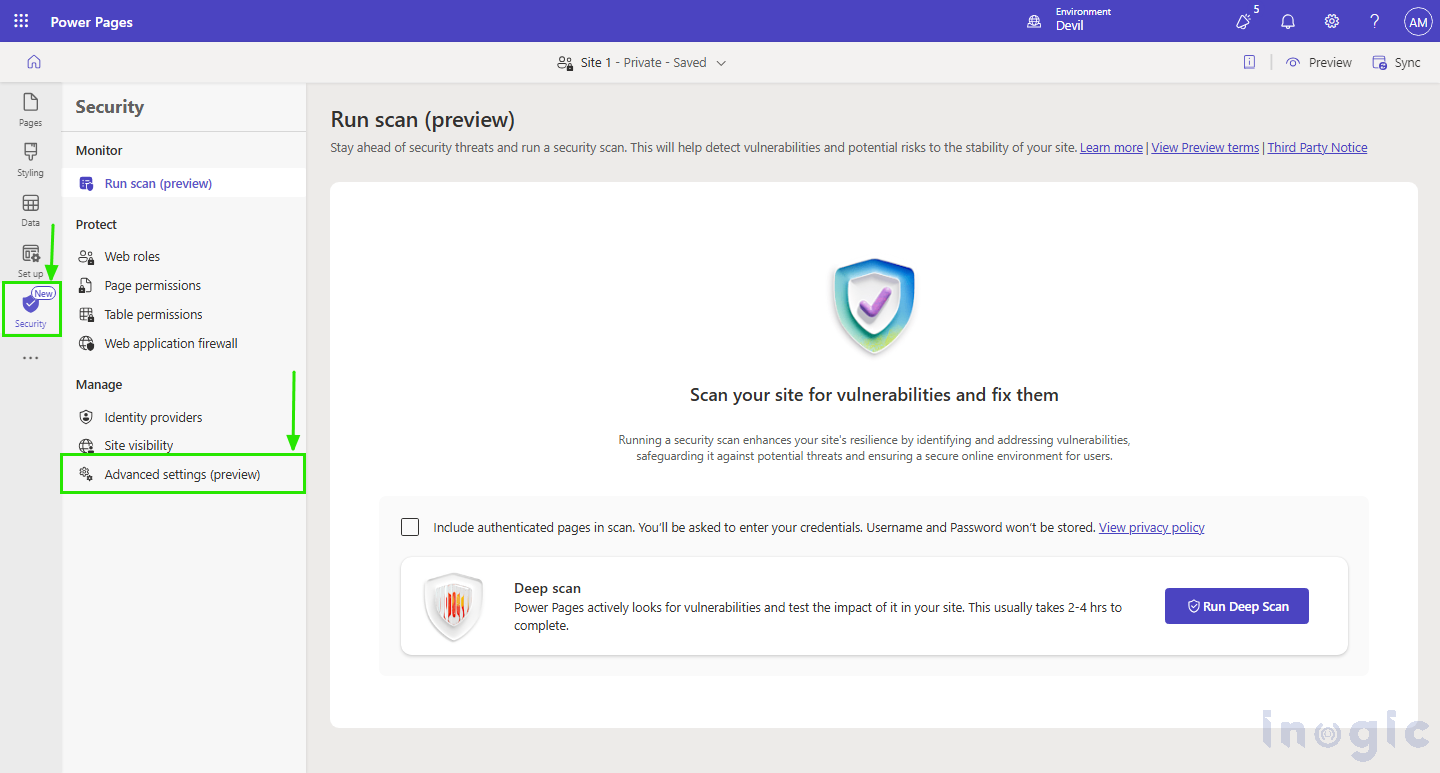
- ChooseAdvanced Settings (preview) to start customizing your security features.
Why Use Advanced Settings?
Using Advanced Settings is essential for several reasons:
- Enhanced Security: These settings help protect your site from common vulnerabilities and attacks.
- Control Over Content: You can specify where your content is coming from, which prevents unauthorized access.
- Improved User Trust: A secure website builds trust with your users, encouraging them to interact with your content.
How to use the Features of Advanced Settings –
There are 5 options in the Advanced settings, each one explained below
- Content Security Policy (CSP):
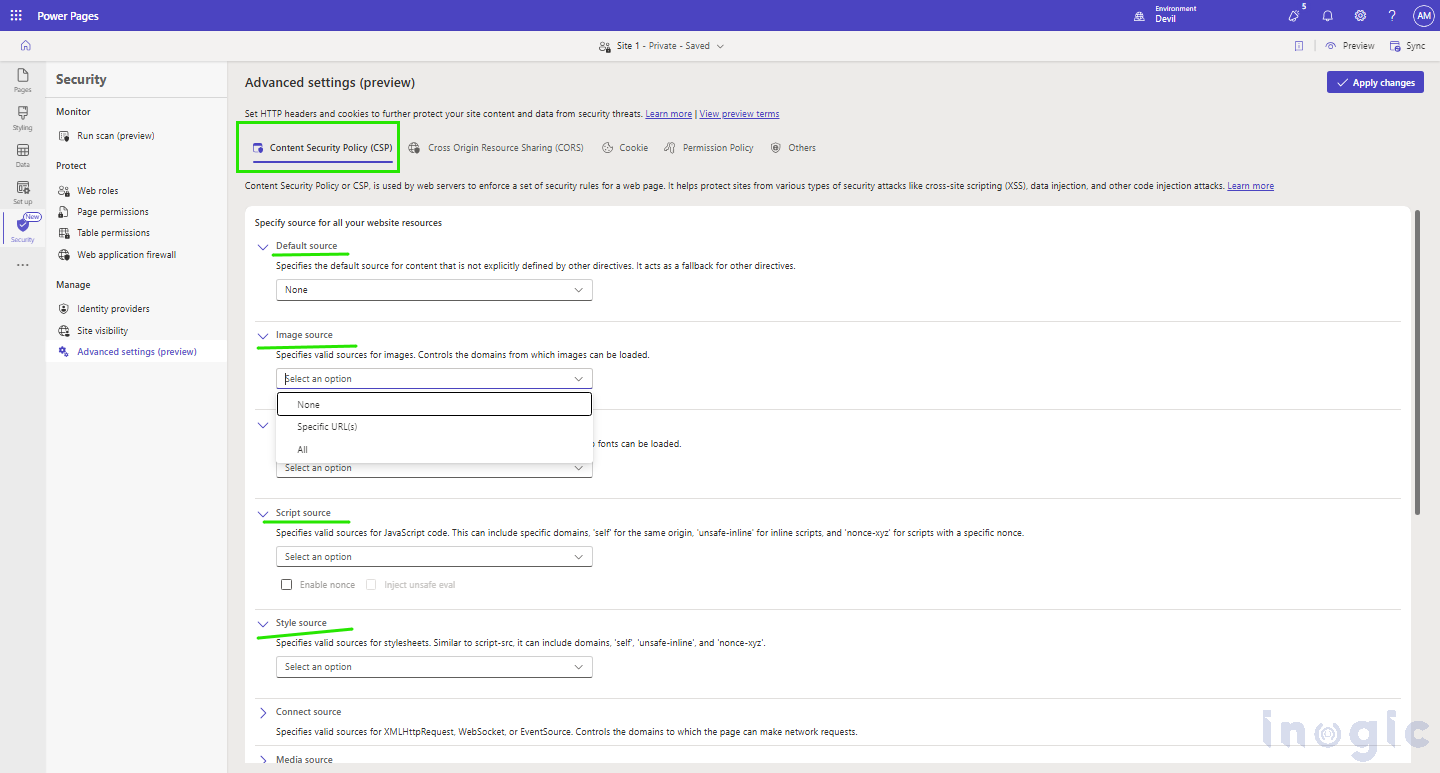
- CSP protects your website from attacks like XSS and data injection.
- It defines which sources the application can use to load resources like images, scripts, and styles.
For example: -For Image source, you can define from where the Images will be accessed.
As shown below –
This means we can set where the images will be accessed. What will be the source of images?
A company can create a pool of images specifically for their site and use the URL of the pool here for better security. This prevents access from any unauthorised source which may breach on to security.
Procedure is as follows: –
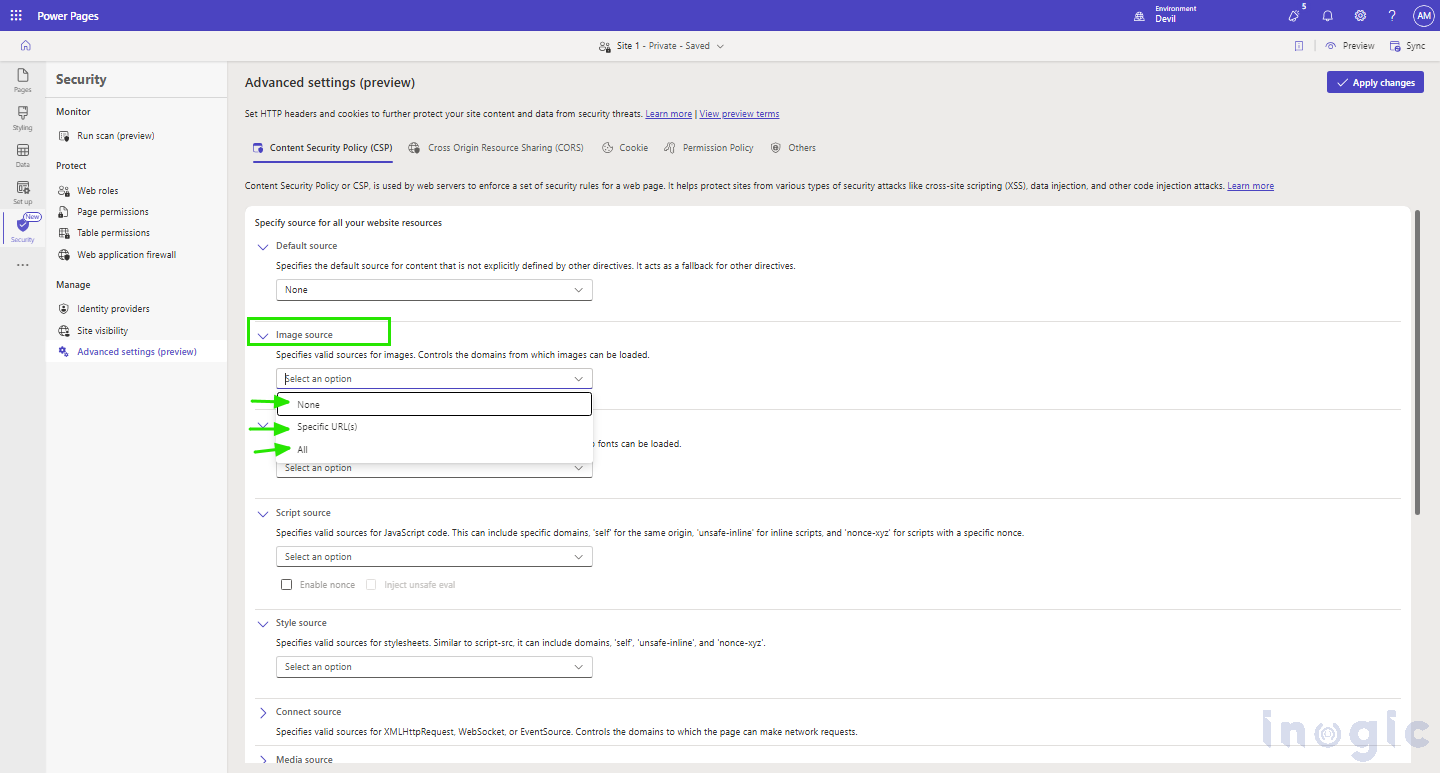
In the Content Security Policy tab of Advanced Settings, click on “Image Source.”
When we click on “Select an Option”, we get a list of 3 options –
- None – When this is selected, NO ANY RESOURSE for Images will be selected.
- Specific URL(s) – Specify the particular URL that will be the source of Images. Always recommended.
- All – Any resource will be used as a Resource of Images.
- CSP includes options like default, image, script, font, style, connect, media, frame, form, and object sources, allowing you to set specific rules.
- Cross-Origin Resource Sharing (CORS):
- CORS (Cross-Origin Resource Sharing) is a web browser security feature that determineswhat resources on a web server may be requested by a different origin (domain, protocol, or port).
- With CORS, a server can definewhich external domains are permitted to access its resources, as well as allowed HTTP methods (GET, POST, etc.) and headers.
- This is achievedvia response headers such as Access-Control-Allow-Origin, Access-Control-Allow-Methods, and Access-Control-Allow-Headers.
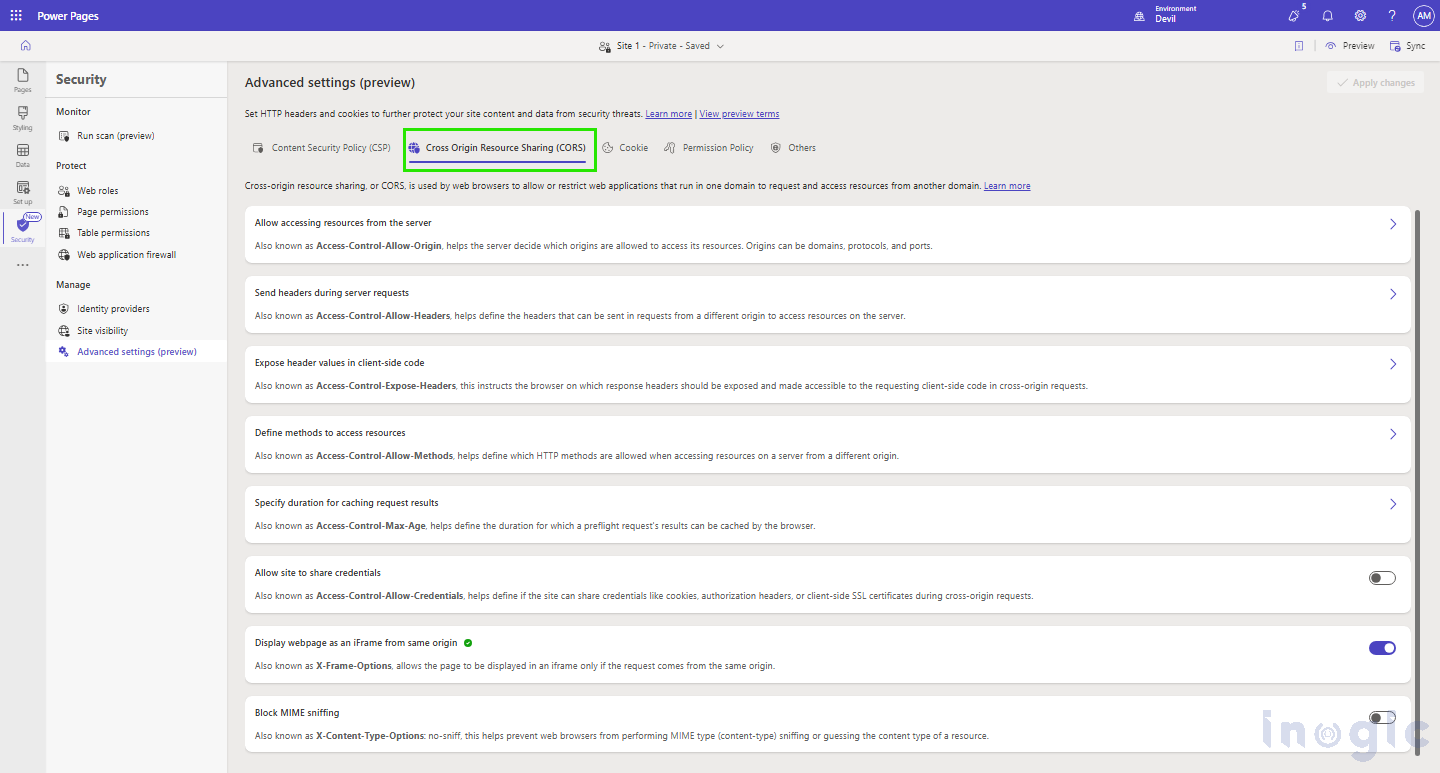
CORS allows us security with the following options –
1. Allow accessing resources from the server
- Determines which outside domains, protocols, or ports may request resources from the server.
- For example, an API can restrict access to specific domains like https://abcexapmleabc.com to prevent unauthorized use.
2. Send headers during server requests
- Specifieswhich request headers (e.g., Authorization, Content-Type) may be sent along in cross-origin requests. This helps ensure only authorized headers are accepted, making it more secure.
3. Expose header values in client-side code
- Someresponse headers (such as Content-Length, ETag) are automatically hidden in cross-origin requests.
- CORS enablesspecific headers to be exposed to client-side scripts when necessary.
4. Define methods to access resources
- Determines which HTTP methods (GET, POST, PUT, DELETE, etc.) are allowed in cross-origin requests.
- This prevents unauthorized or unsafe actions on the server.
5. Allow the site to share credentials
- Cross-origin requests don’t send credentials (cookies, auth tokens) by default.
- Servers can send credentials explicitly if needed for secure, authenticated requests.
6. Display webpage as an iframe from the same origin
- To prevent clickjacking attacks, a site can restrict itself from being loaded into an iframe unless the request originates from the same domain to keep content secure.
7. Block MIME sniffing
- Browsers occasionallymake an educated guess about a file’s content type (MIME type), which can result in security vulnerabilities (e.g., interpreting an image as a script).
- Enabling nosniff requiresbrowsers to adhere strictly to the declared MIME type, avoiding such risks.
For example-
Consider the following use case.
- When a website (https://pqrtestpqr.com) tries to fetch data from another website’s API (https://abctestabc.com), the request is considered a cross-origin request because the two websites have different origins (domains).
- By default, web browsers block such requests for security reasons unless the API server at https://abctestabc.com explicitly allows them.
- As shownin the picture below, API methods such as GET, PUT, POST, PATCH, OPTIONS, and DELETE can be authorized according to the CORS policy of the server.
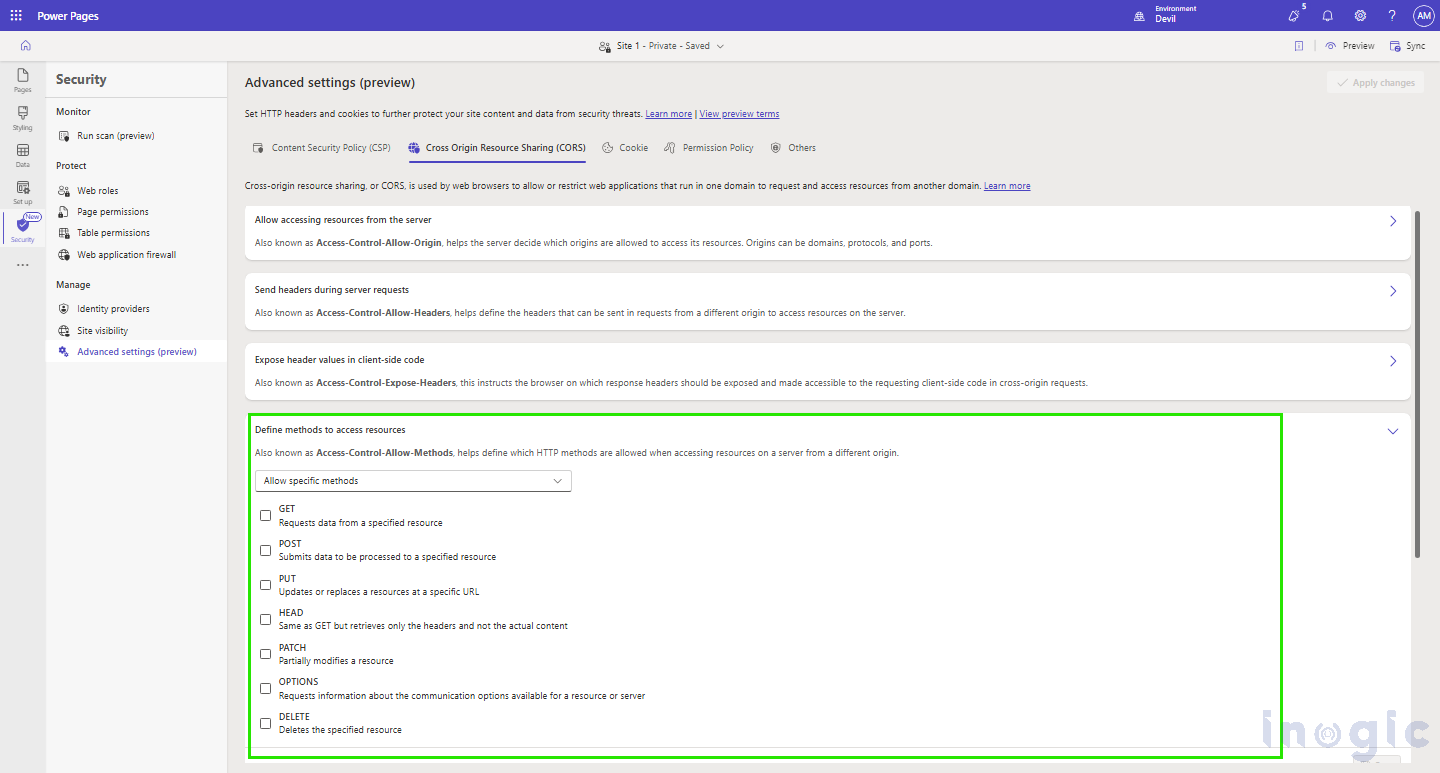
This way, only valid requests via approved methods can communicate with the server, enhancing security and discouraging malicious use.
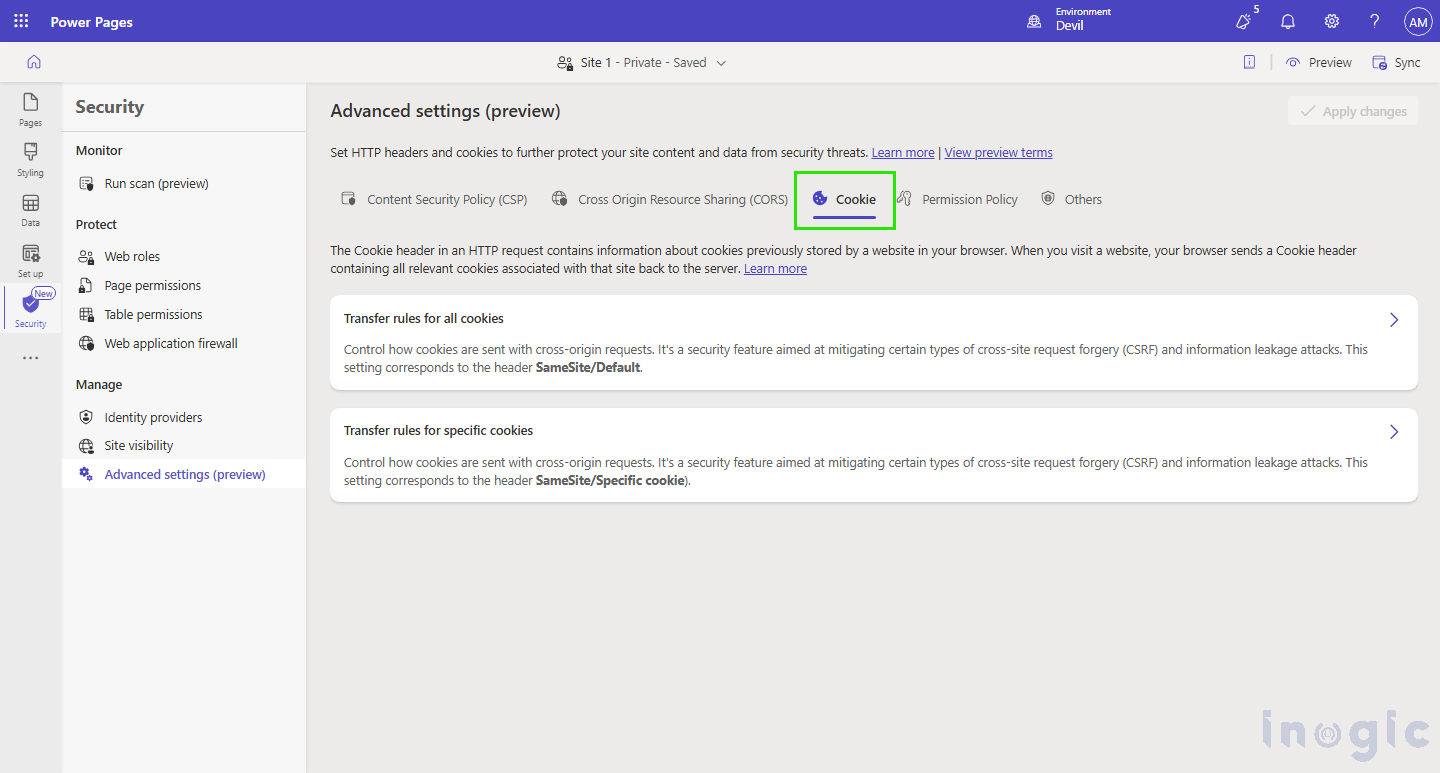
- Cookie Configuration:
-
- This feature controls how cookies are sent along with requests for security against CSRF types of attacks.
- You can create rules that apply to all the cookies or specific cookies to control their behaviour.
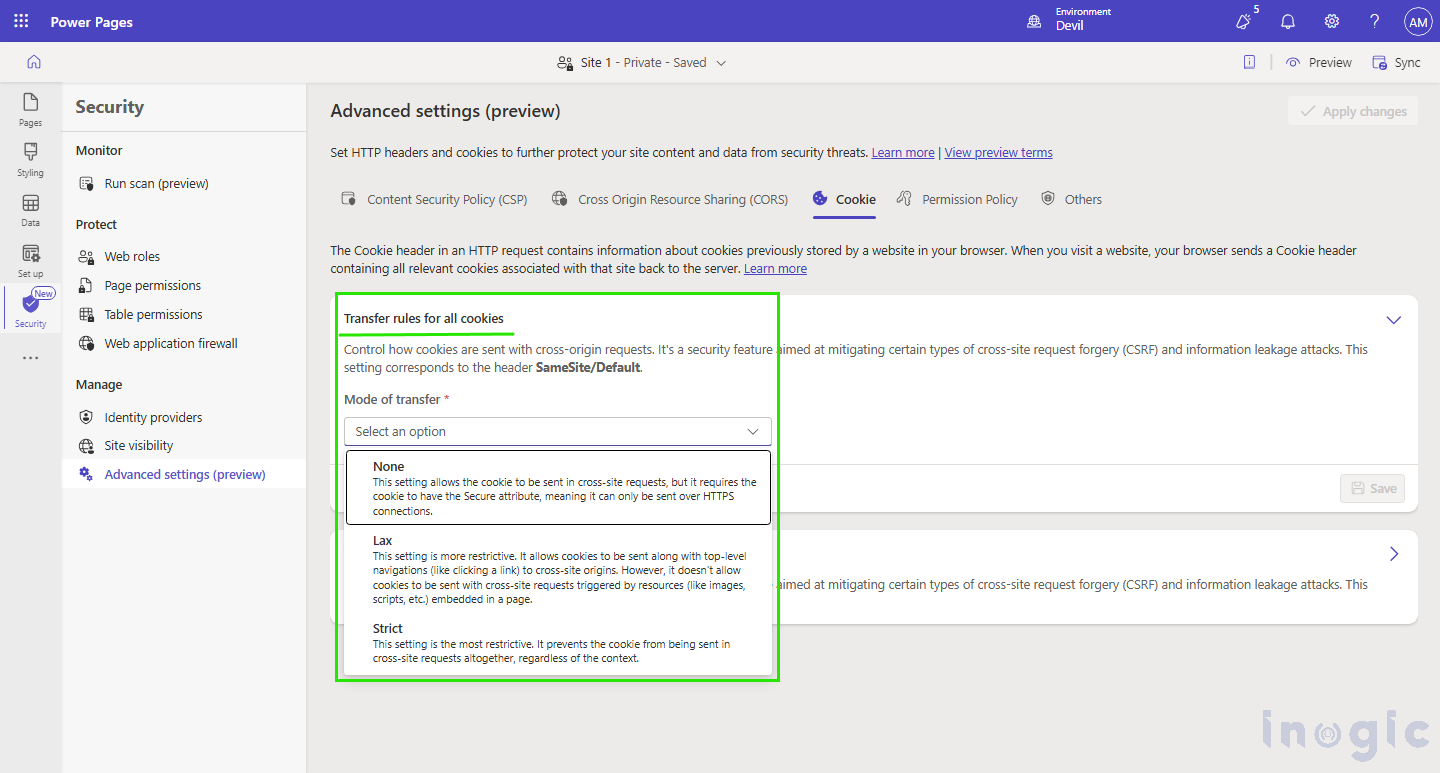
For Example, we can use the Transfer Rule for all cookies option to control how cookies are sent with cross-origin requests.
As shown in the image below, these settings are
- None – only be sent over an HTTPS connection.
- Lax – More restrictive. Allows particular cookies to be sent over cross-origin requests.
- Strict – Most restrictive. Blocks all cookies from being sent.
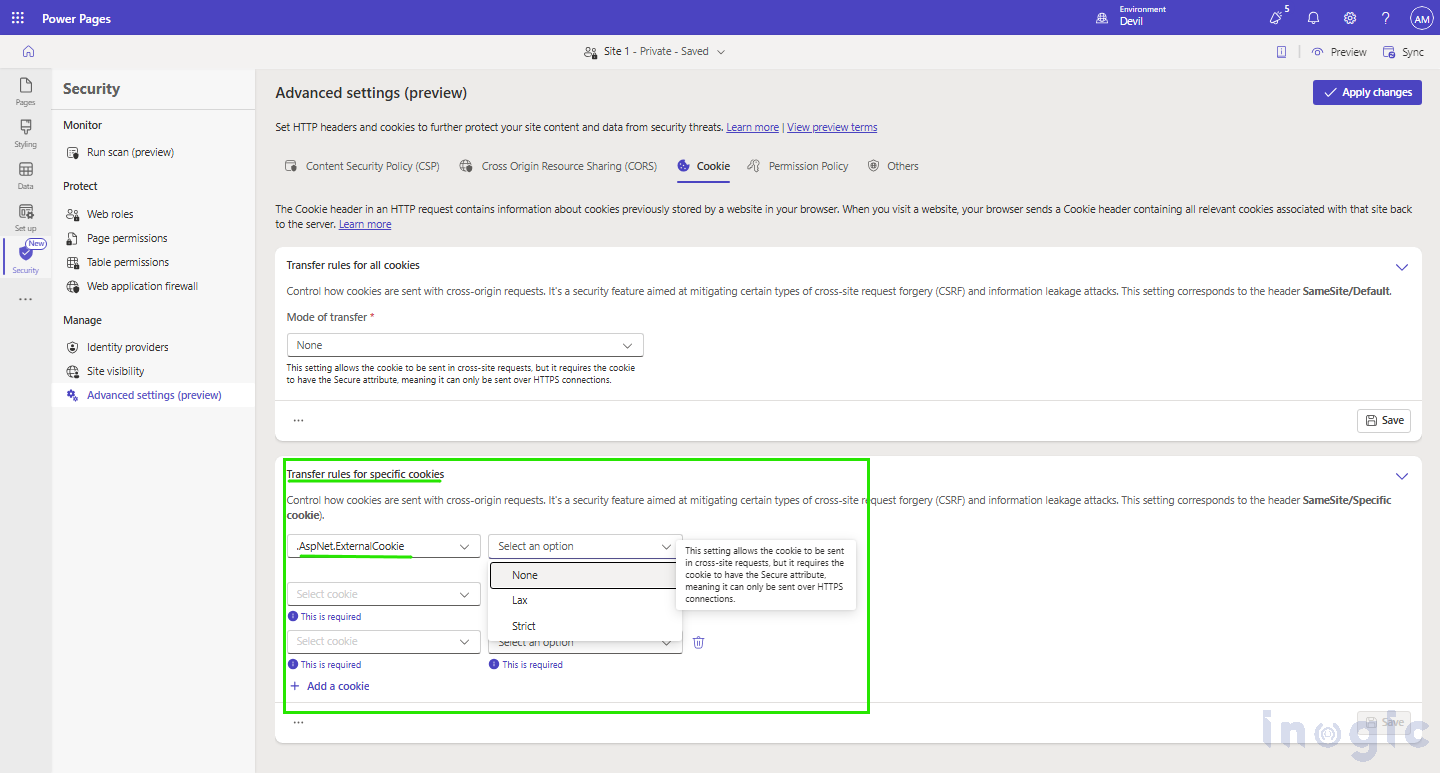
OR, else you can add a cookie and give them the above permissions. Shown below.
4. Permissions-Policy:
Permissions-Policy lets website owners’ control what features a site can use in a web browser.
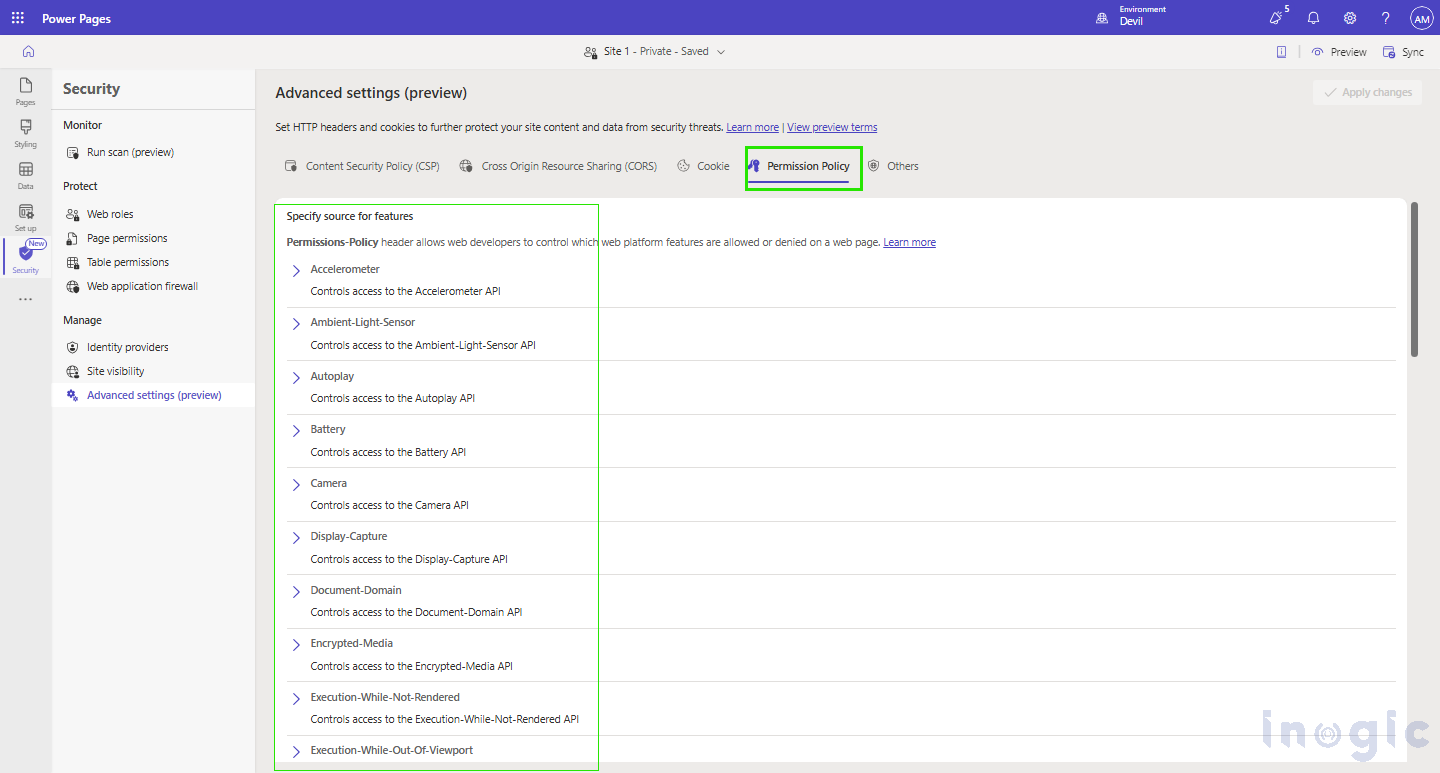
For example, you can decide whether your website should be able to:
- Access a user’s location (GPS).
- Use their camera and microphone.
This helps protect user privacy and security by blocking features that aren’t needed, preventing unwanted access.
- OTHERS –
Advanced settings enable you to set multiple HTTP headers that enhance the security of your site. These headers secure users against possible threats and provide safe surfing.
This includes –
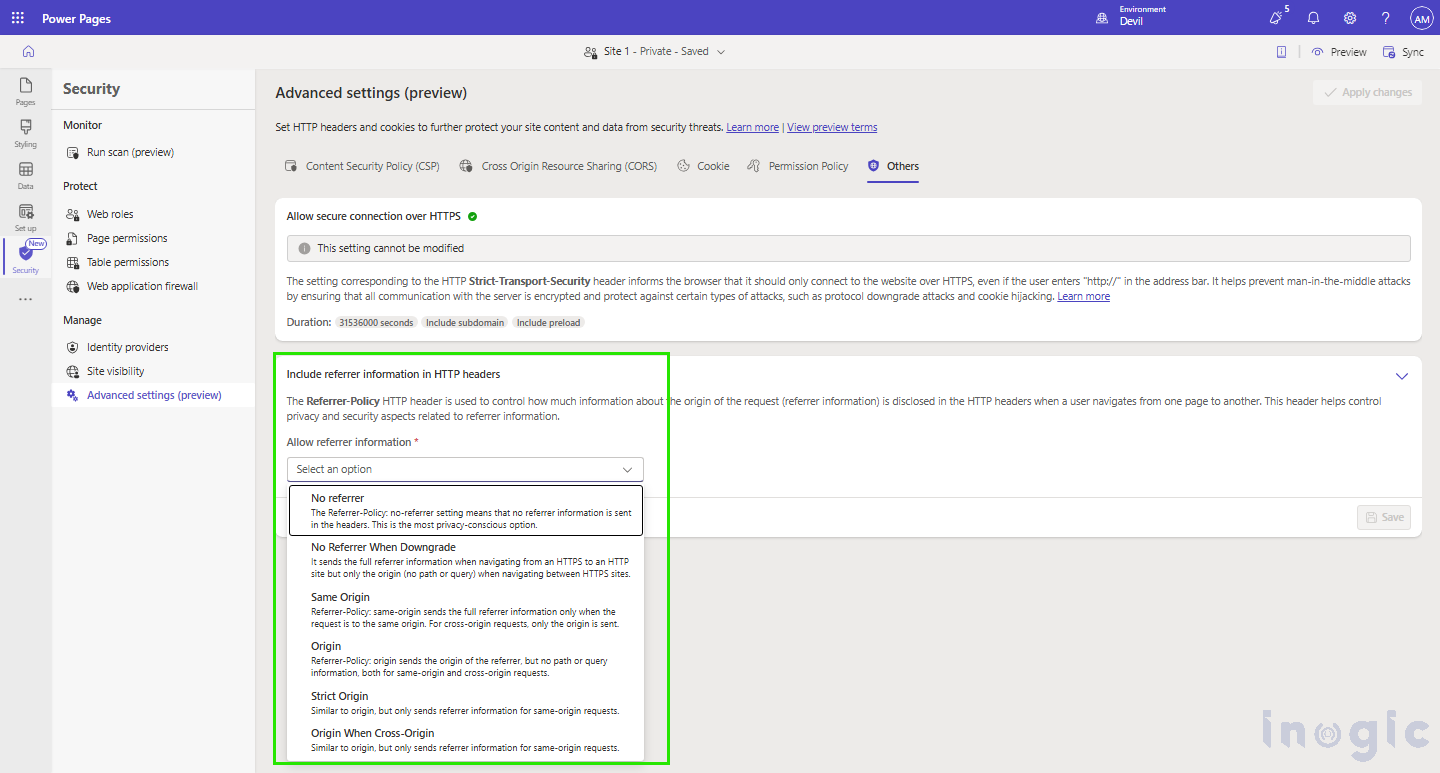
- Allow secure connection over HTTPS –
This setting cannot be modified, as it is always recommended to use HTTPS connections instead of HTTP.
- Include referrer information in HTTP headers-
The Referrer-Policy HTTP header controls how much information about the referring page is shared when a user navigates to a new page or makes a request.
As shown in the below image we can have idea of the options provided to configure referrer information in HTTP headers.
Conclusion
If you want to make your website more secure, the advanced settings in Power Pages are really useful. Once you learn how to use them, you can better protect your content and create a safer experience for your users. This is especially helpful for developers and site admins who manage website security.