Elastic tables are a new feature in Dynamics 365 Dataverse. They come in four types: Standard, Activity, Virtual, and Elastic tables. Elastic tables are designed to handle data that changes a lot. They are great when you have data that might look different depending on the situation. In this blog post, we will talk about Elastic Tables and show you how to make them using code.
Note: Elastic Tables are still being tested, and are in preview phase.
Use Case: Why You Might Need Elastic Tables?
Let’s say you want to create a table to store information about electronics. The data for each electronic device can be different, like its size, brand, or use.
Each type of device could have its own table, but it would get complicated if you tried to put all the data in one standard table.
Elastic tables are perfect for situations like this, where the data is unpredictable. Regular tables are too inflexible for this kind of data.
Elastic tables are more adaptable and can handle data that changes, like having a number in one record and text in the next.
About Elastic Tables
Before we get into the code, let’s clarify a few important points!
Elastic Tables are still in the testing phase, so how they work might change later. Right now, there are some things Elastic Tables can’t do. They are great for managing text columns with JSON data and handling messy, unstructured data.
They are unique because they can change their structure dynamically, which other table types can’t do. But there are some limitations too. You can’t make custom alternate keys for Elastic Tables, and they don’t support certain data types like calculated columns, rollup columns, and more. They do support one-to-many relationships, but with some restrictions.
Here’s how to create an Elastic Table programmatically:
In this example, we will use the Dynamics 365 SDK and Visual Studio. We will connect to our environment by running an SDK request in .NET. If you already know how to connect to your environment, you can use the code below to create an Elastic Table entity. Alternatively, you can follow the steps provided by Microsoft in this link.
To write the code for creating the Elastic Table and its primary attribute, you can refer to the code below. Ensure that you write this code in a way that it runs successfully after you’ve connected using the connection string.
// Declare a variable named request, we will fill in the related data in the request and then use the variable for executing the service
var request = new CreateEntityRequest

{

// Define table and its properties

Entity = new EntityMetadata

{

// Giving the names and descriptions for the table (schema name, display name, logical name, etc)

SchemaName = "Exmp_ElectricalDevice",

DisplayName = new Label("Electrical Device", 1033),

DisplayCollectionName = new Label(" Electrical Devices", 1033),

Description = new Label("Stores the data related to all the electrical devices provided by the organization", 1033)

// Setting ownership type

OwnershipType = OwnershipTypes.UserOwned,

// Setting table type

TableType = "Elastic",

IsActivity = false,

CanCreateCharts = new Microsoft.Xrm.Sdk.BooleanManagedProperty(false)

},

// Define primary attribute for the entity

PrimaryAttribute = new StringAttributeMetadata

{

// Naming the attribute

SchemaName = "Exmp_DeviceType",

RequiredLevel = new AttributeRequiredLevelManagedProperty(AttributeRequiredLevel.None),

MaxLength = 100,

// Define the datatype

FormatName = StringFormatName.Text,

// Set display name and labels

DisplayName = new Label("Device Type", 1033),

Description = new Label("Name of the electrical device", 1033)

}

};

// Execute the request created

return (CreateEntityResponse)service.Execute(request);
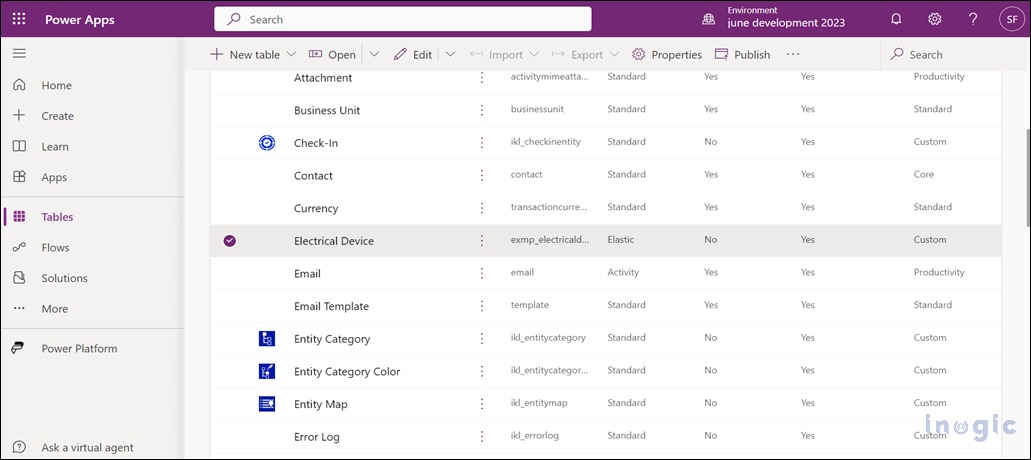
You can include additional columns as needed to meet the user’s requirements; these can be added following standard practices. Be sure to address any exceptions, build the project, run the code, and then publish the changes. Once the code has executed successfully, you can access your environment and verify that the entity has been created without any issues. Below, you’ll find a screenshot displaying the Elastic Table entity that was created using the provided code in PowerApps.
Concluding the Creation of a Simple Elastic Table Using Dynamics 365 SDK and C#
In this guide, we have covered the steps for creating a straightforward elastic table through code. We have harnessed the Dynamics 365 SDK and the C# language for our project.
While we have shown one approach, there are alternative methods for creating elastic tables programmatically.
It’s worth noting that while we can create more complex elastic tables with various types of columns, we must be mindful of the data types that elastic tables do not currently support.
Conclusion
The introduction of elastic entities offers a wealth of possibilities, even though they are still in the preview phase. We anticipate numerous changes and enhancements in upcoming updates. Elastic entities provide a valuable solution for users dealing with unpredictable and irregular data.
Before their introduction, handling such data types was limited with other entity types. With elastic entities, managing different data types becomes more straightforward, offering options for both structured and organized data, as well as unstructured and unpredictable data.
This marks a significant advancement in data handling within the Dynamics 365 ecosystem.