Skip to content
Microsoft Dynamics 365 CRM Tips and Tricks
By Inogic
  • Blogs
  • D365 Apps
  • Inogic
  • D365 / Power Platform Services
  • Maplytics Docs
  • D365 Apps Docs
    • Omnichannel Apps
      • WhatsApp4Dynamics
      • TextSMS4Dynamics
      • LiveChat4Dynamics
    • File and Storage Managment
      • Attach2Dynamics
      • SharePoint Security Sync
    • Visualization Apps
      • Map My Relationships
      • Kanban Board
      • Business Process Checklist
    • Productivity Apps
      • Click2Clone
      • Click2Export
      • Undo2Restore
      • Lead Assignment and Distribution Automation
      • Alerts4Dynamics
      • Translate4Dynamics
      • Subscription Recurring Billing Management
    • User Adoption Apps
      • DeDupeD
      • User Adoption Monitor
      • Gamifics365
    • Integration Apps
      • Marketing4Dynamics
      • InoLink

Set the metadata of a SharePoint file using REST

By Inogic | August 9, 2017
0 Comment

Introduction:

In our earlier blog, we discussed about creating folders and uploading files on the SharePoint Online through workflows/plugins using REST.

In this blog, we will see how we can set the metadata of the uploaded files using REST.

Below is the code snippet to set the metadata of a file using REST:

//Here first create the JSON string of file metadata
string result = @"{'__metadata': { 'type': 'SP.ListItem'}, 'Aliases':'My File.docx', 'Owner':'CRM Owner', 'Date':'1/7/2017'}";
string siteUrl = “https://crmtrial.sharepoint.com” 
Uri spSite = new Uri(siteUrl);
private SpoAuthUtility _spo = SpoAuthUtility.Create(spSite, _username, WebUtility.HtmlEncode(_password), false);
//read the digest
string digest = _spo.GetRequestDigest();
//convert JSON data to bytes
byte[] content = ASCIIEncoding.ASCII.GetBytes(result);

//define the file URL to set the metadata
string fileURL = Account/Test Account Folder/TestFile.docx;
var requestUrl = string.Format("{0}/_api/web/GetFileByServerRelativeUrl('{1}')/ListItemAllFields", siteURL, fileURL);

var webRequest = (HttpWebRequest)HttpWebRequest.Create(requestUrl);
                webRequest.Headers.Add("X-RequestDigest", digest);
                webRequest.Headers.Add("X-HTTP-Method", "PATCH");
                webRequest.Headers.Add("If-Match", "*");
                webRequest.Accept = "application/json;odata=verbose";
                webRequest.ContentType = "application/json;odata=verbose";
                webRequest.Method = "POST";

                // Send a json odata request to SPO rest services to fetch all list items for the list.
                byte[] result = HttpHelper.SendODataJsonRequest(
                  new Uri(requestUrl),
                  "POST", // reading data from SP through the rest api usually uses the GET verb 
                  content,
                  webRequest,
                  _spo // pass in the helper object that allows us to make authenticated calls to SPO rest services
                  );

                //read the response
                string response = Encoding.UTF8.GetString(result, 0, result.Length);

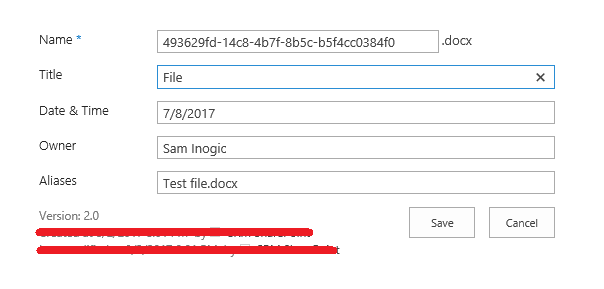
If you go to the uploaded file’s properties in SharePoint, you can see the metadata of the file as shown in the screenshot below;

Set the metadata of a SharePoint file using REST

Hope this helps!

Generate Your Own New Leads Within Microsoft Dynamics 365 CRM

Contact us for a demo to know more about how Maplytics can help you to generate new leads from within Microsoft Dynamics 365 CRM.

Maplytics is a 5-star rated, preferred business app on the Microsoft AppSource that is Certified for Microsoft Dynamics 365 (CfMD) and comes with powerful features like Appointment Planning, Sales Routing, Territory Management, Heat Maps, Geo-analytical Dashboards and more that empower organizations to add more value to their CRM data, improve sales & service processes, and achieve high ROI.

Get your free trial from our Website or Microsoft AppSource!

‘If data is the new oil, location intelligence is ??”
Category: Dynamics 365 Dynamics CRM SharePoint Tags: REST, Set the metadata of a SharePoint file, SharePoint
Post navigation
← Change the background of List Row dynamically in Resco Exporting and Sharing Dynamics 365 Reports Made Easy! →

Follow Us!

Follow Us on FacebookFollow Us on TwitterFollow Us on LinkedInFollow Us on YouTubeFollow Us on InstagramFollow Us on E-mailFollow Us on Docs

Blog Series

  • Power Apps – Model Driven Apps
  • Power Apps – Canvas App
  • Power Pages
  • Power Automate
  • Power BI
  • AI Builder
  • Copilot
  • Azure OpenAI
  • Microsoft Teams
  • Dynamics 365 for Field Service

Recent Innovations

Translate Dynamics 365 Data in Real-Time using Azure AI Translator with our New App!

Summer 2025 Dynamics 365 Maps Release: Smarter Routing, Azure Maps, Canvas Apps & More!

How to Create Mailchimp Email Campaigns Directly from Dynamics 365 CRM!

Detect and Merge Dynamics 365 CRM Duplicate Records with New DeDupeD Features!

SharePoint Metadata – Enhance document searchability in Dynamics 365 CRM integration!

WhatsApp, Text SMS, and Live Chat Integration – Dynamics 365 Omnichannel suite by Inogic!

Recent Posts

  • Role-Based Access Control for Document Security in Dynamics 365 CRM!
  • How to Create and Modify a Segment in Customer Insights – Journeys Using the Web API
  • Dynamics 365 WhatsApp Integration: Trigger vs Segment Customer Journeys – Explained!
  • Add Process Mining Report in Power BI Workspace
  • Webinar: Copilot Agents in Action: Document Reading, Response Generation, and Email Drafting!

Archives

SiteLock
Copyright © 2025 Inogic. All Rights Reserved
Iconic One Theme | Powered by Wordpress