Introduction:
In earlier versions of CRM, the SLA feature was only applied to the Case Entity. Now, with Dynamics CRM 2016 Update 1 release, you can enable Enhanced SLA for other entities as well.
Below are the entities for which you can enable SLA in CRM:
- Contact, Account, Lead, Opportunity, Quote, Order, Invoice.
- Custom Entities and Custom Activities.
- Also for some activity entities as email, phone, and appointment except for the recurring appointment.
NOTE: You can apply only enhanced SLAs for other entities. Standard SLAs are applied for Case Entity only.
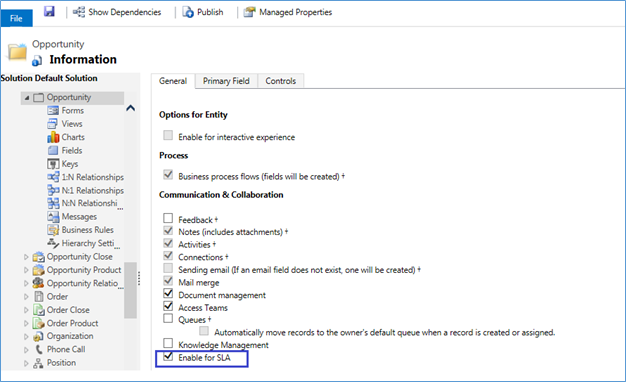
For enabling this enhanced SLA feature in CRM for the above entities or any Custom Entity, you will need to follow below mentioned steps:
- Navigate to Settings → Customizations
- If you want to enable SLA for Opportunity entity then in the left pane, you can select Opportunity from the list of entities.
- Then under the General tab, in the Communication & Collaboration section, select the “Enable for SLA” checkbox.
- After checkbox is checked, click to Save and Publish. Below is the screenshot for reference:

NOTE: Once you have enabled this feature for the entity, you cannot disable it again.
Below are the Steps for Creating SLA for the Opportunity Entity:
Step 1: Navigate to Settings → Service Management → Service Level Agreements. On the SLA page, click on “New” button in the ribbon as shown in screenshot below:
After this, you will be able to see Create SLA pop-up as shown in screenshot below: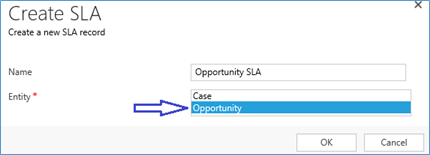
In the above pop-up, you will be able to see an Entity option value where all the entities will be displayed in the list, which you have enabled for SLA at entity level.
Now, type the SLA Name and select Opportunity entity, click “OK”.
Step 2: And then you will be directed to the new SLA window where you can set the criteria, as you want to apply for the SLA as shown in below screenshot: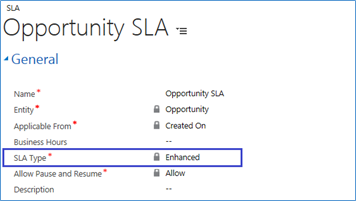
As you can see from the above screenshot, Entity will be set as “Opportunity” by default and SLA Type will be set as “Enhanced”. Select the desired criteria for Opportunity SLA and then click to save.
NOTE: Only when you select Case entity, you will be asked with two options to select the SLA Type that is either “Standard” or “Enhanced”.
Step 3: After this you will need to create the SLA Item to set the success and failure conditions for SLA. So further, just scroll down the SLA form to set the SLA Details as shown in below screenshot: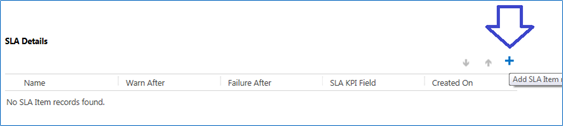
Click to + Add SLA item button. Then a new window will be displayed to set the success and failure criteria.
Now, when you try to set the criteria in the SLA Item Window, you will face a situation where you will be stuck, as you will not find any options predefined for SLA KPI Instances in the CRM for Opportunity entity as shown in below screenshot: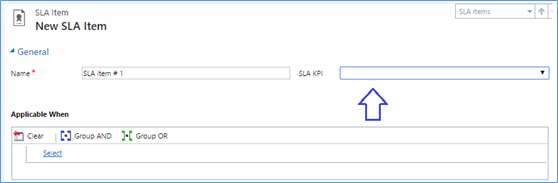
Hence, if we try to save this “SLA Item”, by keeping this field blank, it will not allow you to do so.
So the Solution for this is to first manually create and define the SLA KPI Instances for Opportunity Entity in CRM.
Step 4: You can follow the below mentioned procedure for adding the “SLA KPI Instance” field on the Opportunity:
- Navigate to Settings à
- In the left pane, select Opportunity Entity, click on the Fields.
- Create a new lookup field with Name – “First Response In” and Target Record Type as “SLA KPI Instance” for the Opportunity entity.
- After creating this field, 1: N relationship will be automatically created between SLA KPI Instances and Opportunity. Save and Publish these Customizations.
- After this, open Form Editor of the Opportunity and add this “First Response In” field on the Opportunity Form.
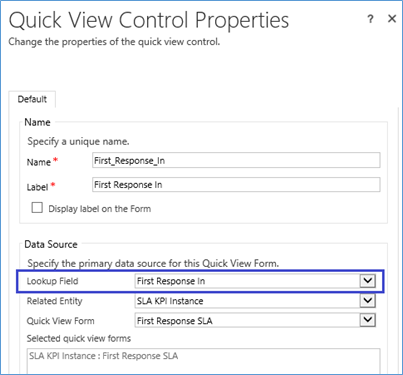
- With this field, you will need to insert a “Quick View Form” in the Form Editor, with the lookup field source of “First Response In” and select the Quick View form of “First Response SLA” for the opportunity form so that you can check the Timer Status of the SLA applied to the record as shown in below screenshot:

- So, this “Quick View form” will automatically add a Timer on the form to track the Time of SLA for the Opportunity records in CRM.
- For e.g.: If your SLA Time is elapsed then you will be able to see the timer as shown in below screenshot:

- Also you can add this field and Quick view form in a new “Enhanced SLA Results” section on the opportunity form and click “OK” and then Save & Publish Opportunity.
Important Points to be highlighted:
- You will have to perform this action of creating lookup field with Target Record Type as “SLA KPI Instance” for all the Entities, which you have enabled for SLA.
- The Timer will be visible only when your SLA will be applied to the Opportunity record.
Step 5: Now once you have performed the above actions, you will be able to select this SLA KPI Option value on the SLA Item for Opportunity as shown in below screenshot: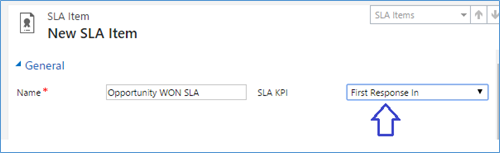
Now you can define the Success and Failure criteria for applying SLA on the Opportunity entity.
Step 6: Suppose, if you want to track the “Opportunities which are Won within 5 mins”, then you can set the Success criteria as Opportunity Status = “WON” and in the SLA Item Failure time you can set time as “5 minutes”. Below is the screenshot for reference.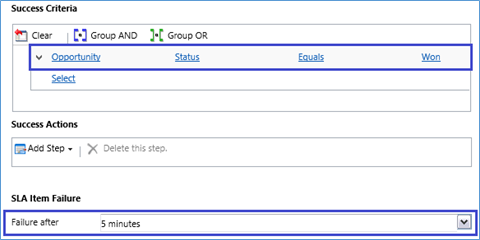
Also, if you want then you can set the Success and Failure Actions to perform on SLA on the SLA Item Window and then click to Save & Close button.
Then further click on “Activate” and then click to “SET AS Default” button on the SLA so that this SLA will be automatically triggered once the Opportunity record is created.
Now your SLA will be successfully created for Opportunity entity and you can check the SLA status on the Opportunity records.
Step 7: To check the SLA status on Opportunity, create an Opportunity record and fill the required Information and click on save.
Once the opportunity record is created, SLA will be triggered and the SLA KPI Instance record will be created in the CRM and set in the “First Response In” field on the Opportunity as shown in below screenshot: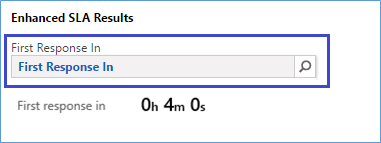
As you can see from the above screenshot, on creation of your Opportunity record, the SLA will be triggered and applied to the Opportunity.
Also, you can see the Time remaining in the “First Response in” field on the added Quick view form.
Step 8: Once your Opportunity is created, you can check the Success or Failure of SLA as per the criteria you set in the SLA.
i.e.: If the “Opportunity is WON in 5 minutes”, then on refreshing the page, you will be able to see as shown in below screenshot:
Else If the “Opportunity is not WON in 5 minutes”, then on refreshing the page, you will be able to see as shown in below screenshot:
Hence, you will be able to see the SLA KPI Instance record created in CRM regarding the “Opportunity” as shown in below screenshot.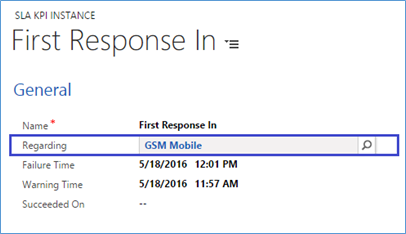
Conclusion:
This blog explains about the enhanced SLA extended for other entities in CRM 2016 update 1. Now with this SLA extended feature for other entities, it will become easy for you to track if the users in your organisation are responding your customers within the specific time or not.
Dynamics CRM Bing Maps integration redesigned – Download your free trial today!