If you often build automation flows in Power Automate, you’ve probably used the “List rows” action to pull data from Microsoft Dataverse. It’s useful for basic data retrieval—but when your data grows or you need to search across multiple tables, it starts to hit limitations.
That’s where the “Search Rows (Preview)” action comes in. It lets you perform fast, intelligent, and relevance-based searches across multiple tables in Dataverse—all within a single flow. In this blog, you’ll learn when and how to use it, how it differs from “List rows,” and how it can make your flows more efficient and scalable.
Why “List Rows” Isn’t Always Enough
You might already know that the “List rows” action works well for straightforward queries. But as your data grows, so do its challenges:
- Row limits: By default, it retrieves only up to 5,000 rows (and with pagination, up to 100,000).
- Performance issues: Large datasets can slow down your flows.
- Limited search flexibility: It doesn’t support fuzzy matching, keyword search, or relevance-based ranking.
If your goal is to find records based on a search term—like finding Leads, Contacts, or Accounts that match a keyword—“List rows” isn’t built for that.
Meet the “Search Rows (Preview)” Action
The “Search Rows (Preview)” action in the Microsoft Dataverse connector changes how you retrieve data. Instead of structured OData filters, it uses Dataverse Search—a full-text, relevance-based search engine.
This means you can search for a keyword across multiple tables, apply filters, and instantly retrieve records that match your search intent.
Here’s what makes it powerful:
- Relevance-based search — Prioritizes the most relevant matches first.
- Performance optimized — Faster lookups across large datasets.
- Smart filters — Supports Boolean operators, wildcards, proximity search, fuzzy matching, and even regular expressions.
- Dynamic content — Gives you extra details like search score, highlights, and record IDs.
How to Implement the “Search Rows” Action in Power Automate
To implement this in Power Automate, follow these steps:
1. Enable Relevance Search: Ensure that Relevance Search is enabled in your Dataverse environment. This is a prerequisite for using the “Search rows” action.
2. Create a New Flow:
-
- Go to Power Automate and create a new flow.
- Add a trigger that suits your scenario (e.g., when a record is created or modified).
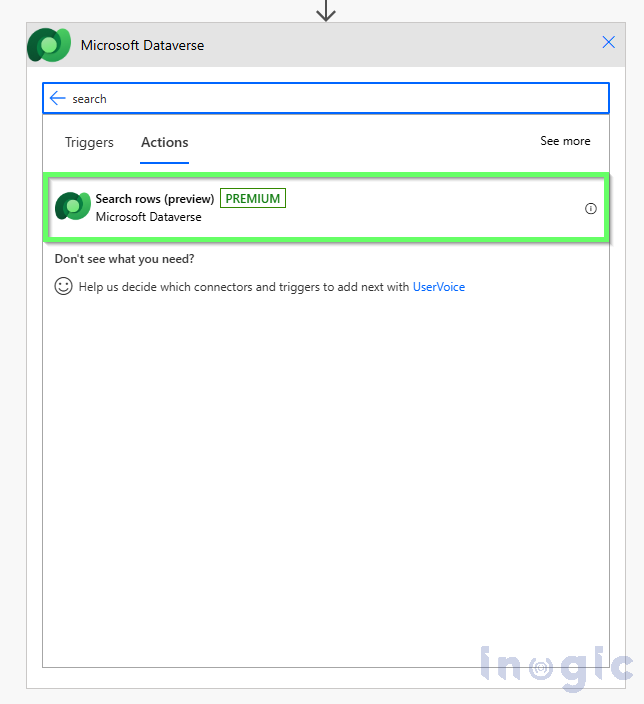
3. Add the “Search rows” Action:
-
- Click on “New step” and search for “Search rows”.
- Select the “Search rows (Preview)” action.
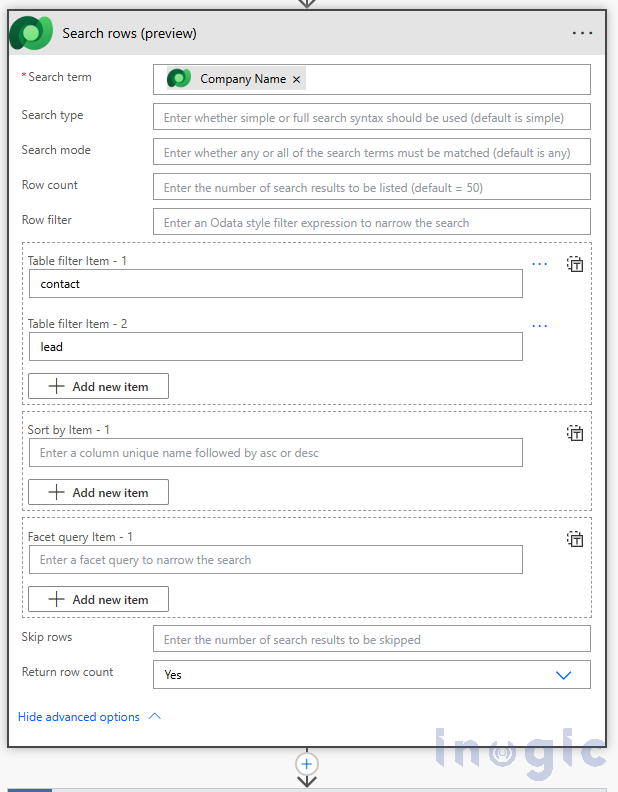
4. Configure the Action:
-
- Search term: Enter the keyword or phrase you want to search for.
- Search type: Choose between “simple” or “full” query syntax. “Simple” is easier to use, while “full” offers more advanced features like fuzzy search and regular expressions.
- Search mode: Decide whether any or all search terms must be matched.
- Row count: Specify the number of rows to return.
- Table filter: Narrow your search to specific tables if needed.
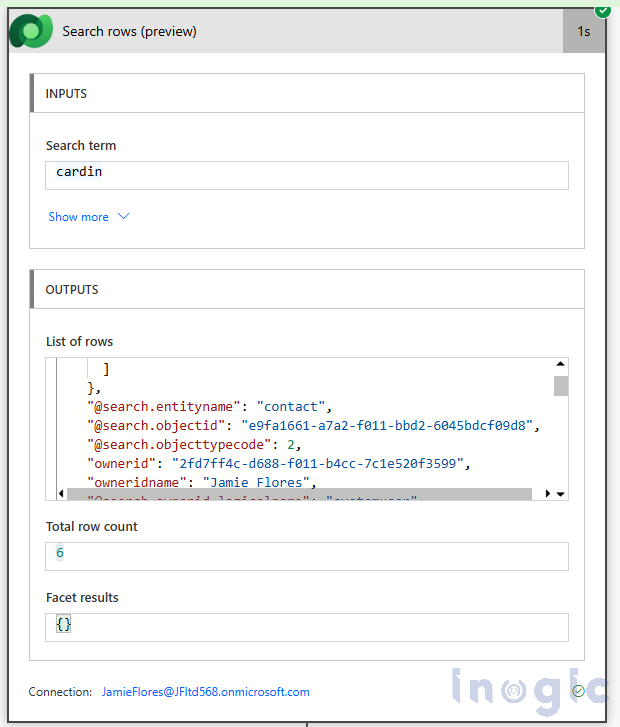
5. Process the Results:
-
- The action will return rows that match the search criteria.
- You can then use the “length” function to count the number of records and proceed with further actions based on that count and searched records.
Understanding the “Search rows” Action
The “Search rows” action offers several advantages:
- Advanced Search Capabilities: Supports Boolean operators, wildcards, exact matches, fuzzy search, term boosting, proximity search, and regular expressions.
- Performance: Optimized for fast searches across large datasets.
- Dynamic Content: Provides dynamic content like row search score, highlights, and object IDs, which can be used in subsequent actions.
Comparison: “Search rows” vs. “List rows”
| Feature / Aspect | Search Rows | List Rows |
| Purpose | Performs a relevance-based search across multiple tables using Dataverse search. | Retrieves records from a specific table with filter/query conditions. |
| Search Method | Uses Dataverse search index (full-text search, supports multiple columns). | Uses OData query against a single entity/table. |
| Scope | Can search across multiple tables (if enabled). | Works only on one table at a time. |
| Fields Queried | Searches across indexed searchable fields (defined in Dataverse). | Returns only fields you explicitly select via $select. |
| Filtering Options | Limited filtering; focus is on keyword/relevance. | Rich OData filters ($filter, $top, $orderby, $expand). |
| Use Case | Best for user-driven keyword searches (e.g., search by name, email, text). | Best for system queries, workflows, and data retrieval with precise filters. |
| Performance | Optimized for search but depends on indexing. | Optimized for structured queries; predictable results. |
| Example | Search “Cortana” across Contacts, Accounts, and Leads at once. | Get all Contacts where city = ‘Mumbai’ and createdon > 2024-01-01. |
Best Practices for Using “Search Rows”
- Keep your Dataverse Search index updated to ensure results are accurate.
- Use Table filters to limit scope and improve performance.
- When handling large datasets, limit the row count to what’s necessary.
- Combine with conditional actions (like “Apply to each” or “Condition”) for automation logic.
Q&A: Quick Answers for AI Search & Readers
Can I use “Search Rows” to search across Leads, Contacts, and Accounts at once?
Yes. That’s one of its biggest advantages—it can query multiple tables in a single search.
Does it support fuzzy or partial matches?
Absolutely. The “Full” query syntax supports fuzzy search and even regular expressions.
Is it available in all environments?
It’s in Preview, so availability might vary depending on your Dataverse region and updates.
Should I replace “List rows” entirely?
Not necessarily. Use “Search Rows” for keyword and relevance-based searches; use “List rows” for structured OData queries.
When Should You Use “Search Rows”?
You should use “Search Rows (Preview)” when:
- You need to search across multiple tables.
- You want relevance-based or fuzzy results.
- You’re building flows that rely on text-based lookups.
- You’re optimizing for speed and scalability in your automation process.
It’s an ideal choice for customer lookup flows, data synchronization, AI-driven automation, and search-based notifications.
Conclusion
The “Search Rows (Preview)” action brings a smarter, faster, and more flexible way to work with Dataverse data inside Power Automate. By combining it with dynamic filters, conditions, and AI-powered logic, you can create intelligent automation flows that scale easily and deliver results faster.
So, the next time you’re building a flow that needs to search, match, or filter data dynamically, skip the “List rows” hassle and give “Search Rows” a try — you’ll notice the difference immediately.
Next Step: Automate Smarter with Power Platform Experts
If you’re exploring ways to build intelligent Dataverse flows or optimize Power Automate performance, our team can help.
Reach out to Inogic for tailored Power Platform solutions that integrate AI, Dataverse, and Dynamics 365 automation seamlessly.