The Power Apps Component Framework (PCF) has long empowered developers to create custom controls for Power Apps, but its interaction capabilities were historically limited.
In model-driven apps, form interactions were confined to some core events, which are OnLoad, OnChange, TabStateChange, and OnSave, tied to the form lifecycle or field updates.
PCF controls could only trigger OnChange by updating a bound field, restricting direct communication with the parent form. Similarly, in canvas apps, PCF controls faced challenges in dynamically interacting with Power Fx expressions or external scripts in a model-driven app.
With the introduction of Events in PCF, these barriers have been significantly reduced. Developers can now define and raise custom events within PCF controls, enabling seamless communication with form scripts in model-driven apps or Power Fx logic in canvas apps.
This blog is part 1 of the PCF events series, where we’ll explore how to leverage Events in PCF to call external scripts in Model-Driven Apps, walk through practical examples, and highlight best practices and use cases to implement these patterns effectively.
Scenario: Calling our Custom Events in Form Script through PCF control (Model-driven App)
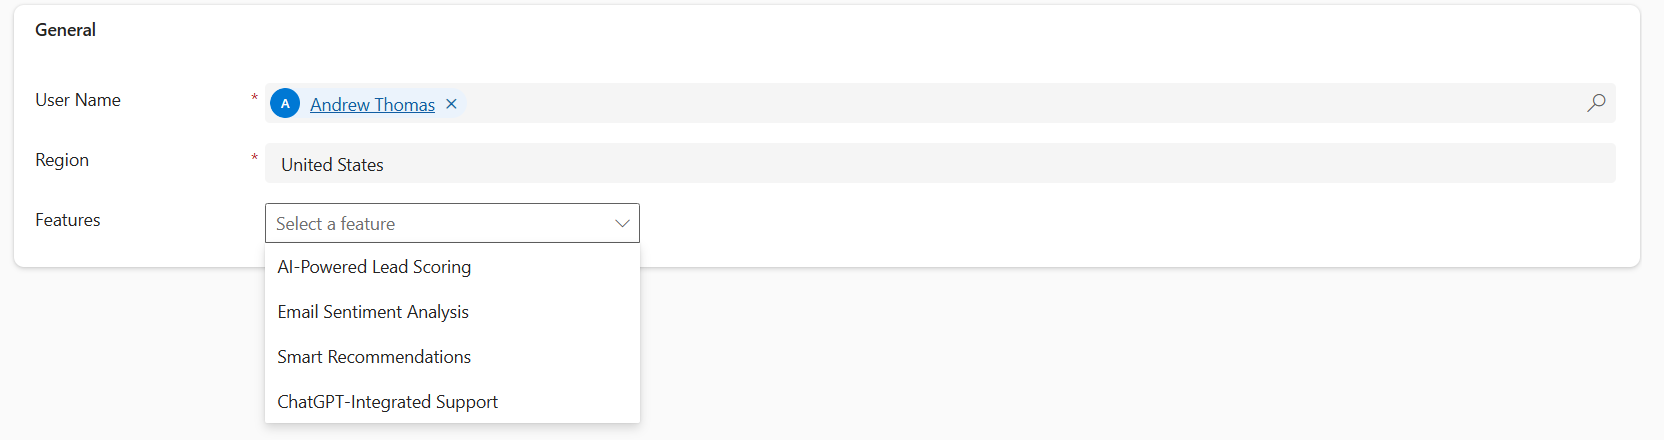
Let’s consider a scenario where an admin configures user-specific features via a User Feature Settings form within CRM. The form includes a PCF component that displays a dropdown of features fetched from a Features List API, including each feature’s name and its supported regions, respectively.
Now, here, instead of binding the onChange event within the CRM, which will require updating our bound field of the PCF control to indirectly trigger form scripts, we created our custom event named featureChange. This event triggers whenever the feature field value changes, allowing seamless interaction of the PCF component within the CRM form itself.
Here is our visual image for our PCF component.
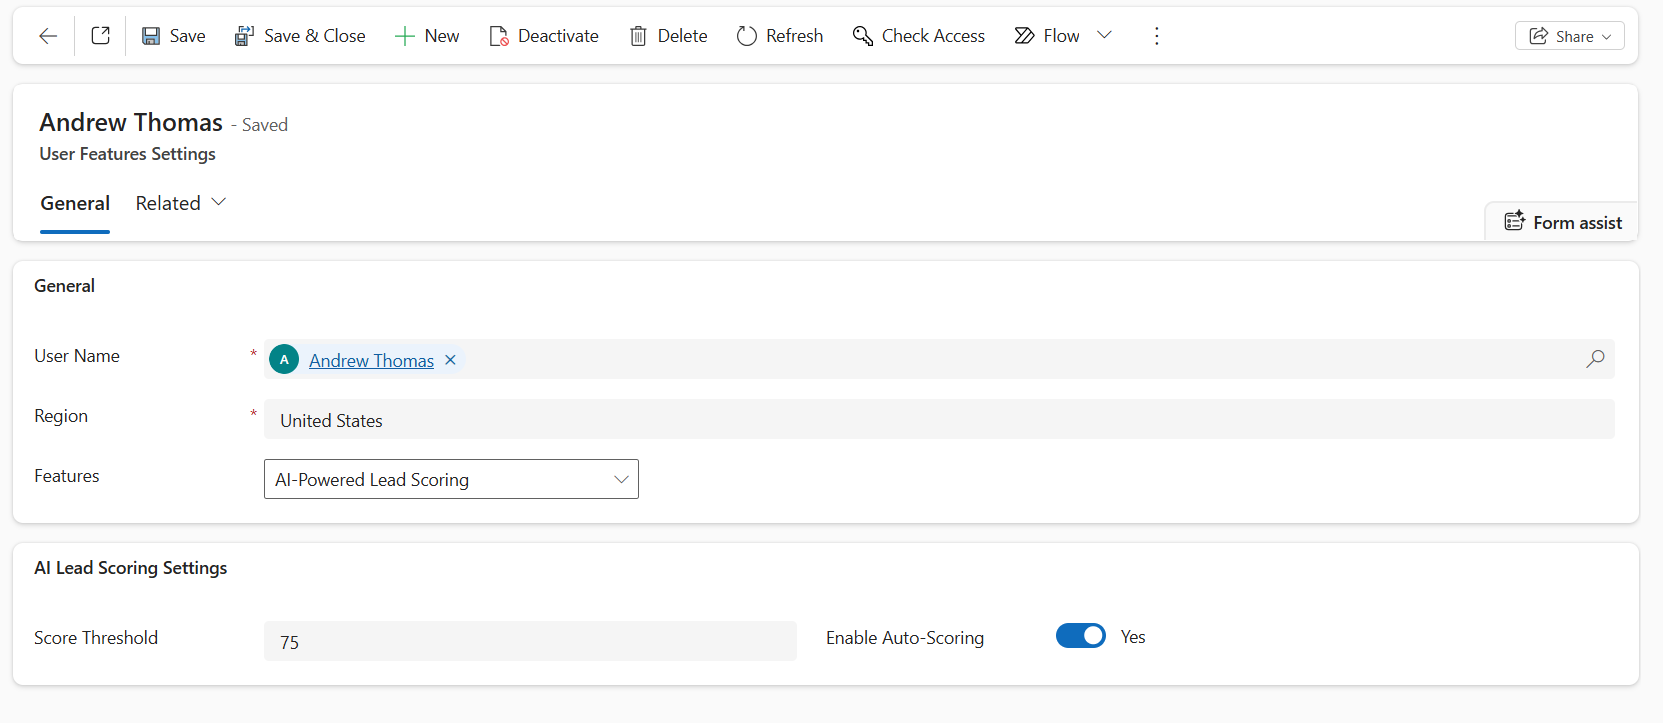
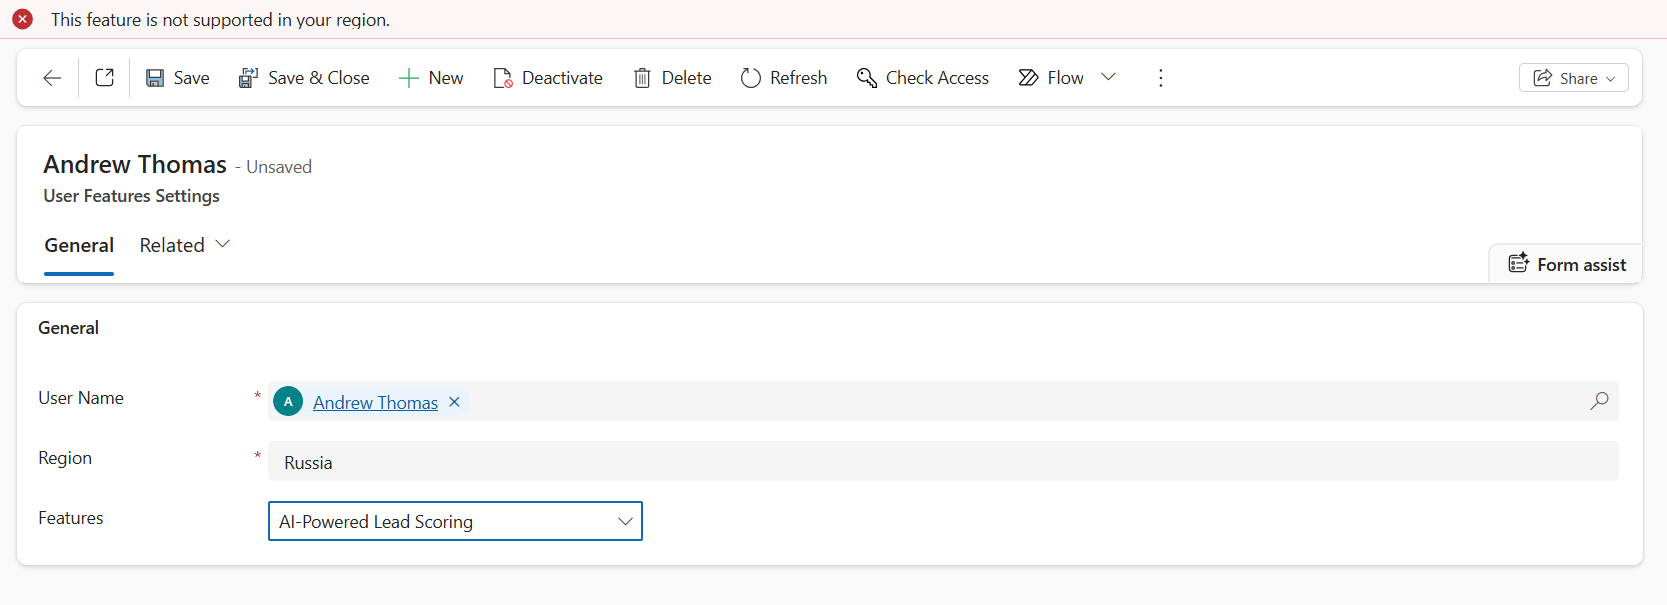
Now, when the admin selects a feature, the form checks if the feature is supported in the user’s region and enables the respective settings. If not, a form-level notification is displayed.
Let’s walk through how to implement events in our PCF control with a step-by-step guide to implement events.
Step-by-Step Implementation
Step 1: Define the Custom Event in the PCF Manifest
Define the custom event that the PCF control will expose. This is done in the same way as we define properties in the ControlManifest.Input.xml. Here’s what the new event declaration looks like:
<event name=”featureChange” display-name-key=”featureChange” description-key=”The event to handle feature change.” />
Step 2: Implement the Event in the PCF Control (index.ts)
In index.ts, define a method to fire the event and pass it to your React component via props. Include parameters (e.g., a selected license key) to provide context to the form script.
private handleValidate = () => {
if (this._selectedFeature) {

this._context.events.featureChange({

featureKey: this._selectedFeature,

supportedRegions: this._supportedRegions.map(r => r.toLowerCase()),

});

}

};


private handleFeatureChange= (key: string, supportedRegions: string[]) => {

this._selectedFeature = key;

this._supportedRegions = supportedRegions;

};

public updateView(context: ComponentFramework.Context<IInputs>): React.ReactElement {

const props: IFeatureControlProps= {

featureChange: this.handleValidate,

onFeatureChange: this.handleFeatureChange,

};

return React.createElement(FeatureControl, props);

}
Step 3: Update the React Component (FeatureControl.tsx)
In your React component, define the props interface and bind the event handler to the onChange of the Dropdown. So, when the user changes the option in the Dropdown, the onFeatureChange and featureChange methods will be triggered. The featureChange is the event that we had set in the Manifest file.
export interface IFeatureControlProps{

featureChange: () => void;

onFeatureChange: (selectedKey: string, regions: string[]) => void;

}

export const FeatureControl = (props: IFeatureControlProps) => {

const [selectedKey, setSelectedKey] = React.useState<string | undefined>(undefined);

return (

<div>

<Dropdown options={options} selectedKey={selectedKey}

onChange={(event,option) => {

const key = option?.key as string;

const regions = (option as IFeatureOption)?.data?.supportedRegions || [];

setSelectedKey(key);

props.onFeatureChange(key,regions);

if(key) { props.featureChange(); }

}}

placeholder="Select a feature"

styles={{ root: { minWidth: 200 } }}

/>

</div>

);};
Step 4: Update the Existing Form Script (TypeScript Web Resource)
Update your existing web resource to handle the featureChange event. Register it on the form’s on-load event to attach the event handler to the PCF control. So, when the event is triggered from the PCF control, it invokes the method defined in this script –
namespace IKL{

export namespace FeatureControl {

export class CheckFeature {

private readonly controlName = "sha_features";

public onLoad(executionContext: any): void {

let formContext = executionContext.getFormContext();

let featureControl = formContext.getControl(this.controlName);

if (featureControl ) {

featureControl.addEventHandler("featureChange", (params: any) => {

this.onFeatureChange(params, formContext);

});

}

}

public onFeatureChange(params: any, formContext: any): void {

//Here, our logic for enabling settings and showing form-level notification will come.

}

}

}

}

let featureValidate = new IKL.FeatureControl.CheckFeature();
Summary: What’s Happening Here:
- We define a custom event (featureChange) in the manifest file.
- In the PCF control, we fire that event from the React Component when the user selects/changes the dropdown option.
- The JavaScript Web Resource present on the CRM Form listens for that event and executes the logic.
Time to See It in Action
Now that everything is wired up, event in the manifest, handler in the control, and logic in the form script, you’re ready to test it. Load up your form, interact with the control, and watch how your external script reacts instantly. Smooth, seamless, and finally possible thanks to the PCF Events!
Now, based on the user’s selected feature, the PCF control’s FeatureChange event enables the corresponding settings. Refer to the screenshots below for a better understanding.
Conclusion
The introduction of Events in PowerApps Component Framework (PCF) has extended its limits of what developers can do with the field-level controls. What once seemed to be a rigid, isolated environment now has a more interactive and integrated ecosystem, allowing PCF controls to communicate directly with the Parent Form.
Whether you’re triggering form script events or updating related fields, Events are a bridge between the PCF control and the CRM form. This capability of Events not only simplifies complicated workarounds but also promotes cleaner, more consistent, and maintainable code.
As you design your next PCF control, consider leveraging Events to create more powerful, flexible, and context-aware experiences across model-driven apps.