Model-driven apps in Power Platform provide a structured way to build data-centric applications using Dataverse where the user interface is automatically generated based on tables, relationships, and business logic. As these apps evolve it incorporates complex forms, business process flows, security roles, plugins, and integrations.
Over the time the need for automated, reliable testing becomes essential. Automation minimizes the dependency on repetitive manual testing, helping teams conserve time and optimize resources. Additionally, identifying defects and regressions early in the development lifecycle enhances overall solution quality and enables faster, more reliable releases.
Power Apps Test Engine is a low code automation tool offering from Microsoft. It allows automate end-to-end testing for both Canvas and Model-Driven Apps.
This blog provides a step-by-step guide to setting up and using the Power Apps Test Engine for Model Driven Apps, demonstrating how to utilize basic “Power Fx” queries to execute automated tests. We will be using a common “Sales Hub” app for Lead record creation scenario to stimulate the user interactions such as filling fields, clicking buttons, and verifying expected outcomes using Assert functions.
Note: Currently Power Apps Test Engine offers Power Fx functions for Model Driven App automation that are still in PREVIEW hence to use those you must explicitly pass “allowPowerFxNamespaces:- Preview” parameter in Yaml file (explained later). The available supported Power Fx functions can be referred from this Microsoft doc.
In the previous blog, we already explored how to implement automation for Canvas Apps using the Power Apps Test Engine. Before starting with the Model Driven App automation, you can refer the previous blog and ensure that you have fulfilled the prerequisites and have installed and configured Power Apps Test Engine along with the Playwright.
I am just mentioning the overview of the steps you need to perform in your visual studio code editor by referring to previous blog mentioned above.
- Create Test Engine Workspace
- Clone the PowerApps Test Engine Repository
- Navigate to the Source Folder & build the Power Apps Test Engine Project
- Install Microsoft Playwright from within the Power Apps Test Engine
- Create Folder Structure for your tests under root directory to maintain :
- Yaml file
- json file
- ps1 PowerShell script file.
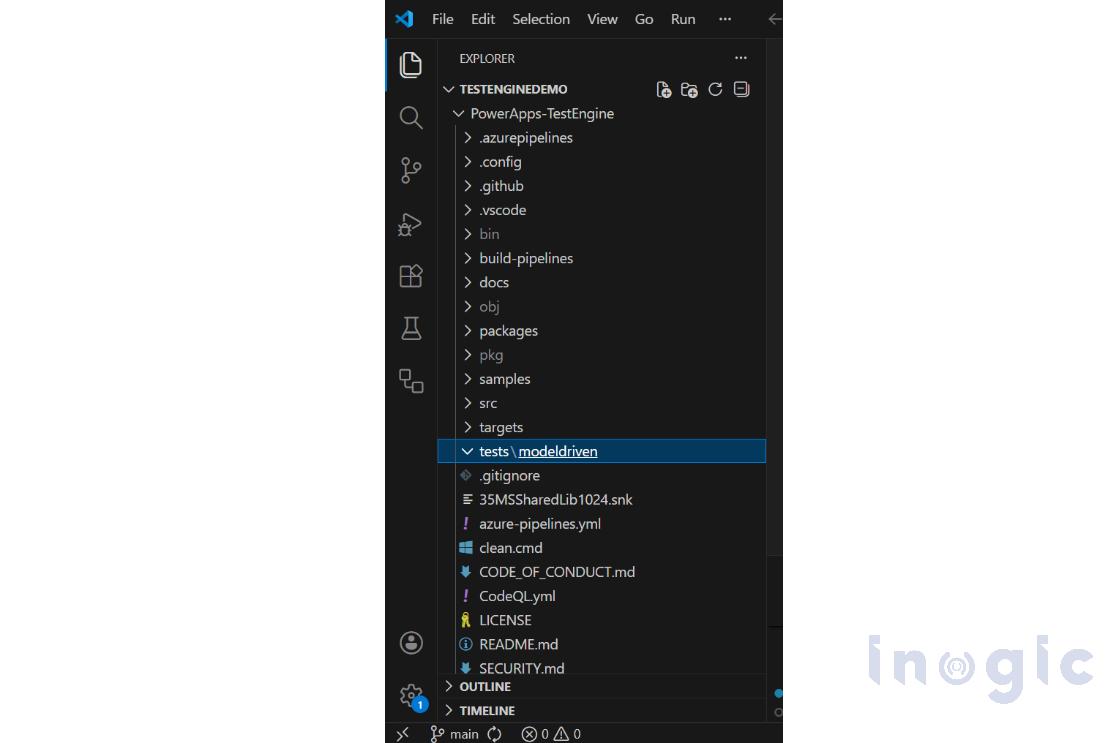
For this demonstration I have created folder under root directory “tests” under which created another one named “modeldriven” as shown below:
Testing your model-driven application with Power Apps Test Engine requires the following steps:
-
Create the Config.json file as shown below:
- environmentId: The ID of your Power Platform environment where the Model driven s app is deployed.
- tenantId: Your tenant ID.
- installPlaywright: Set to false if Playwright is already installed.
- user1Email: Email of the user who will run the tests.
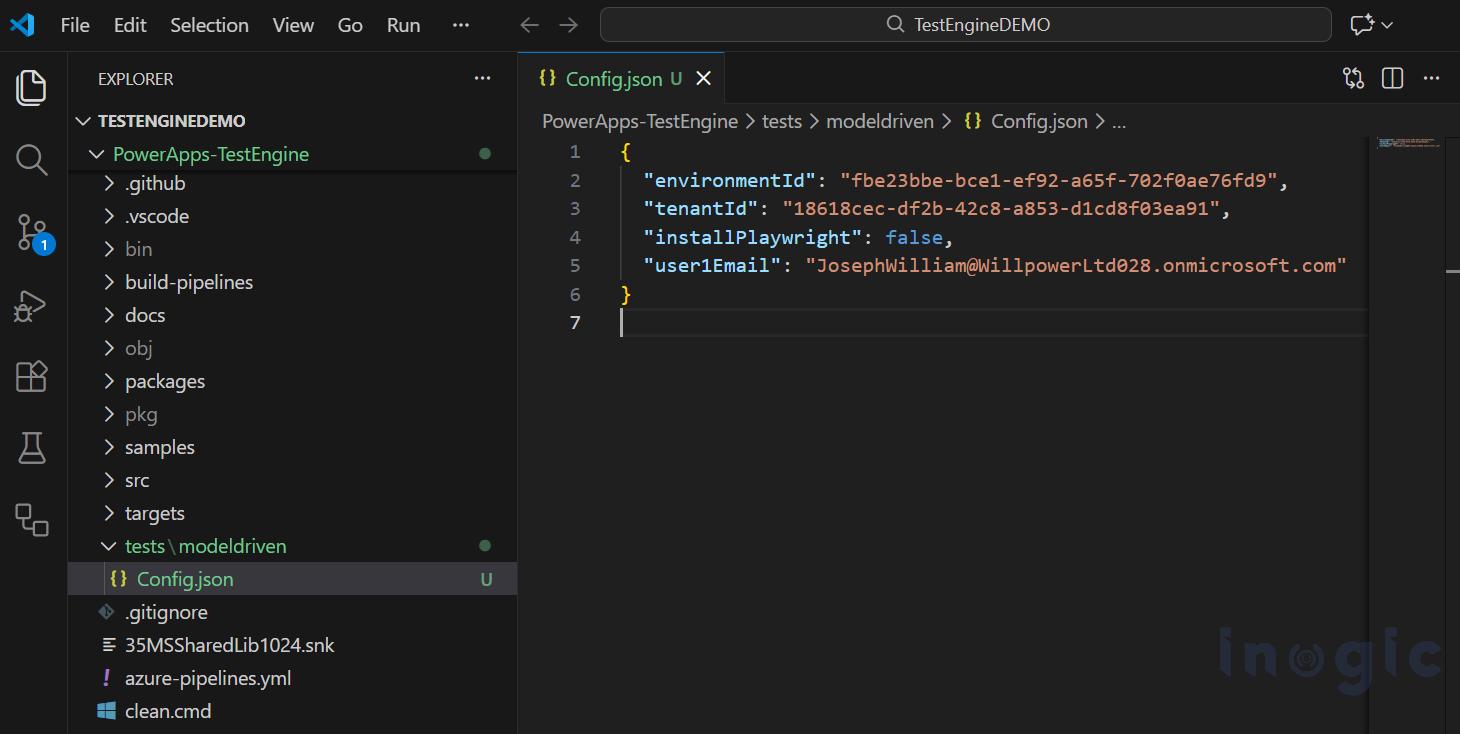
Note: You do not need to specify a password here, as authentication uses the saved StorageState.
-
Create a Test Plan
- Define the test plan using YAML-based format which uses Power Fx test functions. For more details about Test Plan definition you can refer this Microsoft doc.
Test Plan majorly consist of below 3 sections:
- testSettings: Basic settings like Browser for test run, recording setting, headless mode etc. are defined here. Note: If headless is set as false means you will see the test run execution in visible browser window.
- environmentVariables: User Persona which was defined in Config.json is passed here. You can’t store test credentials in test plan files. You must select Storagestate as the secure location to store credentials. The test plan file contains references to which environment variables are used for user persona.
- testSuite: It is collection of test steps. You can define the PowerFx functions as per your use case.
I have created “LeadCreation.yaml” file wherein I have implemented the simple lead creation use case with below logic:
- Open the Sales Hub app
- Verify/assert if Sales Hub app page loaded successfully
- Navigate to Lead view click on New button
- Create Lead record by filling in First Name, Last Name, Subject fields
- Avoid duplicate lead records creation by appending current timestamp
- Wait until save button appears
- Save the record and verify/assert by taking screenshot if lead record saved successfully
This is the complete Yaml file content pasted here:
Note: currently explicitly you have to enable preview under testSettings for all Model Driven Apps testing (highlighted below).
testSettings:
browserConfigurations:

- browser: Chromium

recordVideo: true

headless: false

extensionModules:

enable: true

allowPowerFxNamespaces:

- Preview
environmentVariables:

users:

- personaName: User1

emailKey: user1Email


testSuite:

testSuiteName: "Dynamics 365 Sales Hub Test"

persona: User1

appId: "4c0894ba-19c9-f011-8543-7c1e523cbef1"


testCases:

- testCaseName: "Create Lead record"

testSteps: |

// Verify we are landed on the correct page

Assert(Preview.PlaywrightAction("//div[@title='Dynamics 365']", "exists"), "Failed to navigate to Dynamics 365 - page may not have loaded completely");


// Create new lead -Click on New button

Assert(Preview.PlaywrightAction("button[aria-label='New']", "exists"), "New lead button not found - may not be on the correct page");

Preview.PlaywrightAction("button[aria-label='New']", "click");


// Build unique suffix using time components to avoid duplicates fill firstname, lastname and companyname

Preview.PlaywrightActionValue("input[aria-label*='First Name']", "fill", "John_" & Hour(Now()) & Minute(Now()) & Second(Now()));

Preview.PlaywrightActionValue("input[aria-label*='Last Name']", "fill", "TestLead_" & Hour(Now()) & Minute(Now()) & Second(Now()));

Preview.PlaywrightActionValue("input[aria-label*='Topic']", "fill", "Test Lead Demo " & Hour(Now()) & Minute(Now()) & Second(Now()));


// Save the lead - try multiple save button selectors

Assert(Preview.PlaywrightAction("button[aria-label*='Save']", "exists"), "Save button not found");

Preview.PlaywrightAction("button[aria-label*='Save']", "click");


// Take Screenshot after saving (use Playwright locator-based screenshot)

Preview.PlaywrightActionValue("body", "screenshot", "LeadCreation_" & Hour(Now()) & Minute(Now()) & Second(Now()) & ".png");
Note: Remember appId under Test Suite defined above is to be replaced with your appId.
3.Create a PowerShell Script to Automate the Test Run:
-
- Create a file named ps1 with the necessary code to execute the test cases as shown below:
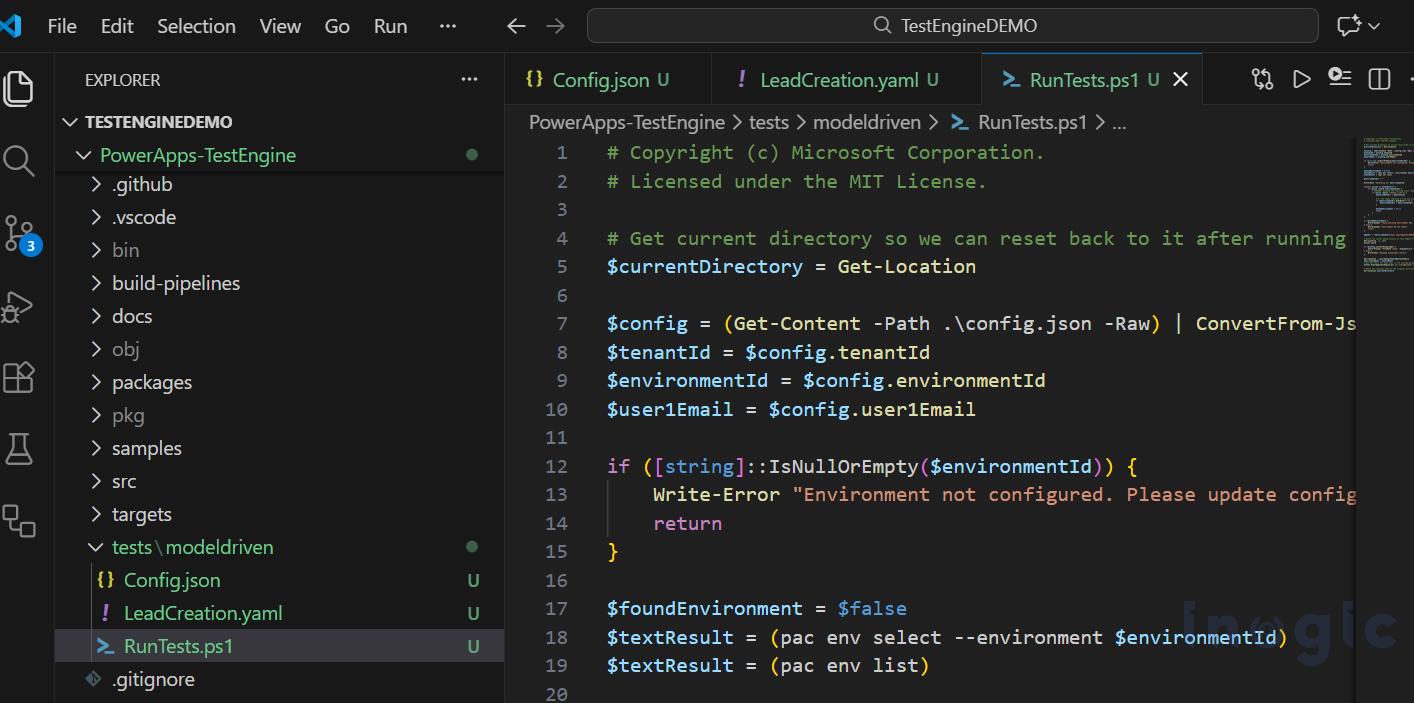
This is the complete RunTests.ps1 file content pasted here, as shown below Pac test run commands are used and pac parameters are passed.
# Copyright (c) Microsoft Corporation. # Licensed under the MIT License. # Get current directory so we can reset back to it after running the tests $currentDirectory = Get-Location $config = (Get-Content -Path .\config.json -Raw) | ConvertFrom-Json $tenantId = $config.tenantId $environmentId = $config.environmentId $user1Email = $config.user1Email if ([string]::IsNullOrEmpty($environmentId)) { Write-Error "Environment not configured. Please update config.json" return } $foundEnvironment = $false $textResult = (pac env select --environment $environmentId) $textResult = (pac env list) $environmentUrl = "" Write-Host "Searching for $environmentId" foreach ($line in $textResult) { if ($line -match $environmentId) { # CHANGED: Removed the trailing slash requirement inside the regex if ($line -match "(https://\S+)") { $environmentUrl = $matches[0] # If the regex captured a trailing slash, remove it nicely, otherwise keep it if ($environmentUrl.EndsWith("/")) { $environmentUrl = $environmentUrl.Substring(0, $environmentUrl.Length - 1) } $foundEnvironment = $true break } } } if ($foundEnvironment) { Write-Output "Found matching Environment URL: $environmentUrl" } else { Write-Output "Environment ID not found." return } $mdaUrl = "$environmentUrl/main.aspx?appid=4c0894ba-19c9-f011-8543-7c1e523cbef1&pagetype=entitylist&etn=lead&viewid=00000000-0000-0000-00aa-000010001005" # Build the latest debug version of Test Engine from source Set-Location ..\..\src dotnet build if ($config.installPlaywright) { Start-Process -FilePath "pwsh" -ArgumentList "-Command `"..\bin\Debug\PowerAppsTestEngine\playwright.ps1 install`"" -Wait } else { Write-Host "Skipped playwright install" } Set-Location ..\bin\Debug\PowerAppsTestEngine $env:user1Email = $user1Email # Run the tests for each user in the configuration file. dotnet PowerAppsTestEngine.dll -u "storagestate" --provider "mda" -a "none" -i "$currentDirectory\LeadCreation.yaml" -t $tenantId -e $environmentId -d "$mdaUrl" # Reset the location back to the original directory. Set-Location $currentDirectory
Notes:
- The URL format should specify the correct “pagetype”, “entity” and “view” based on your testing scenario. As highlighted above $mdaurl is set to open the lead view.
- Under Storagestate –provider is set to “mda” (Model Driven App) and provide yaml file name under $currentDirectory as shown “yaml” file name is passed.
4. Execute/Run the Script
- Now the last step is to execute the script. But before that run the below command from terminal so that authentication will be completed and will be stored in storage state.
pac auth create
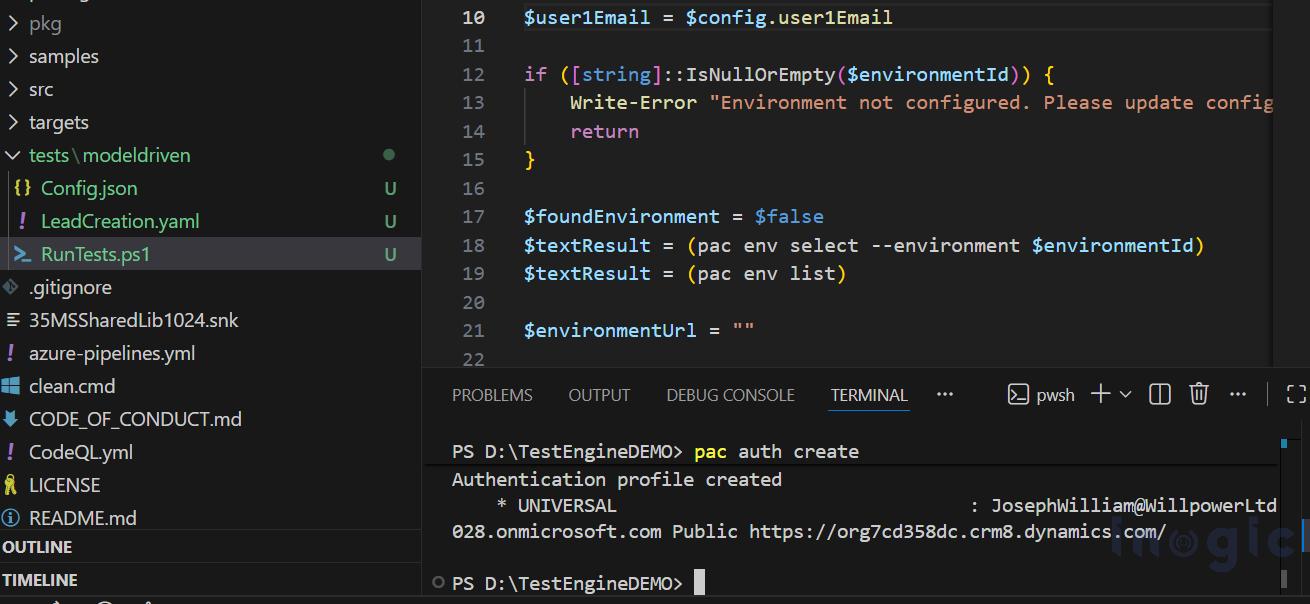
A browser window will launch automatically with the email address pre-filled. You’ll only need to enter the password manually once. This password is securely stored in the StorageState file for future test executions. You will observe below “Authentication Complete” message post login.

Once authentication is completed under the modeldriven folder, execute command: .\RunTests.ps1
![]()
After the first login, the tests will proceed automatically without any additional input, as shown in the video below:
You can see the result of execution at terminal itself in terms of test cases results if passed or failed. If test failed then you can review logs, screenshots, and videos of the test execution in the “TestOutput” folder to verify results and you can debug if necessary.
All output from your test runs will be saved in the TestOutput folder located at below path: %USER_PROFILE%\AppData\Local\Temp\Microsoft\TestEngine\TestOutput

Conclusion:
Using the Power Platform Test Engine with .NET execution provides a reliable and automated approach to validating Model-Driven Apps before deployment. It enables structured test scenarios to verify form behavior, command actions, business process flows, field validations which ultimately improving quality by automating the repetitive scenarios and hence reducing the manual efforts.
FAQs
What is Power Apps Test Engine?
A low-code automation tool from Microsoft for end-to-end testing of Canvas and Model-Driven Power Apps using Power Fx functions and Playwright.
Why automate testing for Model-Driven Apps?
Eliminates manual repetition, catches regressions early, validates forms/business processes, and accelerates releases while conserving resources.
What’s the difference between Canvas and Model-Driven testing?
Canvas tests custom, pixel-perfect user interfaces and unique app logic; Model-Driven tests structured data forms, business processes, and out-of-the-box workflows built on Dataverse tables.
Can Test Engine test real business scenarios?
Yes—like creating Leads in Sales Hub, filling forms, saving records, and verifying success with screenshots.
Can I use the same Test Engine for both Canvas and Model-Driven apps?
Absolutely. While the setup and specific Power Fx functions might differ slightly (e.g., Model-Driven apps currently rely more on Playwright action previews), the core engine and workspace remain the same.
How does “Low-Code” testing help my business team?
Instead of hiring specialized “Automation Engineers” who write complex C# or Java code, your Business Analysts or Functional Consultants can maintain the tests. Since the tests use business logic (e.g., “Click the Save button”), the test scripts are readable by humans, not just machines.