Organizations often use multiple platforms to manage their operations. While Microsoft Dynamics 365 excels at customer relationship management, Databricks provides powerful data processing and machine learning capabilities.
But what if you could seamlessly connect these two platforms to ensure real-time data synchronization?
Sounds great, right?
Microsoft’s Power Platform Custom Connectors solve this integration challenge by allowing organizations to create secure, automated connections between Databricks and Dynamics 365. Instead of manually updating CRM records or running separate data processes, you can establish an automated pipeline that keeps your customer data synchronized with advanced analytics insights.
This blog will walk you through:
- What Databricks and Dynamics 365 integration means for modern businesses
- Why Custom Power Platform Connectors are superior to manual data transfers
- A comprehensive step-by-step implementation guide
- Security considerations for enterprise data integration
- Real-world use cases for CRM and analytics synchronization
What Is Databricks to Dynamics 365 Integration?
Databricks to Dynamics 365 integration is a seamless connection between your advanced analytics platform and customer relationship management system, implemented through Custom Power Platform Connectors. This integration enables automated data synchronization, ensuring that insights generated in Databricks are immediately reflected in your CRM records.
This makes business operations:
- More Efficient → No manual data entry or CSV imports
- Real-time → Instant updates from analytics to CRM
- Accurate → Eliminates human error in data transfer
- Scalable → Handles large volumes of data automatically
Why Use Custom Power Platform Connectors Instead of Manual Integration?
Traditionally, organizations used manual processes to sync data between platforms:
- Exporting data from Databricks to CSV files
- Manually importing or updating records in Dynamics 365
- Running periodic batch jobs with complex scheduling
The Custom Power Platform Connector approach is superior:
- Requires only initial configuration and authentication setup
- Creates automated, real-time data pipelines
- Provides built-in error handling and retry mechanisms
- Scales automatically with your business needs
Step-by-Step Guide to Creating the Integration:
Prerequisites and Setup
Before building the integration, you’ll need to gather essential information from your Databricks environment:
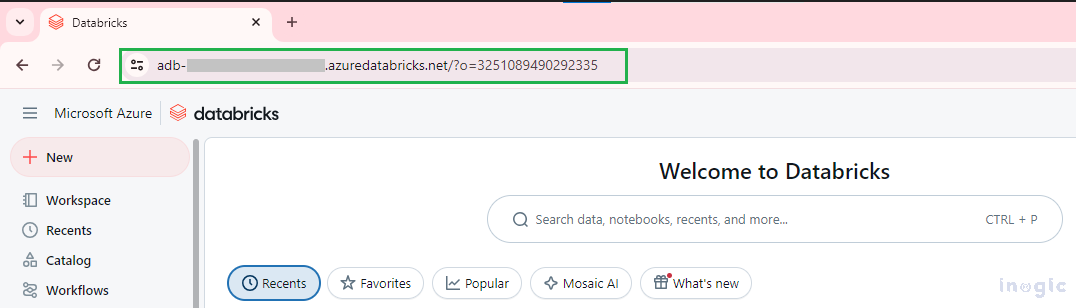
Host URL: Your Databricks workspace URL (e.g., https://your-workspace.databricks.com)
Request URL Format: Host URL + /api/2.1/jobs/<<Action Name>>
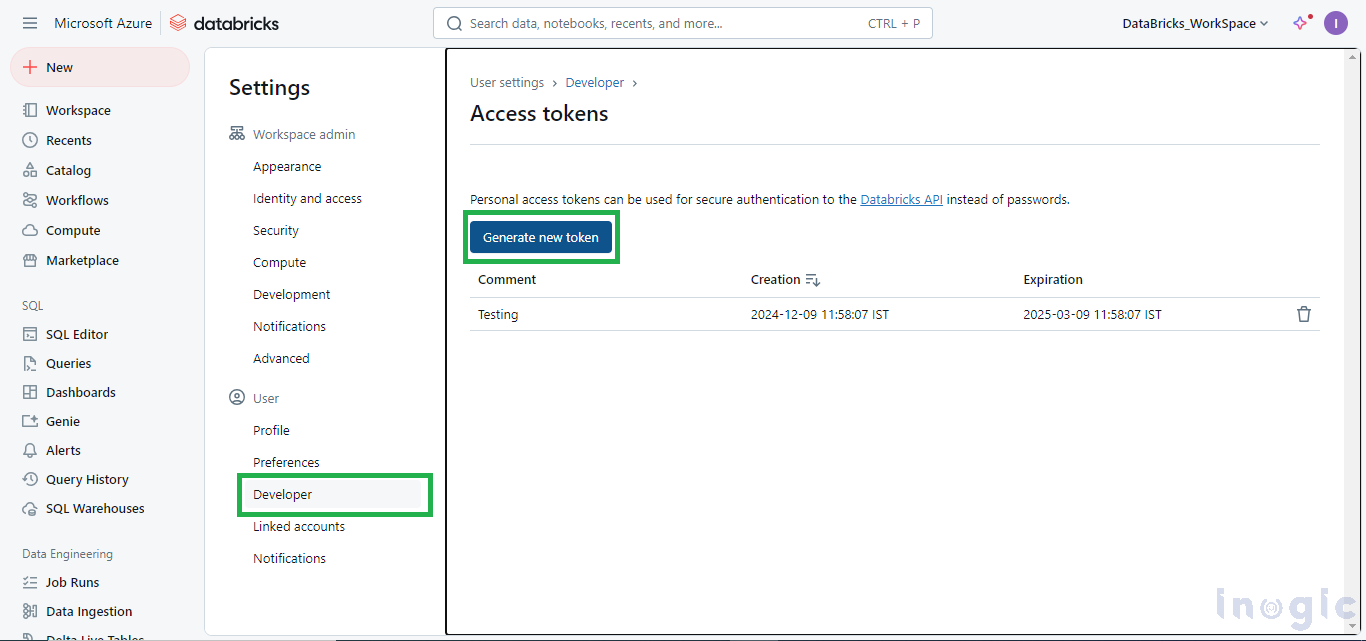
Authentication Key (Access Token): Navigate to Settings > Developer > Generate new token in your Databricks workspace
Key Components Required:
- Cluster: Computational resources to run your notebooks and jobs
- Notebook: Contains the logic to process and output data for CRM integration
- Job: Orchestrates the data processing workflow and provides the job ID for API calls
Please refer to the steps below for key details
Host URL:
Request URL:
Host URL + /api/2.1/jobs/<<Action Name >>
Authentication Key (Access Token):
Settings > Developer > Generate new token
Cluster:
This will be used to run the Notebooks and the Job to push data into the MS-CRM
Notebook:
This will be used to push data as output to the job using a cluster.

Job:
In Databricks, navigate to the Job runs > Job > Open the job > Copy the Job id

Now that we have the key details, we can proceed with creating a Custom Connector to establish the connection with Databricks.
Navigate to Power Apps, select your solution,
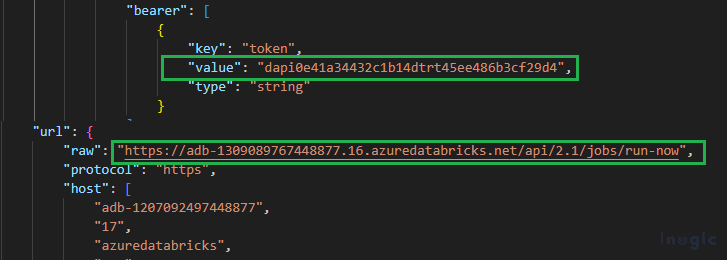
Below is the JSON code snippet from Postman, where we have created parameters for the body. this JSON contains actions that will be used to trigger the job in Databricks and get the output from it within the Power Automate flow.
{“info”:{“_postman_id”:”<<Removed>>”,”name”:”New Collection”,”schema”:”https://schema.getpostman.com/json/collection/v2.1.0/collection.json”,”_exporter_id”:”30140278″},”item”:[{“name”:”jobsrun-now”,”event”:[{“listen”:”test”,”script”:{“exec”:[“// Stores the runId in an environment or global variable”,”var numberinjob = 123;”,”numberinjob = pm.response.json().number_in_job;”,”pm.collectionVariables.set(\”numberinjob\”, numberinjob);”],”type”:”text/javascript”,”packages”:{}}}],”request”:{“auth”:{“type”:”bearer”,”bearer”:[{“key”:”token”,”value”:”dapi0e41a34432t1b14dtrt45ee486b3cf29d4″,”type”:”string”}]},”method”:”POST”,”header”:[],”body”:{“mode”:”raw”,”raw”:”{\r\n \”job_id\”: 941538676264961\r\n}”,”options”:{“raw”:{“language”:”json”}}},”url”:{“raw”:”https://adb-1509089767788877.16.azuredatabricks.net/api/2.1/jobs/run-now”,”protocol”:”https”,”host”:[“adb-1207093497448877″,”17″,”azuredatabricks”,”net”],”path”:[“api”,”2.1″,”jobs”,”run-now”]}},”response”:[]},{“name”:”getJobs”,”event”:[{“listen”:”test”,”script”:{“exec”:[“// Set run_id from tasks in response in variable runId”,” var jsonData =pm.response.json();”,” var runid =123 ;”,” runid = jsonData.tasks[0].run_id”,” pm.collectionVariables.set(\”runid\”, runid);”,” “],”type”:”text/javascript”,”packages”:{}}},{“listen”:”prerequest”,”script”:{“exec”:[“setTimeout(function(){},60000)”],”type”:”text/javascript”,”packages”:{}}}],”request”:{“auth”:{“type”:”bearer”,”bearer”:[{“key”:”token”,”value”:”dapi0e41a332t1b14d826daee486b3cf29d4″,”type”:”string”}]},”method”:”GET”,”header”:[],”url”:{“raw”:”https://adb-1308089767448877.16.azuredatabricks.net/api/2.1/jobs/runs/get?job_id=941538686264961&number_in_job={{numberinjob}}”,”protocol”:”https”,”host”:[“adb-1207092497448877″,”17″,”azuredatabricks”,”net”],”path”:[“api”,”2.1″,”jobs”,”runs”,”get”],”query”:[{“key”:”job_id”,”value”:”941538686264961″},{“key”:”number_in_job”,”value”:”{{numberinjob}}”}]}},”response”:[]},{“name”:”getOutput”,”request”:{“auth”:{“type”:”bearer”,”bearer”:[{“key”:”token”,”value”:”dapi0e41a332c1g14d826daee486b3cf29d4″,”type”:”string”}]},”method”:”GET”,”header”:[],”url”:{“raw”:”https://adb-1309089767448877.16.azuredatabricks.net/api/2.1/jobs/runs/get-output?run_id={{runid}}”,”protocol”:”https”,”host”:[“adb-1207092497448877″,”17″,”azuredatabricks”,”net”],”path”:[“api”,”2.1″,”jobs”,”runs”,”get-output”],”query”:[{“key”:”run_id”,”value”:”{{runid}}”}]}},”response”:[]}],”event”:[{“listen”:”prerequest”,”script”:{“type”:”text/javascript”,”packages”:{},”exec”:[“”]}},{“listen”:”test”,”script”:{“type”:”text/javascript”,”packages”:{},”exec”:[“”]}}],”variable”:[{“key”:”runid”,”value”:”599586925989625″,”type”:”string”},{“key”:”numberinjob”,”value”:”184228706587626″,”type”:”string”}]}
Open the file and update the Host URL, Access Token (There are multiple places where you have to update the keys), and the job id, and please cross-verify the actions in the JSON File.
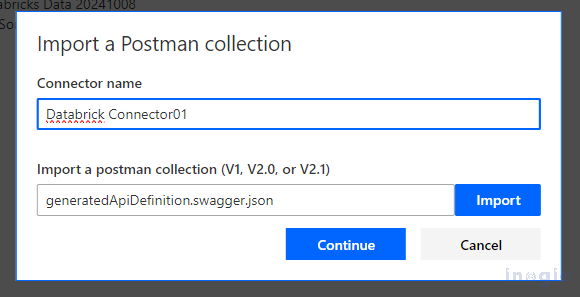
Create a Custom connector, select Import from Postman Collection,
Once you create the Custom connector using the Postman Collection this will include all the required actions to trigger the job in the Databricks.
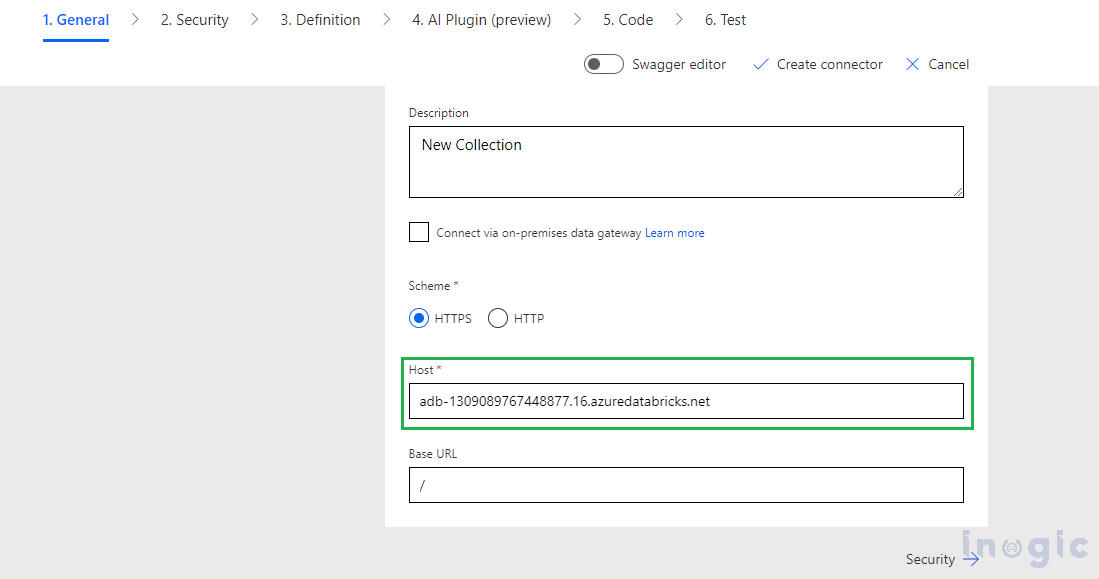
Review your connector.
Under the General section Validate the Host URL,
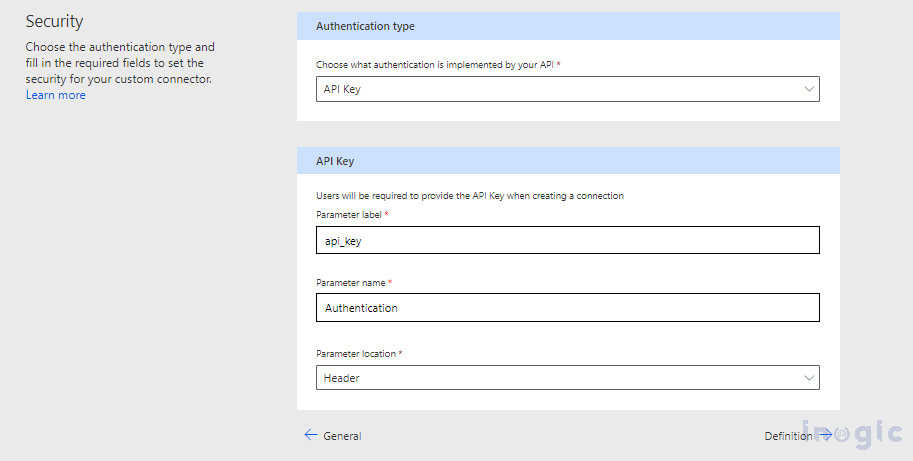
In the Security tab, update the Authentication type as API Key
Under the API Key section update the Parameters.
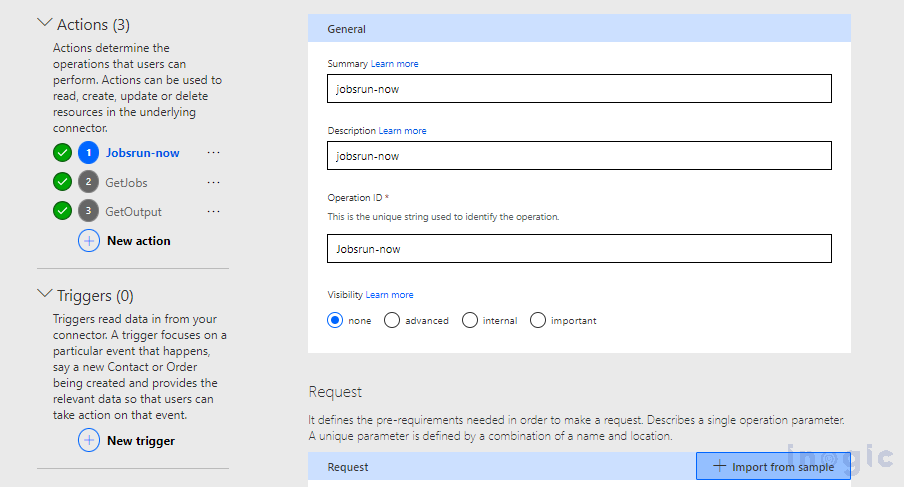
Under the definition tab, see that all three required actions exist, and all three have proper Request URL, as shown in the screenshot given below.

We have successfully created the custom connector and are ready to proceed with the Power Automate flow.
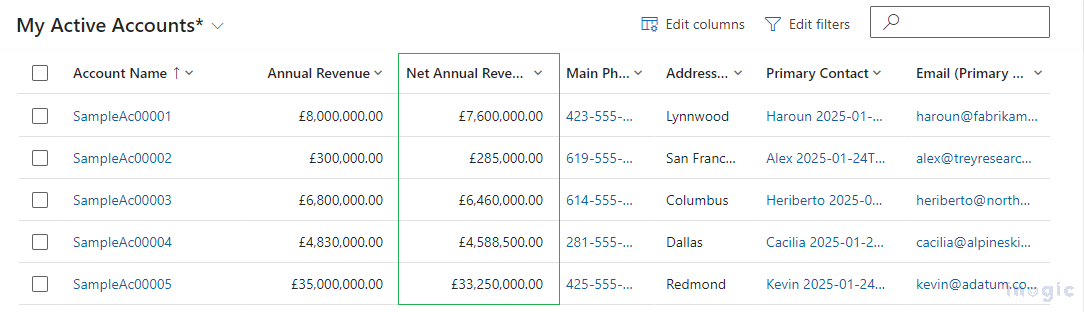
Before initiating the flow, we have updated the Annual Revenue for accounts in Databricks and expect these values to be reflected in MS CRM.
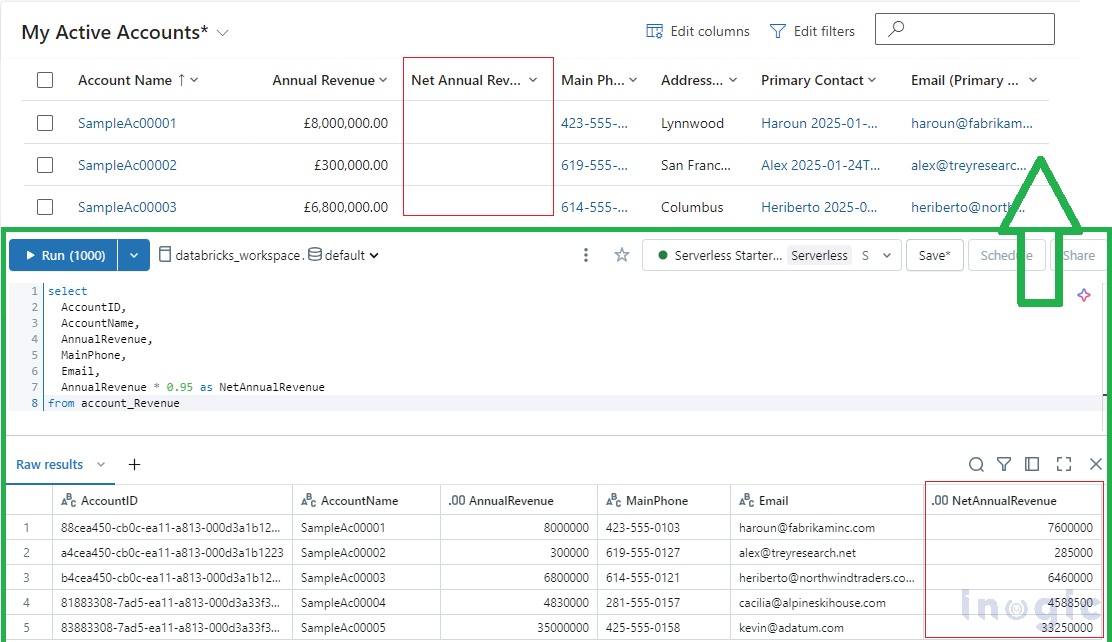
Let’s create the Scheduled Power Automate flow.
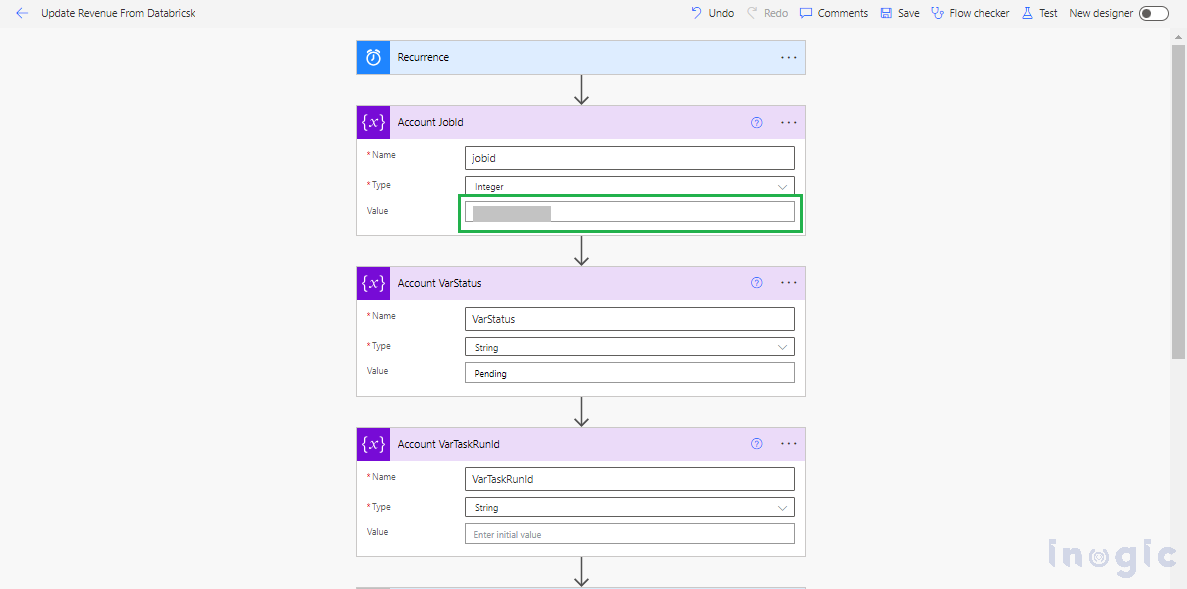
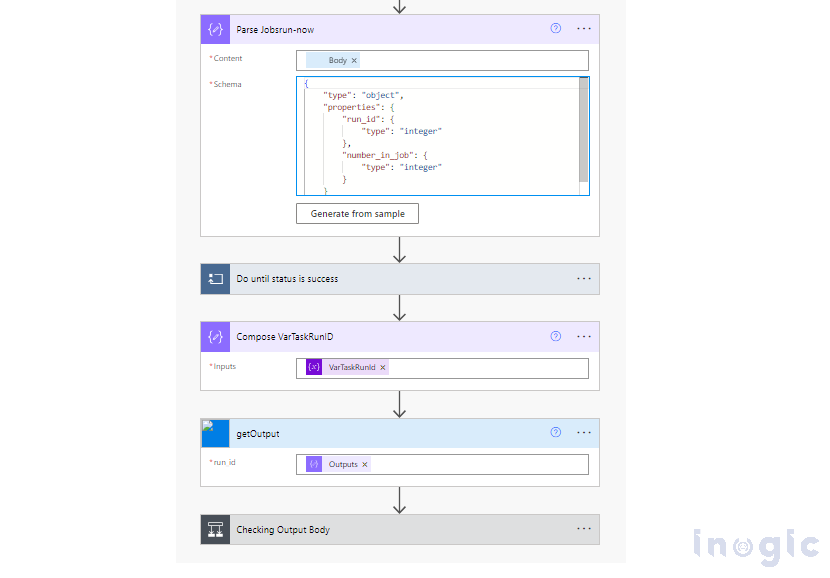
Initially, we will add a few variables to the flow such as Account Jobid, Account VarStatus, Account VarTaskRunid. Provide the job id to the Account Jobid variable.
Refer to the screenshot given below,
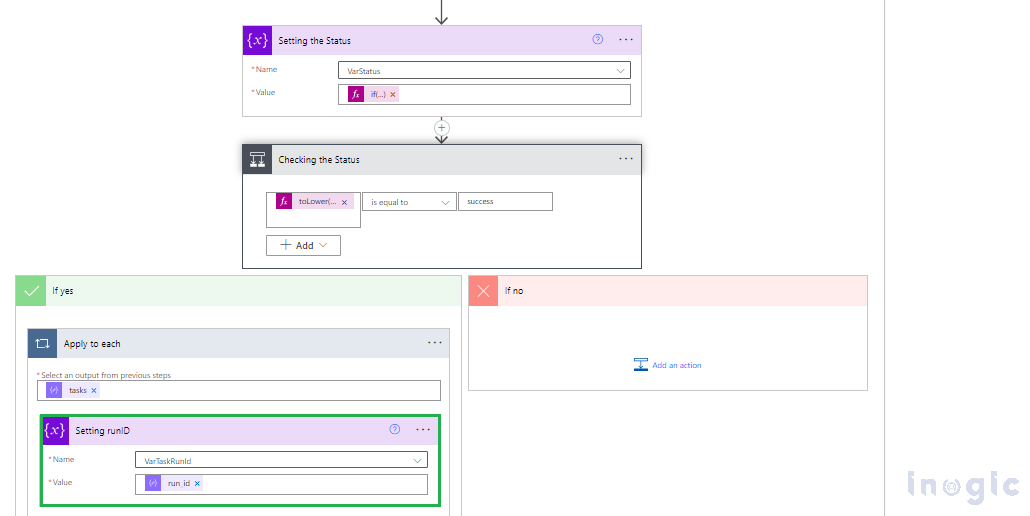
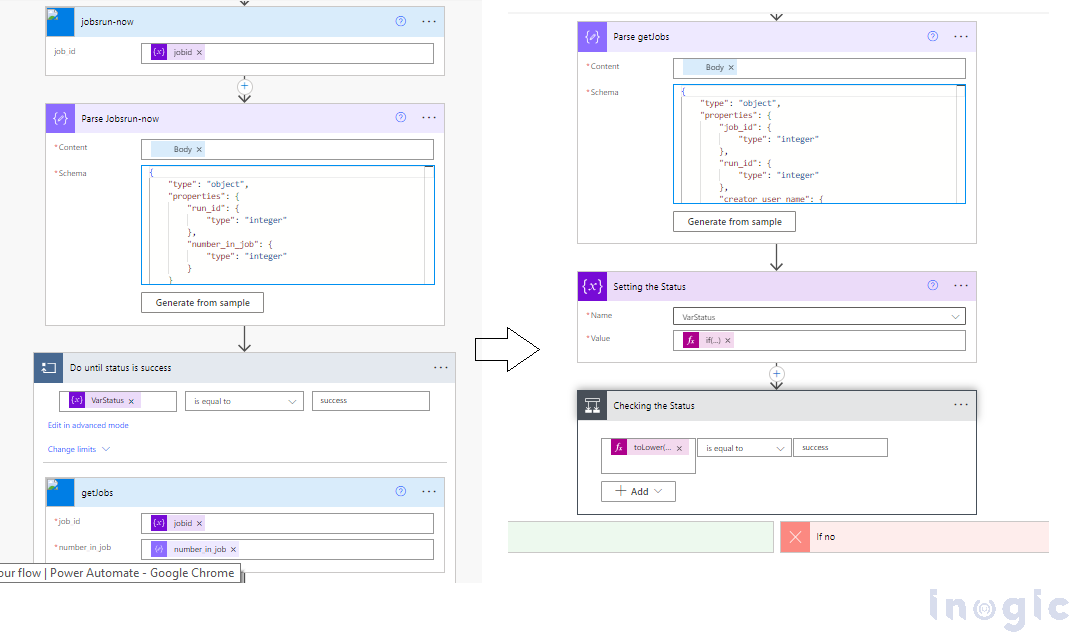
We will first trigger the jobsrun-now action to initiate the job. Once the job status is successful, we will trigger the getJobs action to retrieve the run ID, which will then be stored in the AccountVarTaskRunid variable.
Find below expressions for actions to get the exact values
“Parse jobsrun-now” have the body of “jobsrun-now” action,
“getJobs” have the “jobid” and “Number in job”
body(‘Parse_Jobsrun-now’)?[‘number_in_job’]
“Parse getJobs” have the body of “getJobs”,
“Setting the status” if(empty(body(‘Parse_getJobs’)?[‘state’]?[‘result_state’]), ‘jobrunning’, toLower(body(‘Parse_getJobs’)?[‘state’]?[‘result_state’]))
When the Jobs status is successful set the VarTaskRunId
Under “Apply to each”
body(‘Parse_getJobs’)?[‘tasks’]
“Setting runID”
items(‘Apply_to_each’)?[‘run_id’]
Once we obtain the run ID, we will trigger the third action, which will return an output containing an array of Account records.
“getOutput” action set the “Account VarTaskRunId”
We will filter the output to focus on the relevant data, and then proceed to update the Account records in MS-CRM.
“Parse Job Output” Body of “getOutput”
body(‘getOutput’)
“Parsing Accounts from Result” use result of “Parse Job Output”
body(‘Parse_Job_Output’)?[‘notebook_output’]?[‘result’]
Once the accounts are narrowed down, use the resulting Account Array in the “Apply to each” action to update all the relevant Account records in MS-CRM.
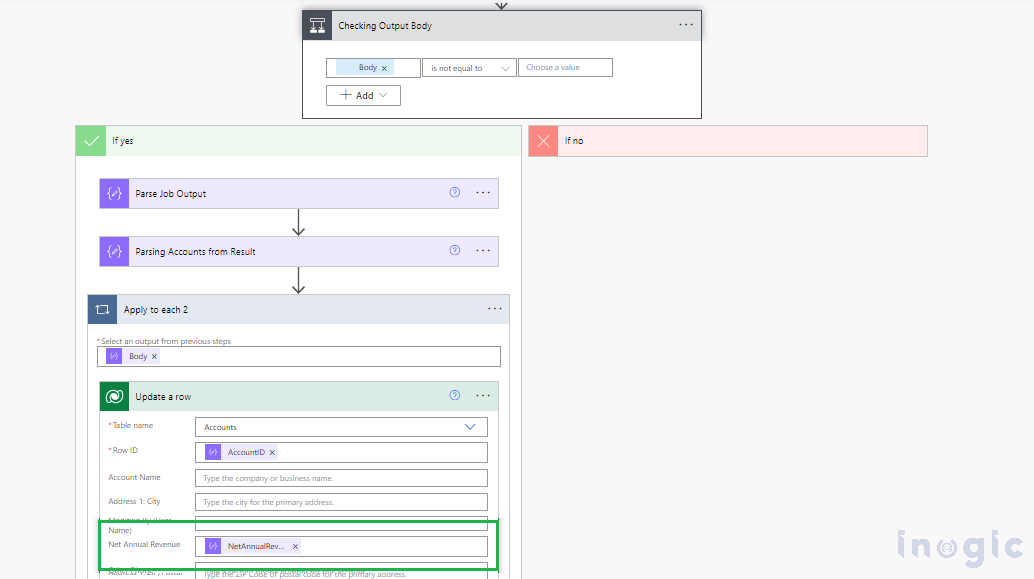
Final Result: The Accounts are updated in MS CRM, ensuring data accuracy and consistency.
FAQs
Q: How often does the data sync between Databricks and Dynamics 365?
The sync frequency depends on your Power Automate flow configuration. You can set it to run on a schedule (hourly, daily) or trigger it based on specific events in either system.
Q: Can I customize which fields get updated in Dynamics 365?
Absolutely. You can modify the Databricks notebook output and the Power Automate flow to update specific fields, create new records, or perform complex data transformations.
Q: Can I integrate multiple Databricks workspaces with one Dynamics 365 instance?
Yes, you can create multiple Custom Connectors for different Databricks workspaces and orchestrate them through separate Power Automate flows or a master flow.
Q: What happens if the Databricks job fails?
The Power Automate flow includes error handling logic. You can configure retry mechanisms, email notifications, and fallback procedures for failed job executions.
Conclusion
Integrating Databricks with Microsoft Dynamics 365 using a Custom Power Platform Connector ensures seamless data synchronization between the two platforms. By leveraging Databricks’ powerful data processing capabilities, organizations can enhance their CRM data with real-time, calculated insights, such as updated revenue figures.
This integration streamlines workflows, eliminates manual data entry, and maintains data accuracy within Dynamics 365. The automated process using Power Automate ensures that account records in MS CRM always reflect the latest updates from Databricks, supporting better decision-making and operational efficiency.
With the Custom Connector successfully implemented, organizations can now extend this approach to other use cases, such as customer analytics, sales forecasting, and advanced reporting, further unlocking the potential of Databricks and Dynamics 365 integration.