In today’s world, the demand for intelligent applications that can analyze and transform text is increasing rapidly. AI-powered text editors are becoming popular for generating content as well as data restructuring tools for many developers and businesses.
For any business, it is important to have data stored in the CRM system consistently and according to business standards. Users need to be trained to follow these standards or formats when entering data into the CRM system. However, mistakes are often made, leading to inconsistencies in the data.
Artificial Intelligence (AI) can be a solution to this problem. We aim to develop an AI Text Editor capable of analyzing user-input text and offering suggestions for restructuring it based on predefined formats.
We’ll use the capabilities of Azure OpenAI service, a platform for natural language processing tasks, that will allow our text to be analyzed and transformed into the desired format. In this blog, we’ll guide you on how to build a custom AI text editor using PCF (Power Apps Component Framework) and Azure OpenAI service.
Create Azure OpenAI service and get Azure OpenAI API Key and Endpoint
- Currently, at the time of writing this blog, access to Azure OpenAI service in Azure is limited. You need to apply here for access.
- Once you get access from Microsoft, login to the Azure Portal at https://portal.azure.com and create Azure OpenAI service.
- Configure the service according to your needs. This may include selecting a pricing tier, specifying a location for the service, and setting up resource groups and tags. You can refer to this article to create an Azure OpenAI service.
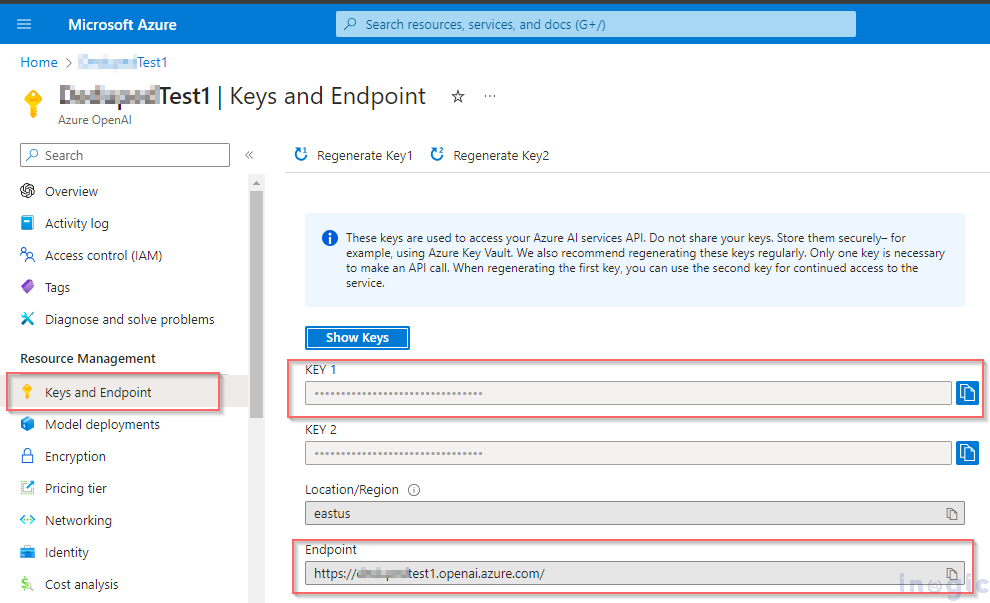
- Once the Azure OpenAI Service resource is created, navigate to it in the Azure portal and You should find your API key and endpoint listed in the Key and Endpoint section under Resource Management as shown below. These are the credentials you’ll use to authenticate and access the OpenAI API.
- To call Azure OpenAI API and generate text, you need to deploy an appropriate model that suits the requirement.
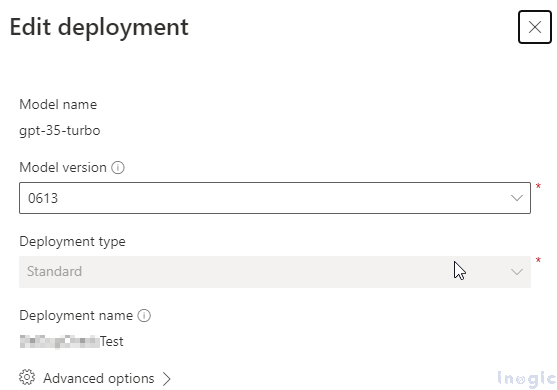
- To create and manage deployments, you can use Azure AI Studio (preview). https://oai.azure.com. Create a new deployment and save the “Deployment name” to be used for calling Azure OpenAI. Here, we have deployed “gpt-35-turbo” model with version “0613”.

- By following these steps, we have obtained three values: API Key, Endpoint, and Deployment ID/Name, which are required for calling the Azure OpenAI service. In the next section, we will see how to use these values to use generative AI in the PCF control.
Create field level Power Apps Control Framework control:
Here, we will create a field-level PCF control that can be bound to a multiline or single line of text fields in the Power Apps. You can follow the steps outlined in the following article to create a field PCF control, Create a field level model driven apps control.
- Install @azure/openai module: Once the PCF control is created, use the “npm install @azure/openai” command to install the Azure OpenAI libraries in the project.
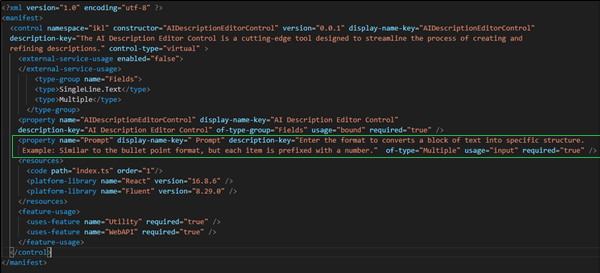
- Create a property named “Prompt” in ControlManifest.Input.xml for the user to insert the format they want to convert the text into while configuring the control through Power Apps.
- Create a “App.tsx” file to add Fluent UI components and call it in the index.tsx file.
- In the App.tsx file, create a UI which consists following elements,
Multiline Text Field: Editable text field where user can enter their data.
Submit button: A button to execute or call Azure OpenAI API to generate a text based on the instruction provided.
Information Label: When utilizing AI-generated text, it is crucial to review the content carefully before use. This is a message to the user to review AI generated content before use.
<div
style={{
width: "100%",
display: "flex",
flexDirection: "column",
position: "relative",
}}
>
<div
style={{
display: "flex",
flexDirection: "row",
padding: "10px 0px 10px 0px",
}}
>
<div style={{ flexGrow: 1, marginRight: "10px" }}>
<TextField
type=""
multiline
rows={10}
autoAdjustHeight
value={inputValue}
disabled={isButtonDisabled}
onChange={handleChange}
/>
</div>
</div>
<div>
<PrimaryButton
text="Submit"
onClick={handleSubmit}
disabled={isButtonDisabled}
/>
</div>
<div
style={{
position: "absolute",
top: "50%",
left: "50%",
transform: "translate(-50%, -50%)",
}}
>
{isLoading && (
<Spinner
label="Generating..."
styles={{
label: {
fontWeight: "bold",
color: "blue",
fontFamily: "Segoe UI",
},
}}
/>
)}
</div>
</div>
Using of Azure OpenAI in PCF:
- In the onSubmitClick function, ensure to input the endpoint and azureApiKey obtained from the Azure AI Studio as explained above. It is recommended to use a secure method to access or use Keys and endpoints in the code.
- Azure OpenAI needs a system instruction/message and a user prompt to generate content. It generates the content based on the instruction provided in the natural language.
- In this demo, we are providing the static system message alongside the user prompt. Obtain the result using Azure OpenAI’s getChatCompletions(deploymentId, messages, options) Once the response is received, the output message will be sent back to the control and bound to the text field.
// Function to handle form submission
const onSubmitClick = async () => {
const endpoint = ""; // OpenAI endpoint
const azureApiKey = ""; // Azure API key

// Chat messages to be sent to OpenAI
const messages: ChatRequestMessage[] = [
{ role: "system", content:"You are an AI Text Editor where you primary role is to analyze text and help users transform it into a desired structure. " },
{ role: "user", content: prompt +" : "+ inputValue },
];

try {
// Confirmation dialog before proceeding
const confirmationResult = await context.navigation.openConfirmDialog(
{
text: "Proceeding will result in the restructuring of data. Click 'Ok' to proceed with the process. Please ensure that you have backed up any important data before proceeding.",
title: "Caution: Data Restructuring Ahead",
},
{ height: 200, width: 450 }
);

if (!confirmationResult.confirmed) return;

// Disable button and show loading spinner
setIsButtonDisabled(true);
setIsLoading(true);

// Check for empty input or prompt
if (!inputValue.trim() || inputValue == "" || prompt == "") {
return;
}

// Initialize OpenAI client
const client = new OpenAIClient(
endpoint,
new AzureKeyCredential(azureApiKey)
);
const deploymentId = ""; // Deployment ID
const options: GetChatCompletionsOptions = {
temperature:0,
topP: 0,
frequencyPenalty: 0.0,
presencePenalty: 0.0,
maxTokens: 800,
stop: [],
};

// Get completion from OpenAI
const result = await client.getChatCompletions(
deploymentId,
messages,
options
);

// Extract result value
const resultValue = result.choices[0].message?.content;

// Update input value and notify parent component
setInputValue(resultValue || "");
notifyChange?.(resultValue || "");

// Enable button and hide loading spinner
setIsButtonDisabled(false);
setIsLoading(false);
} catch (error:any) {
// Show error dialog and log error
context.navigation.openConfirmDialog(
{
text: error.message,
title: error.code,
},
{ height: 200, width: 450 }
);
console.error("An error occurred:", error.message);
setIsButtonDisabled(false);
setIsLoading(false);
}
};
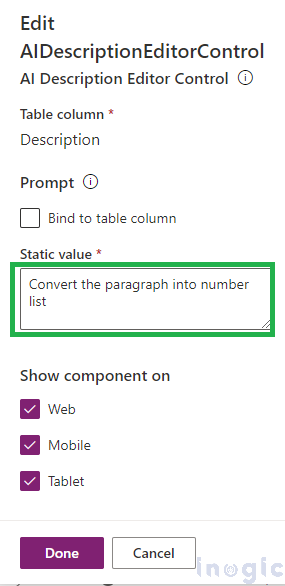
- Build the solution and import the solution.zip file in Dataverse. While configuration of control in the description field we are providing the prompt to convert the paragraph into a number list as shown below:
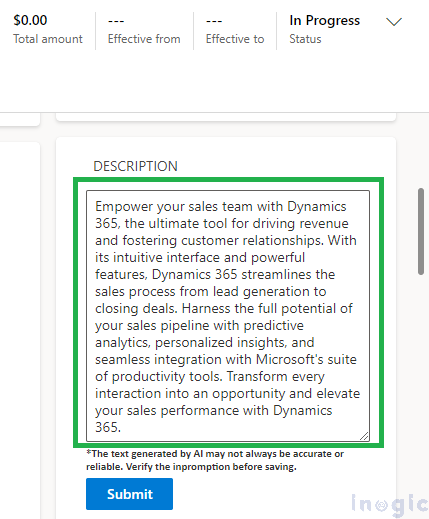
- In the description field of CRM, we are providing a random paragraph to demonstrate the conversion to number list.
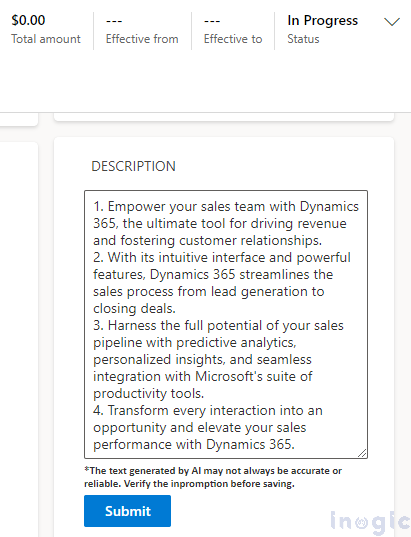
- Once the input has been submitted, the output from OpenAI is displayed in the description field as shown below.
index.ts
import { IInputs, IOutputs } from "./generated/ManifestTypes";
import * as React from "react";
import { ITextProps, AITextControl } from "./components/App";
export class AIDescriptionEditorControl
implements ComponentFramework.ReactControl<IInputs, IOutputs>
{
private theComponent: ComponentFramework.ReactControl<IInputs, IOutputs>;
private _navigation: ComponentFramework.Navigation;
/**
* Empty constructor.
*/
constructor() {}
private notifyOutputChanged: () => void;
private _container: HTMLDivElement;
private _value: any;
private _context: ComponentFramework.Context;
/**
* Used to initialize the control instance. Controls can kick off remote server calls and other initialization actions here.
* Data-set values are not initialized here, use updateView.
* @param context The entire property bag available to control via Context Object; It contains values as set up by the customizer mapped to property names defined in the manifest, as well as utility functions.
* @param notifyOutputChanged A callback method to alert the framework that the control has new outputs ready to be retrieved asynchronously.
* @param state A piece of data that persists in one session for a single user. Can be set at any point in a controls life cycle by calling 'setControlState' in the Mode interface.
*/
public init(
context: ComponentFramework.Context,
notifyOutputChanged: () => void,
state: ComponentFramework.Dictionary,
container: HTMLDivElement
): void {
this.notifyOutputChanged = notifyOutputChanged;
// this._context = context;
// this._container = document.createElement("div");
// this._value = context.parameters.sampleProperty.raw || "";
// container.appendChild(this._container);
}
public async notifyOnSelect(value: string) {
this._value = value != null || value != undefined ? value : null;
this.notifyOutputChanged();
}
/**
* Called when any value in the property bag has changed. This includes field values, data-sets, global values such as container height and width, offline status, control metadata values such as label, visible, etc.
* @param context The entire property bag available to control via Context Object; It contains values as set up by the customizer mapped to names defined in the manifest, as well as utility functions
* @returns ReactElement root react element for the control
*/
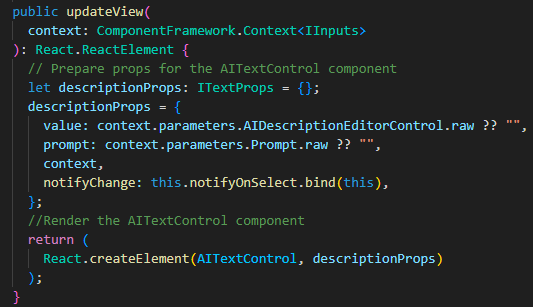
public updateView(
context: ComponentFramework.Context
): React.ReactElement {
// Prepare props for the AITextControl component
let descriptionProps: ITextProps = {};
descriptionProps = {
value: context.parameters.AIDescriptionEditorControl.raw ?? "",
prompt: context.parameters.Prompt.raw ?? "",
context,
notifyChange: this.notifyOnSelect.bind(this),
};
//Render the AITextControl component
return (
React.createElement(AITextControl, descriptionProps)
);
}
/**
* It is called by the framework prior to a control receiving new data.
* @returns an object based on nomenclature defined in manifest, expecting object[s] for property marked as "bound" or "output"
*/
public getOutputs(): IOutputs {
return {
AIDescriptionEditorControl: this._value != null ? this._value : null,
};
}
/**
* Called when the control is to be removed from the DOM tree. Controls should use this call for cleanup.
* i.e. cancelling any pending remote calls, removing listeners, etc.
*/
public destroy(): void {
// Add code to cleanup control if necessary
}
}
App.tsx
import * as React from "react";
import { TextField, PrimaryButton, Spinner, Label } from "@fluentui/react";
import { ChatRequestMessage, OpenAIClient, AzureKeyCredential, GetChatCompletionsOptions } from "@azure/openai";

// Props interface for the AI Text Control component
export interface ITextProps {
context?: any; // Context for the component
prompt ?: any; // prompt for the text
value?: string; // Initial value for the text field
notifyChange?: (value: string) => void; // Callback function to notify parent component of changes
}

// AI Text Control component
export const AITextControl: React.FC<ITextProps> = ({
context,
prompt ,
value,
notifyChange,
}) => {
// State variables
const [inputValue, setInputValue] = React.useState<string>(value || ""); // State for input value
const [isButtonDisabled, setIsButtonDisabled] = React.useState<boolean>(false); // State for button disabled state
const [isLoading, setIsLoading] = React.useState<boolean>(false); // State for loading spinner

// Function to handle input change
const onFieldTextChange = (
event: React.FormEvent<HTMLInputElement | HTMLTextAreaElement>,
newValue?: string
) => {
if (newValue !== undefined) {
setInputValue(newValue);
notifyChange?.(newValue);
}
};

// Function to handle form submission
const onSubmitClick = async () => {
const endpoint = "<YOUR_ENDPOINT_KEY_GOES_HERE>"; // OpenAI endpoint
const azureApiKey = "<YOUR_AZUREAPIKEY_GOES_HERE>"; // Azure API key

// Chat messages to be sent to OpenAI
const messages: ChatRequestMessage[] = [
{ role: "system", content:"You are an AI Text Editor where you primary role is to analyze text and help users transform it into a desired structure. " },
{ role: "user", content: prompt +" : "+ inputValue },
];

try {
// Confirmation dialog before proceeding
const confirmationResult = await context.navigation.openConfirmDialog(
{
text: "Proceeding will result in the restructuring of data. Click 'Ok' to proceed with the process. Please ensure that you have backed up any important data before proceeding.",
title: "Caution: Data Restructuring Ahead",
},
{ height: 200, width: 450 }
);

if (!confirmationResult.confirmed) return;

// Disable button and show loading spinner
setIsButtonDisabled(true);
setIsLoading(true);

// Check for empty input or prompt
if (!inputValue.trim() || inputValue == "" || prompt == "") {
return;
}

// Initialize OpenAI client
const client = new OpenAIClient(
endpoint,
new AzureKeyCredential(azureApiKey)
);
const deploymentId = "<YOUR_DEPLOYMENTID_GOES_HERE>"; // Deployment ID
const options: GetChatCompletionsOptions = {
temperature:0,
topP: 0,
frequencyPenalty: 0.0,
presencePenalty: 0.0,
maxTokens: 800,
stop: [],
};

// Get completion from OpenAI
const result = await client.getChatCompletions(
deploymentId,
messages,
options
);

// Extract result value
const resultValue = result.choices[0].message?.content;

// Update input value and notify parent component
setInputValue(resultValue || "");
notifyChange?.(resultValue || "");

// Enable button and hide loading spinner
setIsButtonDisabled(false);
setIsLoading(false);
} catch (error:any) {
// Show error dialog and log error
context.navigation.openConfirmDialog(
{
text: error.message,
title: error.code,
},
{ height: 200, width: 450 }
);
console.error("An error occurred:", error.message);
setIsButtonDisabled(false);
setIsLoading(false);
}
};
// Render component
return (
<div
style={{
width: "100%",
display: "flex",
flexDirection: "column",
position: "relative",
}}
>
<div
style={{
display: "flex",
flexDirection: "row",
padding: "10px 0px 0px 0px",
}}
>
<div style={{ flexGrow: 1, marginRight: "10px" }}>
<TextField
type=""
multiline
rows={10}
autoAdjustHeight
value={inputValue}
disabled={isButtonDisabled}
onChange={onFieldTextChange}
/>
</div>
</div>
<Label styles={{ root: { fontSize: 11, fontFamily: "Calibri" } }}>
*The text generated by AI may not always be accurate or reliable. Verify
the inpromption before saving.
</Label>
<div>
<PrimaryButton
text="Submit"
onClick={onSubmitClick}
disabled={isButtonDisabled}
/>
</div>
<div
style={{
position: "absolute",
top: "50%",
left: "50%",
transform: "translate(-50%, -50%)",
}}
>
{/* Loading spinner */}
{isLoading && (
<Spinner
label="Generating..."
styles={{
label: {
fontWeight: "bold",
color: "blue",
fontFamily: "Segoe UI",
},
}}
/>
)}
</div>
</div>
);
};
Preview
Conclusion
In this blog post, we’ve explored how to build an AI Text Editor using Azure OpenAI. With this powerful tool, users can analyze and transform text with ease, making it a useful control across all dataverse tables for content generation, data restructuring, and more.