Modern organisations rely on vast webs of customer, partner, and product data.
In Microsoft Dynamics 365 CRM, this often means dealing with complex relationship types – 1 : N, N : 1, N : N – across accounts, contacts, opportunities, and custom entities. Navigation through multiple forms and lists wastes time, hampers insights, and reduces adoption.
In this blog, we’ll walk through how to configure CRM records and relationships to visualize them in a Mind Map View within Dynamics 365 CRM. This includes both basic and advanced configurations, along with a real-world example of drilling through related records.
Let’s dive in.
Why Visualising Relationships Matters in Dynamics 365 CRM
In Dynamics 365 CRM you routinely define relationships:
- 1 : N (one Account has many Contacts)
- N : 1 (many Contacts relate to one Account)
- N : N (many Contacts linked to many Accounts)
When you have multiple such relationships + custom entities + connections/roles, the user experience becomes fragmented. Users jump between forms, views, and navigation links, leading to poor clarity and slower decisions.
Step-by-Step Configuration for Visualizing CRM Relationship
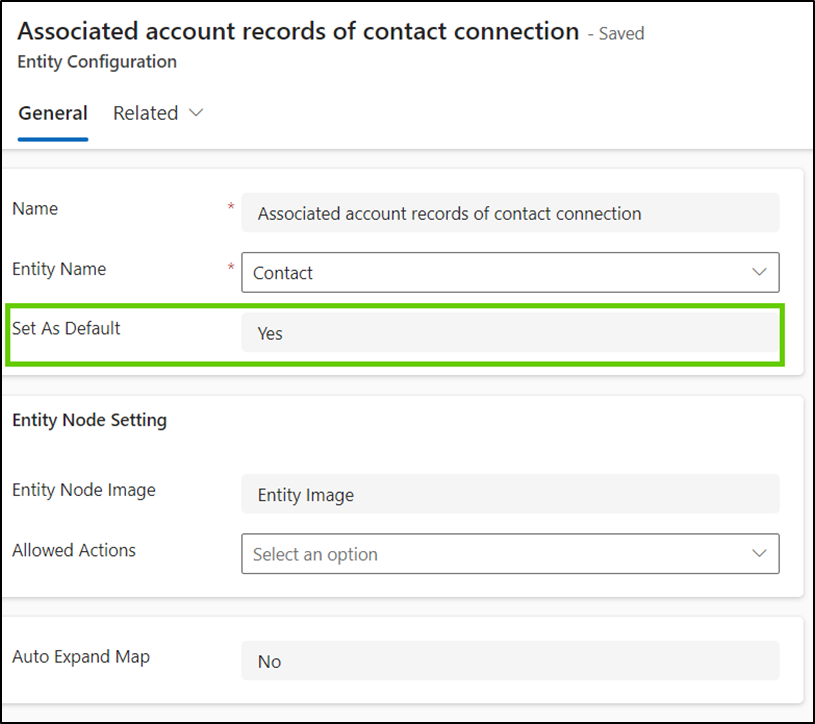
Step 1: Create Entity Configuration
This step allows system administrators to define for which entities the Map My Relationships view should be available.
Navigation Path:
Go to Map My Relationships → Entity Configuration → New
Configuration Fields:
- Name: Enter a friendly name. This name appears in the Map My Relationships Control Configuration property.
- Entity: Choose the CRM entity (e.g., Account, Contact).
- Set as Default: Select Yes or No depending on which entity configuration should be the default.
- Entity Node Image: Choose how the entity’s image appears on the map. Options include:
- Entity Image – image set for the entity in sitemap
- Record Image – image for the specific record (defaults to entity image if none)
- Image URL – use an internal or external image link
- Allowed Actions: Select quick activity actions (e.g., Email, Phone Call, Task) available for the node.
- Auto Expand Map: Choose Yes if you want the map to automatically expand nodes when opened.

Step 2: Configure Entity Relationships for Mapping CRM Records
Entity Relationships define which related records appear on the Map My Relationships view.
Navigation Path:
From the created Entity Configuration record → go to Entity Relationships subgrid → New
Fields to Configure:
- Relationship Type: Choose among One-to-Many, Many-to-One, or Many-to-Many.
- Relationship: Select the relationship (filtered based on chosen type).
- Relationship Node Image: Similar options as before (Entity Image, Record Image, or Image URL).
- Default View Filter: Select the default CRM view for filtering relationship data.
- Allowed Actions: Define actions users can perform for related records.
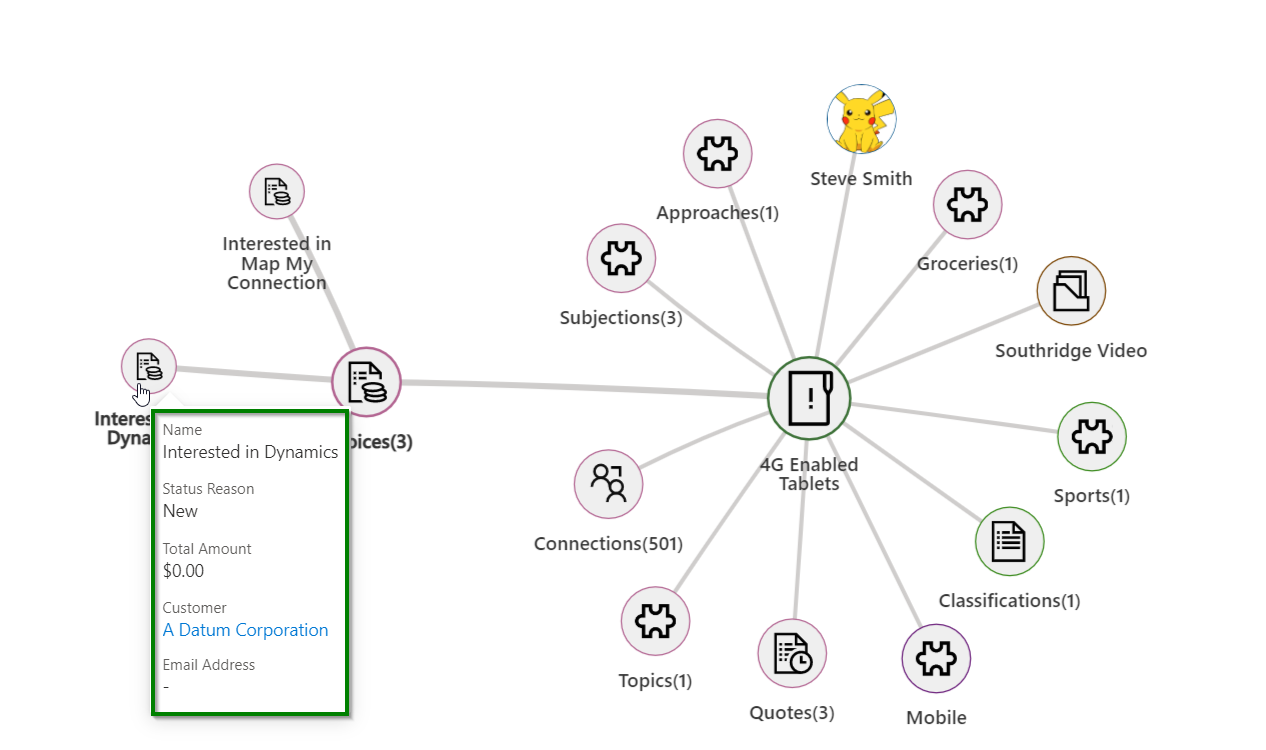
- View to Show Fields on Tooltip: Select which fields to display as tooltips when hovering over nodes.
Example: If you select the Active Invoices view, hovering over an Invoice node displays its key columns.
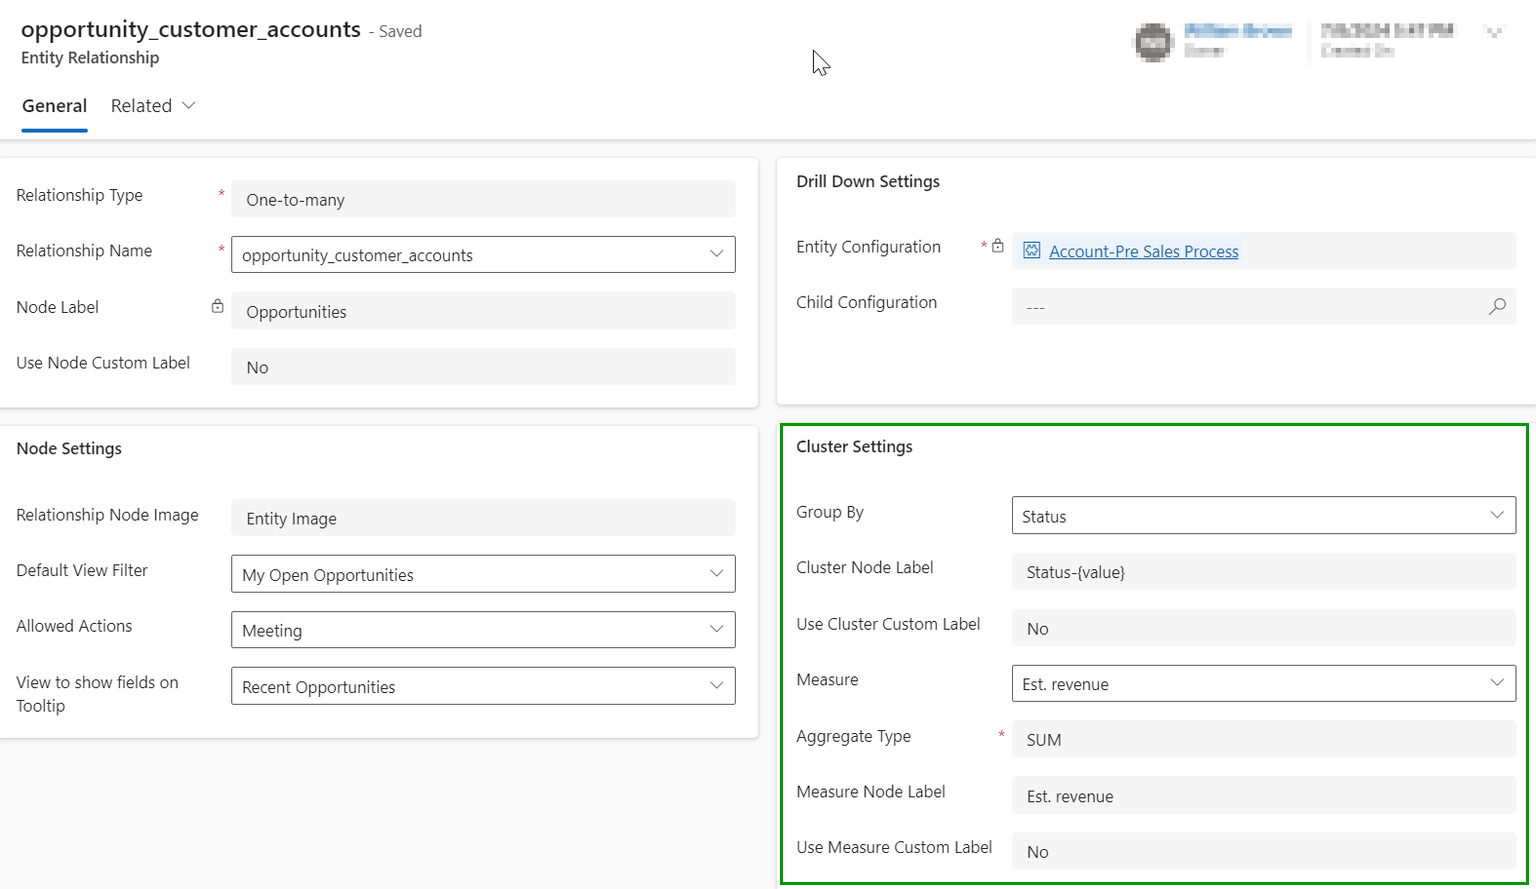
Step 3: Grouping and Data Aggregation
You can organize related records visually and display summarized data.
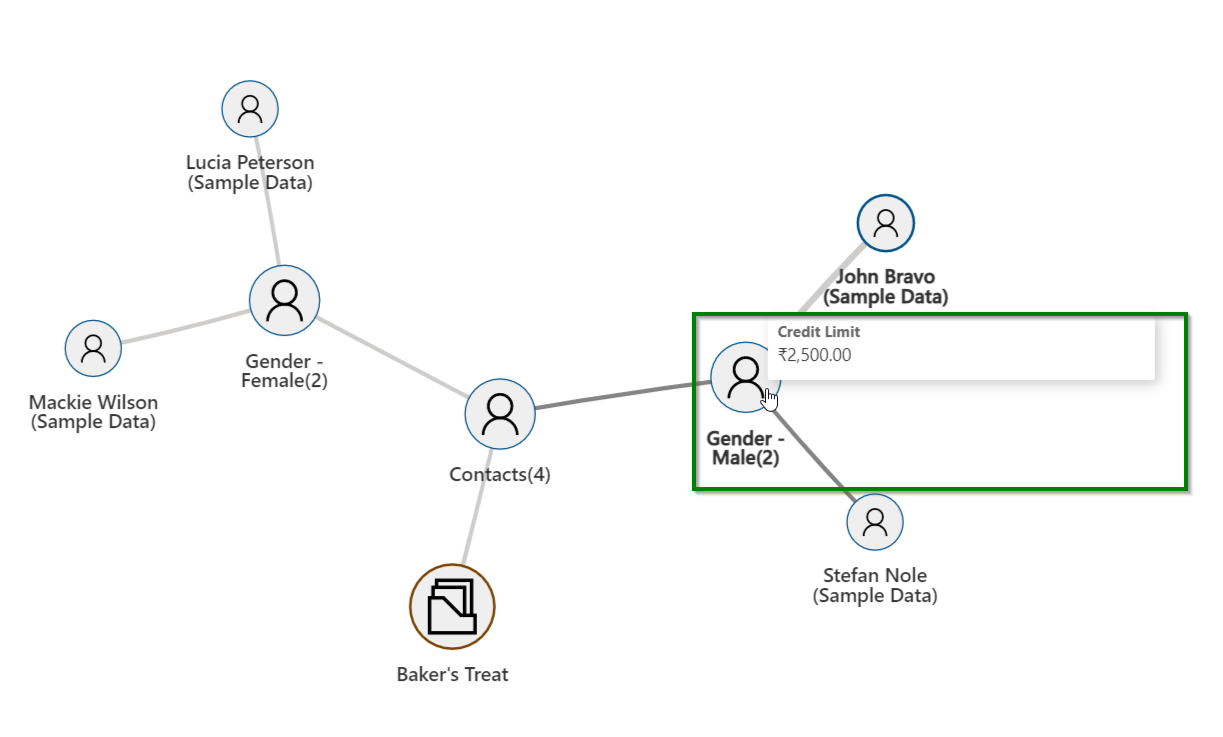
- Group By: Select an OptionSet field (e.g., Gender, Category) to group records.Example: Group Contacts by Gender Code to see male and female records separately.
- Measure and Aggregate Type: Choose a numeric field (e.g., Credit Limit) and aggregation type (Sum, Average, Count).
- Example: If four contacts have different credit limits, hovering over the grouped node shows the total (e.g., ₹5,000).
Output:
How to Configure Drill-Down Relationship Settings in CRM?
The Drill Down feature allows users to explore N-level relationships visually—making it easy to trace connections between Accounts, Contacts, Opportunities, and beyond.
Example Scenario:
A user wants to see:
- The associated contact connections for an Account, and
- Further drill into those Contact records to see related Accounts.
Configuration Steps:
Entity Configuration – Account
- Entity: Account
- Relationship Type: One-to-Many (account_connections1)
- View to Show Fields on Tooltip: Active Connections
- Use Default Configuration: Yes
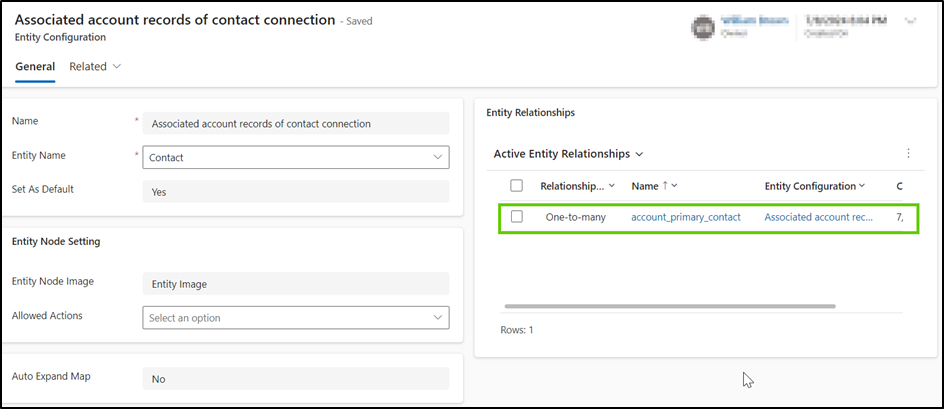
Entity Configuration – Contact
- Entity: Contact
- Set As Default: Yes
- Relationship Type: One-to-Many (account_primary_contact)
- View to Show Fields on Tooltip: My Active Accounts
Note: Only one entity configuration can be set as default to be used as a child configuration.
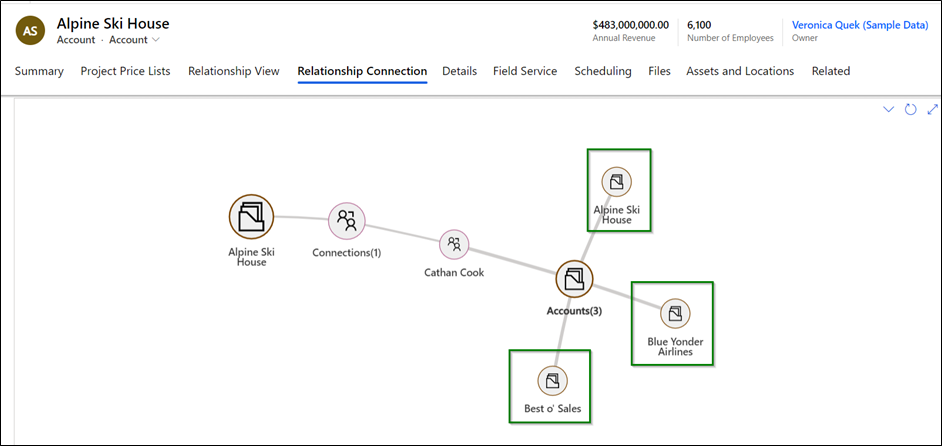
Visual Outcome:
- Open an Account record → Click on Relationship Connection.
- Expand the Connections node to view associated contact connections.
- Expand a Contact record (e.g., Cathan Cook) to see the related Accounts.
- Continue drilling down to explore more associated records visually.
This dynamic mapping gives users a 360° view of CRM relationships—all within a single, intuitive interface.
Pitfalls & How to Avoid Them
- Poorly defined relationships: If your data model is messy, the map will be confusing. Solution: first clean your model.
- Too many nodes / clutter: Don’t try to show everything. Start small, then expand.
- Performance challenges: Large relationships/deep levels slow load — impose limits.
- User resistance: Some users prefer lists — training and champion users help.
- Over-customisation: If you heavily customise visuals/controls, upgrades might become a pain. Balance standard vs bespoke
Why Use Map My Relationships?
By configuring relationships using this method, you can:
- Visually analyze N-level record connections.
- Save time navigating complex relationships.
- Improve data comprehension and decision-making.
- Empower users to act directly from the map (e.g., create tasks, send emails).
The benefit of a “mind-map” / relationship-map view in CRM
- A 360° view: You see all related records in one interactive visual, rather than scattered tabs. For example, the app Map My Relationships claims to give a “birds-eye view” of relationships & connections.
- Faster navigation: Clicking a node takes you to that record or shows deeper layers. No switching multiple screens.
- Better insights: Visual patterns (clusters, connected influencers) emerge. This helps in cross-sell, upsell, service escalation.
- Improved adoption: A visual interface is more intuitive, promoting use of CRM.
Thus, visualising relationships by making them visible and actionable is a key enhancement for Dynamics 365 CRM.
In conclusion, configuring your Dynamics 365 CRM record relationships for a mind-map view is a high-value enhancement: it boosts clarity, speeds navigation, improves decision-making, and fosters user adoption. By following the steps outlined – from data-model preparation to installing a visualization app, configuring relationships, training users, and measuring success, you can turn a complex web of records into a clear, actionable visual network.
If you’re ready to get started: pick a pilot entity (e.g., Accounts), visualize its key relationships, monitor adoption, then scale across your CRM.
Try a 15-day free trial of Map My Relationship from the Inogic website or Microsoft AppSource.
Want to have a first-hand personalized demo? Reach us at crm@inogic.com, and get an exclusive demo, see exactly how it works before anyone else.