 Integrating Dynamics 365 CRM with SharePoint is essential for modern document management. But most organizations overlook a critical issue until it’s too late:
Your CRM security model does not extend to SharePoint.
When you use the out-of-the-box Dynamics 365 SharePoint integration, ALL users can see ALL documents in SharePoint, regardless of the security roles you have carefully configured in Dynamics 365 CRM. Your CRM permissions simply do not carry over. A salesperson restricted to their own account records in CRM can freely browse other accounts’ documents in SharePoint. In other words, your document security becomes disconnected from your CRM security model.
This is not a theoretical risk. It is a real data security and compliance issue that affects businesses worldwide, especially those dealing with sensitive customer data, financial records, legal documents, or GDPR-regulated information.
Key Takeaways
- Native Dynamics 365–SharePoint integration does not carry over CRM security permissions.
- This creates a serious data exposure risk, where users can access documents they shouldn’t.
- Microsoft’s native setup enables integration, but does not solve the security gap.
- SharePoint Security Sync automatically replicates CRM roles and permissions into SharePoint.
- Any changes in CRM (roles, ownership, teams) are reflected in SharePoint in real time.
- The result: a secure, unified document management experience with zero manual effort.
In this guide, you’ll learn:
- How to set up the native Dynamics 365 CRM and SharePoint integration step by step
- How to replicate your CRM security roles and permissions directly into SharePoint, closing the permissions gap permanently
Part 1: Setting Up the Native Dynamics 365 and SharePoint Integration
This section covers the baseline Microsoft server-based SharePoint integration.
Step 1: Enable Server-Based SharePoint Integration
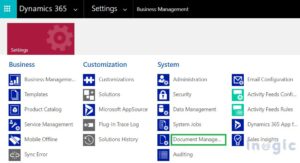
Step 1.1: Navigate to Document Management Settings
In Dynamics 365, go to Settings (the gear icon at the top right) → Advanced Settings → System → Document Management → Configure Server-Based SharePoint Integration.
 Step 1.2: Select SharePoint Online
In the integration wizard, choose Online when prompted for your SharePoint location.
Note: The On-premises option is intended for Dynamics 365 On-Premises environments and will be disabled if you are using Dynamics 365 Online.
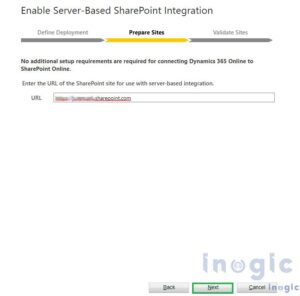
Step 1.3: Enter and Validate Your SharePoint Site URL
Paste the URL of your SharePoint site (e.g., https://yourcompany.sharepoint.com/sites/CRM). Click Next, and the wizard will validate the URL automatically.
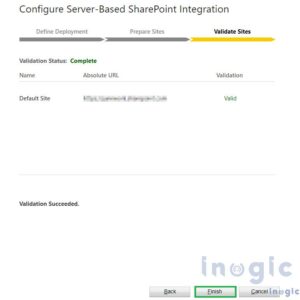
Step 1.4: Complete the Wizard
Once validation passes, click Finish to enable the server-based integration. Important: Once server-based integration is enabled, you cannot revert to client-side integration.
Step 2: Configure Document Management Settings
After enabling the integration, you need to define which CRM entities will store documents in SharePoint and configure the folder structure.
Step 2.1: Open Document Management Settings
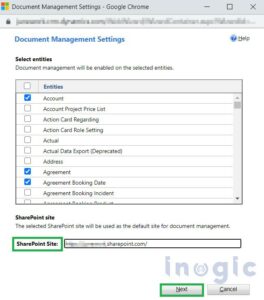
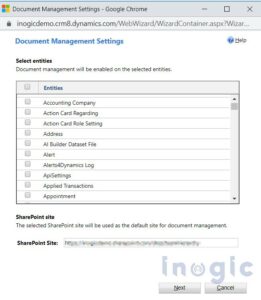
Return to the Document Management screen and click Document Management Settings. A wizard will open where you can select which entities (e.g., Account, Contact, Opportunity, Case) will have SharePoint document storage enabled.
Step 2.2: Select Entities
Check all entities for which you want to store documents in SharePoint. You can follow the defaults suggested by the wizard or customize based on your business processes. Click Next when ready.
Step 2.3: Validate the SharePoint URL Again
Re-enter and validate your SharePoint site URL. Once marked as valid, proceed to the next step.
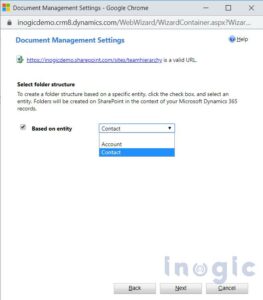
Step 2.4: Define Folder Structure
Choose how folders will be organized in SharePoint.
Step 2.5: Finish
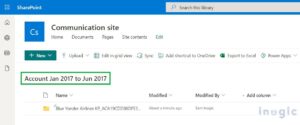
Click Finish. The wizard creates document libraries in SharePoint for your selected entities. You will see a Documents tab appear on those entity records in Dynamics 365.
Your integration is now live, but your data is still exposed.
SharePoint does not respect your Dynamics 365 security model.
This builds urgency to continue reading.
Part 2: Configuring SharePoint with Dynamics 365 CRM to Replicate CRM Permissions
To close this security gap, you need a solution that synchronizes CRM security with SharePoint in real time.
SharePoint Security Sync by Inogic is a purpose-built Dynamics 365 app that automatically syncs CRM security privileges with SharePoint without any additional cost to purchase a VM machine or Azure credits.
Any change to a user’s security role in Dynamics 365 is automatically reflected in SharePoint, with no manual work required.
Step 1: Connector Configuration — Connecting to Your SharePoint Site
The Connector is the link between Dynamics 365 and your SharePoint site. SharePoint Security Sync supports multiple connectors, allowing you to connect to multiple SharePoint sites (e.g., SharePoint_1, SharePoint_2, SharePoint_3), each pointing to a different SharePoint site URL.
Step 1.1: Create a New Connector
Navigate to the SharePoint Security Sync App in Dynamics 365. Click on the Connectors entity in the left navigation, then click New to create a new Connector record.
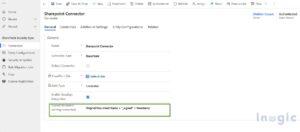
Step 1.2: Fill in Connector Fields
Populate the following required fields:
- Name: Give your connector a clear name (e.g., SharePoint_Primary)
- Connector Type: Select SharePoint from the dropdown
- Default Connector: Enable this checkbox if this is your primary connector
- SharePoint Site: Select the valid SharePoint site URL where files will be stored
Note: Each connector must point to a unique SharePoint site. You cannot reuse the same SharePoint site across multiple connectors.
Step 1.3: Select Authentication Type
- App (Azure AD App Registration): Authentication via Azure Active Directory app. When any action is performed, the logged-in user’s name appears, providing true user-level audit trails.
 Step 1.4: Authenticate the Connector
Once the Connector record is saved, click the Authenticate button on the command bar.
This button is only visible to users with System Administrator or SharePoint Security Sync Administrator roles.
Once authenticated, it will show a pop-up for successful authentication.
Step 2: Configuration for Mapping CRM Entities to SharePoint
Entity Configuration defines which Dynamics 365 entities (Account, Contact, Opportunity, Case, etc.) are connected to SharePoint through a specific connector, and how their documents are handled.
Step 2.1: Navigate to Entity Configurations
Go to SharePoint Security Sync → Entity Configurations, and click New. Alternatively, open your Connector record and click on the Entity Configuration tab, then click + New.
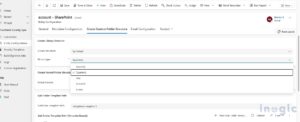
Step 2.2: Fill in the General Tab
Populate these fields:
- Connector: Select the connector you created in Step 1
- Entity Name: Choose the CRM entity (e.g., Account, Opportunity)
- Attachment Action:
– Copy: Attachment is copied to SharePoint; the original remains in CRM
– Move: Attachment is migrated out of CRM to SharePoint permanently
– None Selected: Attachments stay in CRM, but the Attach2Dynamics document UI is still available - Override Files: If enabled, uploading a file with the same name replaces the existing file. If disabled, a new versioned copy is created.
- Auto Create Folder: Set to Yes to automatically create a SharePoint folder for each new record in this entity.
Step 2.3: Configure Custom Folder Structure (Optional)
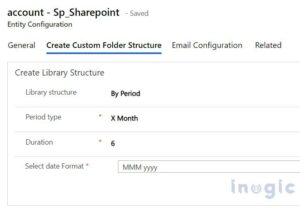
SharePoint Security Sync allows you to define exactly how document libraries and record folders are organized in SharePoint. In the Create Custom Folder Structure tab: Library Structure options:
- By Period: Libraries created based on date periods (Monthly, Quarterly, Yearly, or custom X Month / X Year inter
- By Starting Character: Libraries named based on the first character of a chosen field
- Custom: Libraries named based on the full value of any chosen field (text, option set, or lookup). Record Folder Format: Use any combination of field logical names in curly braces and static text.
For example: {name} Documents would create a folder named after the record’s name, followed by the word ‘Documents’.
 Step 2.4: Save the Entity Configuration
Click Save. The security privilege synchronization for this entity will begin automatically the next time a user accesses the Files tab or clicks the Attach2Dynamics button on a record of this entity type.
Step 3: Configuring Hierarchy-Based Folder Structure (Optional)
If you want documents from related entities (e.g., Opportunities linked to an Account) to be stored in a hierarchical folder structure in SharePoint, you can configure this through Dynamics 365 Document Management Settings.
Step 3.1: Set Up Hierarchy in CRM
In Dynamics 365, go to Advanced Settings → Settings → Document Management Settings. Select the entities, enter your SharePoint URL, enable the ‘Based on Entity’ checkbox, and choose Account or Contact as the parent entity. Click Next and then Finish.
Step 3.2: Configure Entity Configuration for Hierarchy
In SharePoint Security Sync, create or edit an Entity Configuration for the related entity (e.g., Opportunity). In the Folder Structure Fields field, which appears when hierarchy is configured, select the parent entity (Account or Contact). Click Save.
Conclusion
Without security synchronization, SharePoint becomes a blind spot in your CRM architecture.
With the right setup, it becomes a secure extension of your Dynamics 365 environment.
Integrating Dynamics 365 CRM with SharePoint is one of the most impactful steps you can take to improve document management, reduce CRM storage costs, and enhance team collaboration. The native Microsoft integration makes this connection easy to establish, but it leaves a critical security gap that puts your sensitive data at risk.
SharePoint Security Sync by Inogic closes that gap permanently by automatically replicating your CRM security roles, business unit structures, and record-level access controls into SharePoint.
The good news is, you don’t need to purchase any Azure credits or additional VMs.
The result is a secure, unified environment where what users can see in CRM exactly matches what they can access in SharePoint, automatically, in real time, with no manual administration overhead.
Learn More & Get Started
Explore the full SharePoint Security Sync tool from the Inogic Website or Microsoft Marketplace. For enterprise licensing, demos, or technical queries, reach out to the Inogic team at crm@inogic.com.