In the previous article, we guided you through the steps required to install InoLink on your system. After successful installation, it is important to connect Dynamics 365 and QuickBooks to allow InoLink to sync both applications seamlessly. This article describes the steps to connect QuickBooks Online with InoLink.
Video Tutorial:
Follow the steps mentioned below to Connect Dynamics 365/CRM and QuickBooks using InoLink:
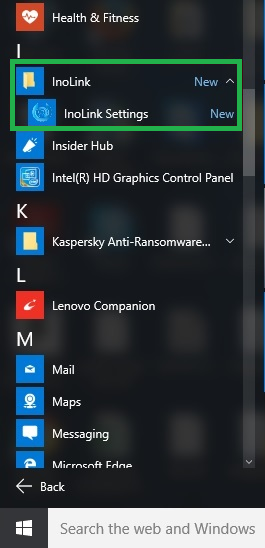
1. After successfully installing InoLink on your system, you can now see ‘InoLink’ option in the installed programs as seen below;
2. Click on ‘InoLink Settings’ to run the application and configure the behavior of InoLink integration. The Connections window, you need to provide the QuickBooks and CRM details to connect both the systems;
QuickBooks Settings (For OAuth 1.0)
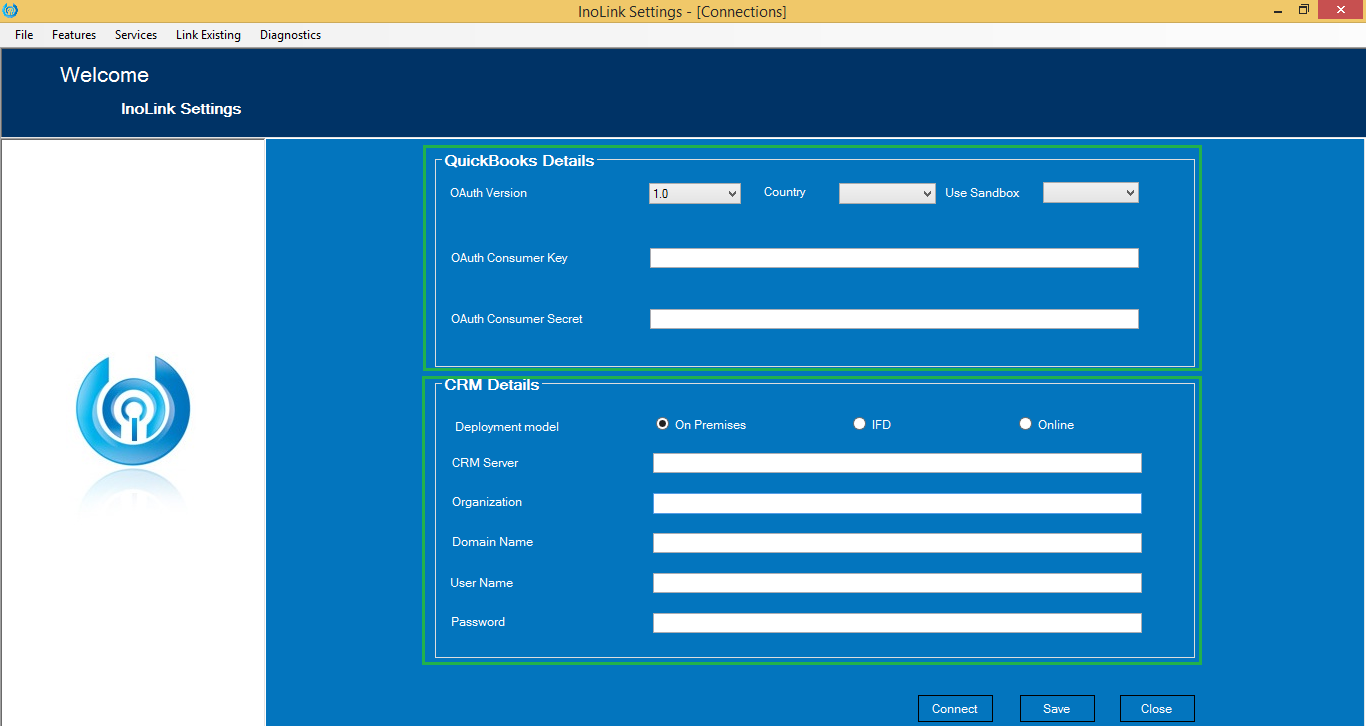
3. QuickBooks Details requires following details;
1) OAuth Version – Select 0 from dropdown if your developer account has not created any apps until after July 17, 2017.
2) Country – You can select appropriate QuickBooks localized version from the list.
3) Use Sandbox – Select False if you are connecting the QuickBooks Production environment.
4) OAuth Consumer Key – Follow the steps mentioned below to obtain this key.
5) OAuth Consumer Secret – Follow the steps noted below to get this key.
Steps to obtain ‘OAuth Consumer Key’ and ‘OAuth Consumer Secret’:
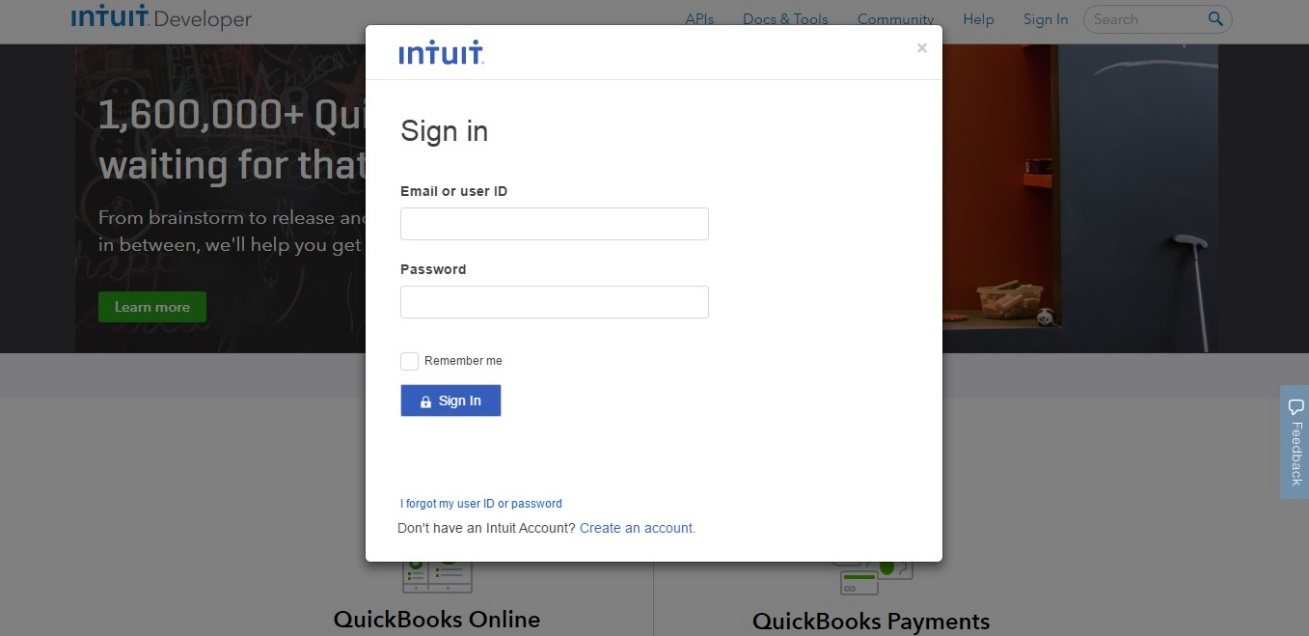
a. Sign In to QuickBooks Developer Account by visiting https://developer.intuit.com/ and enter your current QuickBooks credentials.
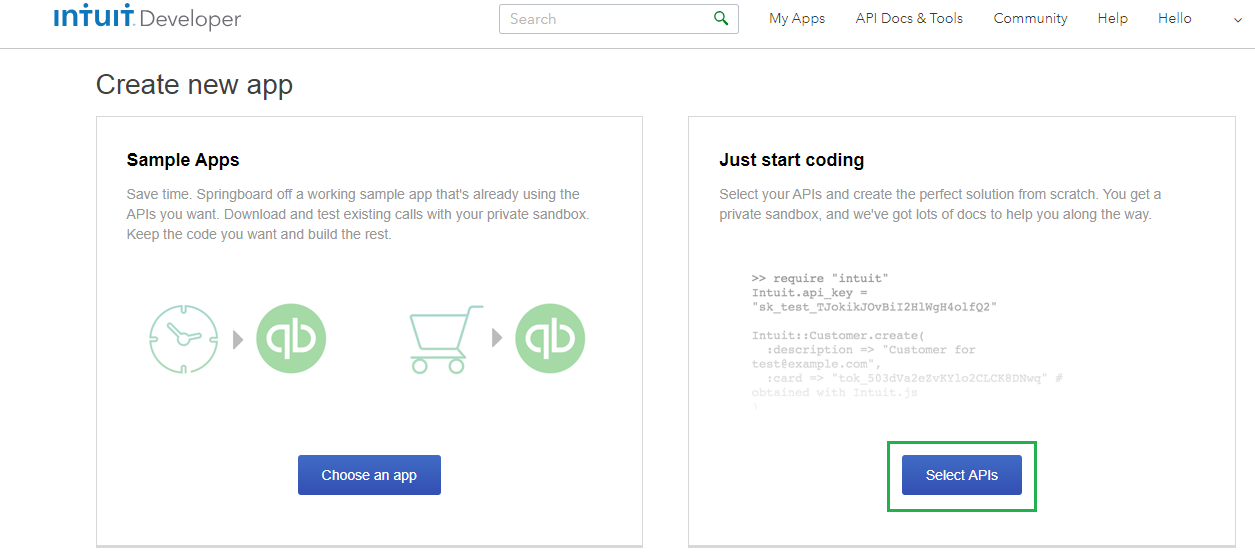
b. After you sign in to your developer account, if there is no app created in your QuickBooks then kindly follow the steps to create the new App.
- Click on ‘Create New App’as shown in the below screenshot;

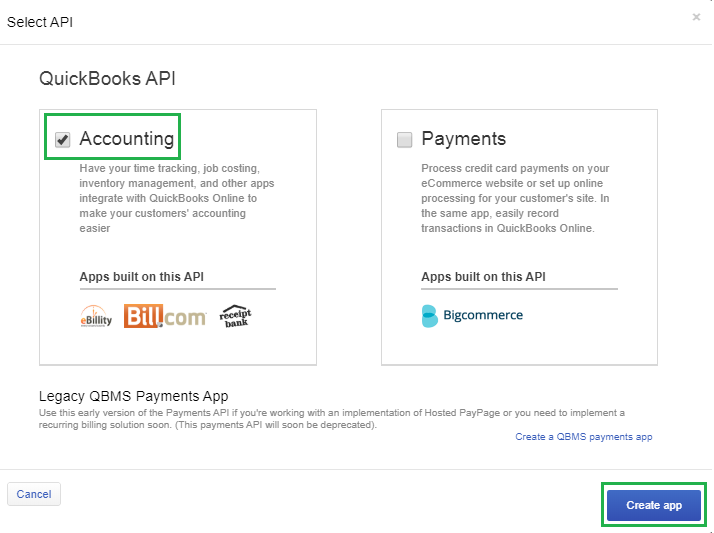
- Select ‘Just start coding’ section and click on ‘Select APIs’.
- After clicking of Select APIs check Accounting QuickBooks API and click on ‘Create App’.
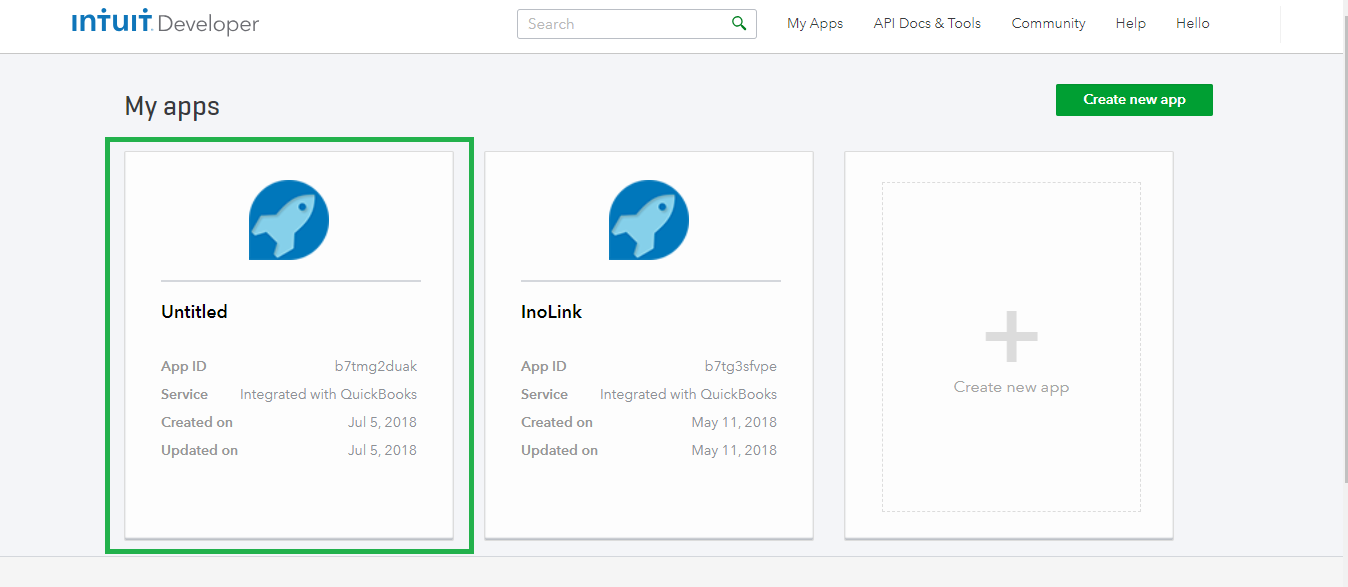
- Once you create the app you can check it in My Apps
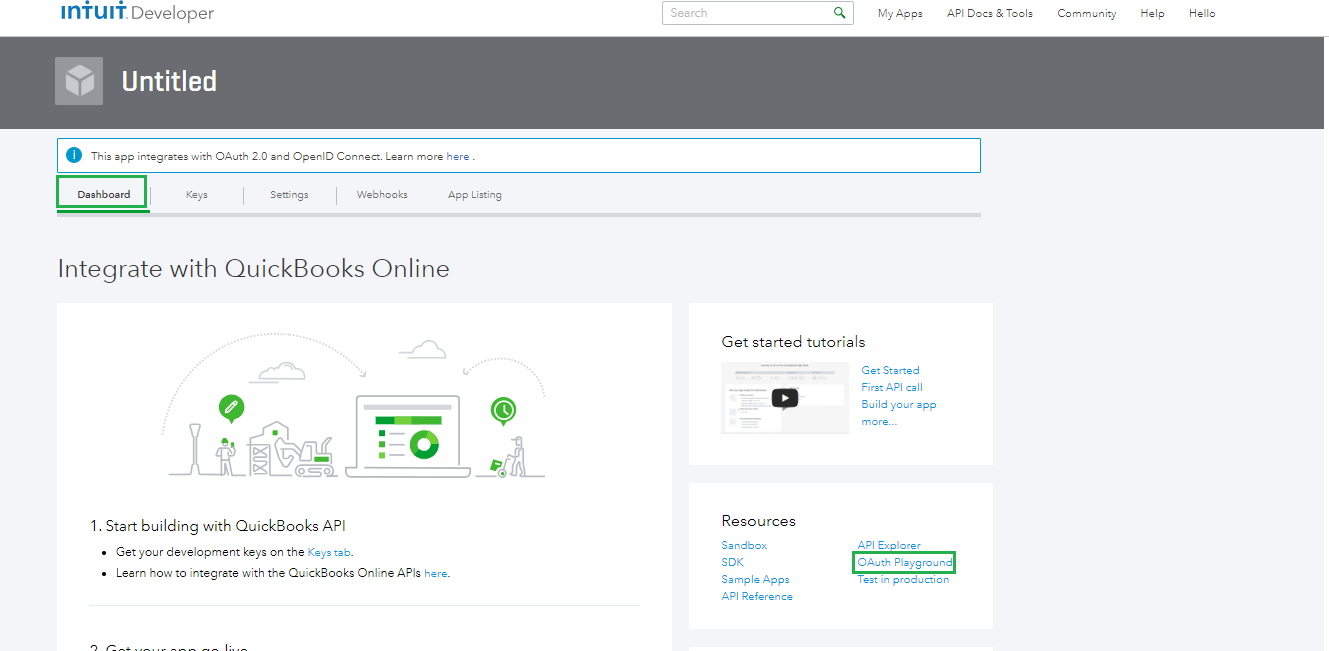
After creating the new app it will be displayed as Untitled App as shown below. You can rename it as per your need.
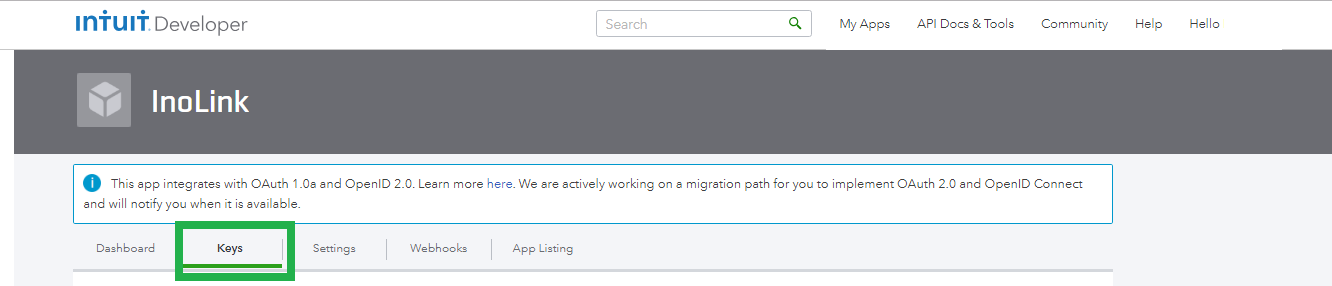
To get the OAuth keys that you have to use in InoLink connection screen follow the below steps:
- Click on Keys section in QuickBooks, as shown below;
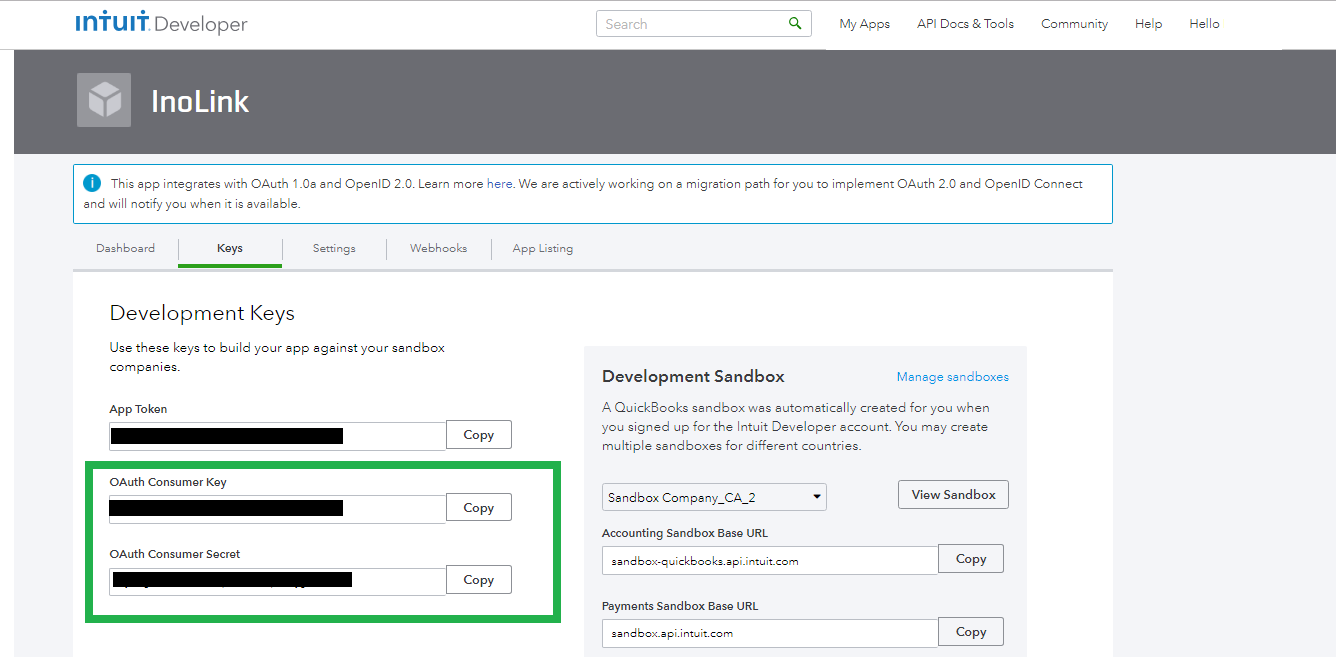
- Here you will find the ‘OAuth Consumer Key’ and ‘OAuth Consumer Secret’. Copy this keys and paste in the respective fields under the QuickBooks Details Section in InoLink;
QuickBooks Settings (For OAuth 2.0)
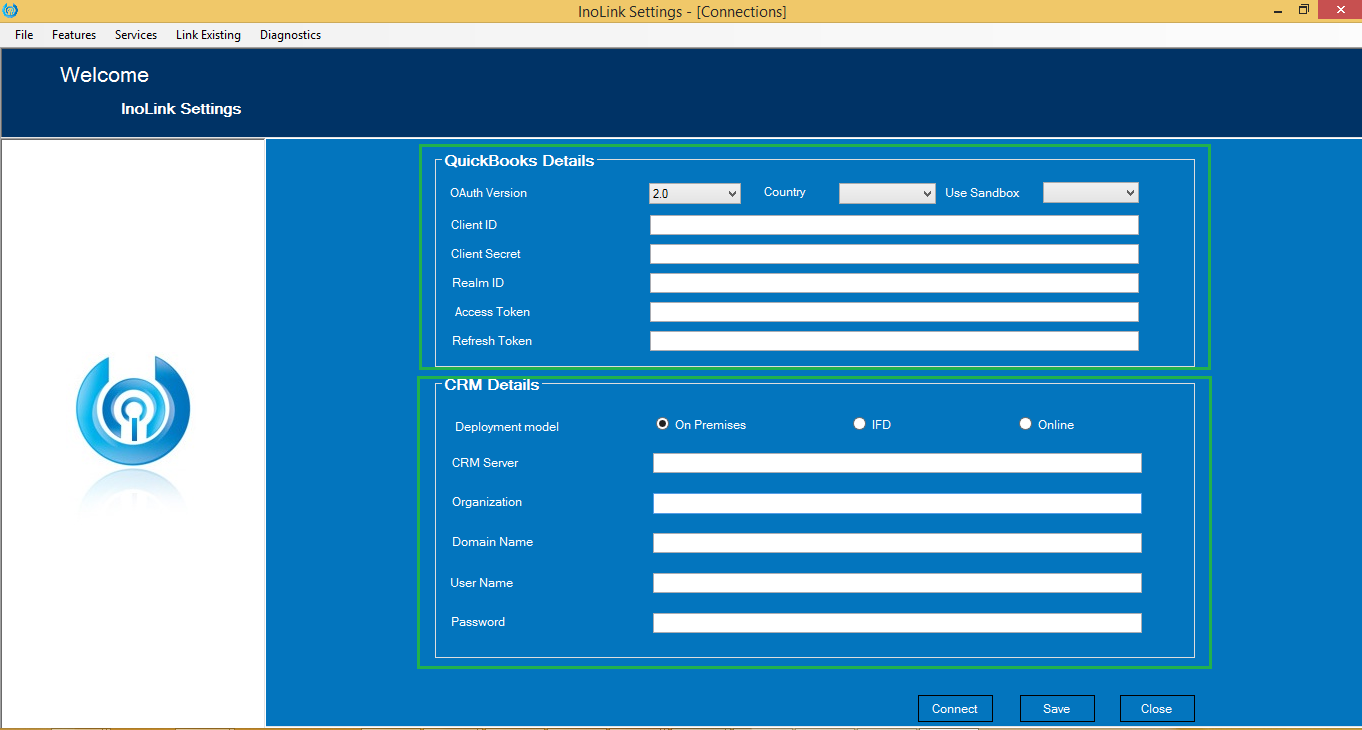
4. QuickBooks Details requires following details;
OAuth Version – Select 2.0 from dropdown if your developer account has not created any apps until after July 17, 2017.
Country – You can select appropriate QuickBooks localized version from the dropdown list.
Use Sandbox – Select False if you are connecting the QuickBooks Production environment.
Client ID – Enter the ‘Client ID’ key obtained from QuickBooks Developer Account.
Client Secret – Enter the ‘Client Secret’ key obtained from QuickBooks Developer Account.
Client Secret – Enter the ‘Client Secret’ key obtained from QuickBooks Developer Account.
Realm ID – Enter the ‘Realm ID’ key obtained from QuickBooks Developer Account.
Access Token – Enter the ‘Access Token’ key obtained from QuickBooks Developer Account.
Access Token – Enter the ‘Access Token’ key obtained from QuickBooks Developer Account.
Refresh Token – Enter the ‘Refresh Token’ key obtained from QuickBooks Developer Account.
To get the OAuth keys that you need in InoLink connection screen follow the below steps:
- Select the required App and navigate to Dashboard section and click on ‘OAuth Playground’ as shown in the screenshot below;
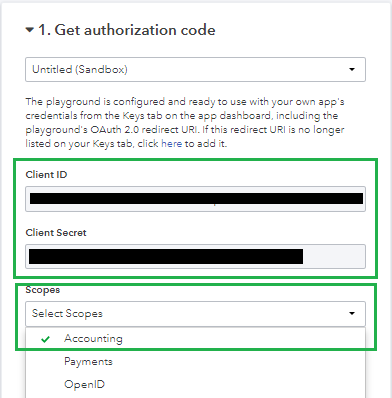
- Here you will get Client ID, Client Secret (Copy the key to input Text) in Get authorization code. Then, Select scope parameter as Accounting, and click Get authorization Code.
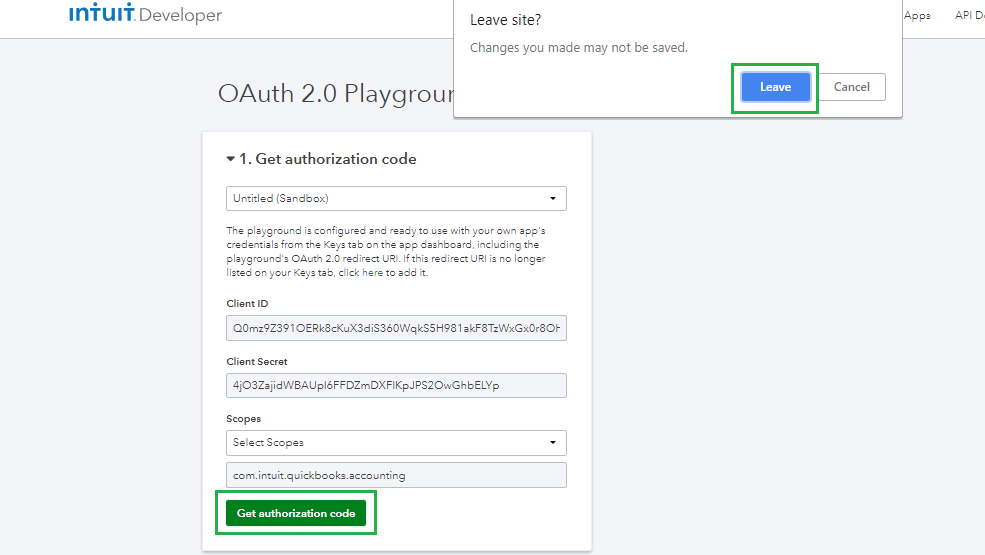
- After selecting the scope you have to click on ‘Get authorize code’. You will get a pop up message where you have to click on Leave option as shown in below screen shot.
- After clicking on Leave, you will get window with list of companies. Select company you need to connect. After authorizing, in Get OAuth 2.0 token auth code you will get Realm ID (Copy the key to input Text).

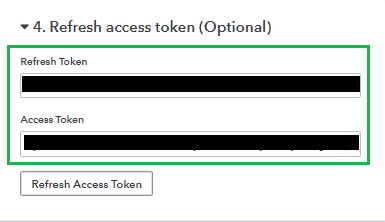
- Now click on ‘Get Token’. In Refresh Access Token Section you will get Access Token and Refresh token (Copy the key to input Text).
- Once you get all the keys use those in the connection window by filling the QuickBooks details and test the connection using connect button.
5. The ‘CRM Details’ section requires following details;
- Deployment Model: Select the CRM deployment model. InoLink supports On-Premises, IFD, and Online deployments.
- CRM Server: Based on the CRM deployment model, enter the CRM Server.
URL:
Online/365 – https://orgname.crm.dynamics.com
On-Premise – http://servername:port
IFD – https://orgname.domain.com
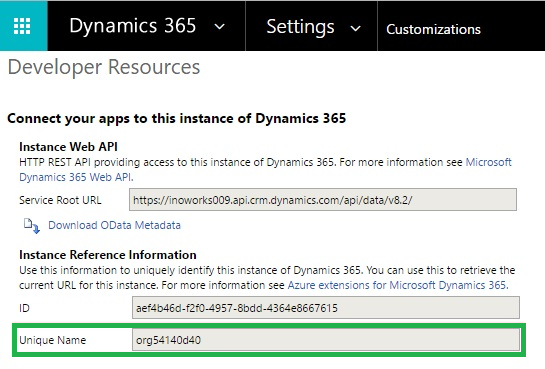
- Organization: This is needed only for On-Premise and IFD deployments. Enter the unique organization name as in Dynamics CRM/365. To find the organization name, navigate to Settings > Customizations > Developer Resources > copy the Unique Name as seen in the screenshot below;
- Domain Name: This is needed only for On-Premise and IFD deployments. For Online deployment, this field is automatically disabled.
- User Name: User Name entered should be of the Dynamics CRM/365 user with permissions to read/write data to Dynamics CRM/365. The username varies based on the deployment model;
Username Structure:
Online/365 – user@<organization>.onmicrosoft.com
On-Premise – domain\user
IFD – user@domain.com or domain\user
- Password: Enter the valid password for your Dynamics CRM/365, if you have enabled ‘Multi-Factor Authentication’ in your CRM you have to use ‘App password’.
6. After entering the required details, click on ‘Connect’ to test the connection with Dynamics CRM/365 and QuickBooks.
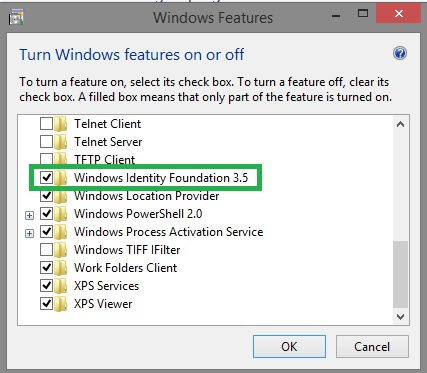
Note: If you are unable to connect and get an error, it might be because “Windows Identity Foundation’ is disabled. To enable it, follow the steps mentioned below;
a. On Windows 8 or higher: To enable the Windows Identity Foundation on Windows 8 and above machine, go to Control Panel > Program and Features and click on ‘Turn Windows features on or off’ and check ‘Windows Identity Foundation’ to enable it, as shown in the screenshot below;
b. On Windows 7 or lower: If you are on the Windows 7 or lower operating System, then you will find this under ‘Installed Updates’ as shown in the screenshot below;

7. Once the connection is checked, and the credentials are verified, click on ‘Save’ and you will be redirected to the QuickBooks Developer Page for authorization if you are having QuickBooks OAuth 1.0 Follow the steps mentioned below to authorize InoLink to connect with QuickBooks.
Steps to Authorize Access from QuickBooks:
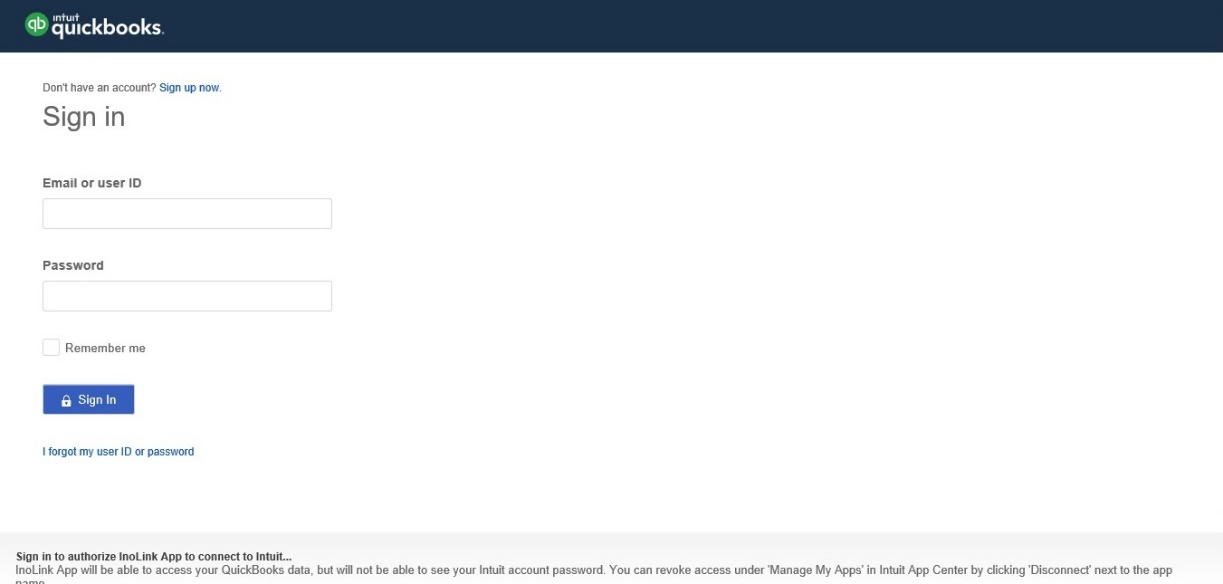
1. On the QuickBooks Developer Login Page, enter the credentials and log in as seen in the screenshot below;
2. After signing in, select the company you wish to link with Dynamics 365/CRM on the Company Selection Page as seen in the screenshot below;

3. After selecting the company, you will be redirected to the Authorization page. Click on ‘Authorize’ button to authorize InoLink to connect with QuickBooks as seen in the screenshot below;

4. After you click on ‘Authorize’ button, you will get the ‘QuickBooks Authorization Successful’ page as seen in the screenshot below;

You have now successfully connected InoLink with QuickBooks.
Note: The authorization process must be completed within 2 Minutes, else the session will expire and you need to redo the process.
8. After the authorization process is completed, Dynamics 365 and QuickBooks are connected successfully using InoLink.
Conclusion:
Now that you have successfully connected Dynamics 365 and QuickBooks using InoLink, the next step is to register and activate InoLink.